
Module Offering Guideline and Information
Step 5: Offering Freeze
After successfully assigning lecturers to modules as Examiners or Moderators, the modules will become visible to students, allowing them to enroll in the relevant courses.
The Module Registration period is defined by the respective Performance Criteria for each degree programme. At the end of this registration period, module registrations must be frozen to finalize the offering.
5.1 Navigating to Offering Freeze
-
From the LMS dashboard, locate the menu on the left-hand side of the screen.
-
Click on the “Offering Freeze” option under the Course Management section to begin the process.
Figure 9: Programme Admin Area and Offering Freeze Option
(Insert screenshot of the Programme Admin Area showing the Offering Freeze option)
Step 1: Login to the System
Step 1: Login to the System
To begin the process of module offering, users must first log in to the Learning Management System (LMS) of the University of Moratuwa.
Accessing the LMS
-
Open a web browser (recommended: Mozilla Firefox or Google Chrome) and navigate to the following URL:
https://lms.uom.lk/login_index.php
Entering Login Credentials
-
Enter your Username and Password in the appropriate fields.
-
Click the Login button to access the LMS dashboard.
⚠️ Note: If you have forgotten your password, use the "Forgot Password" link on the login page.
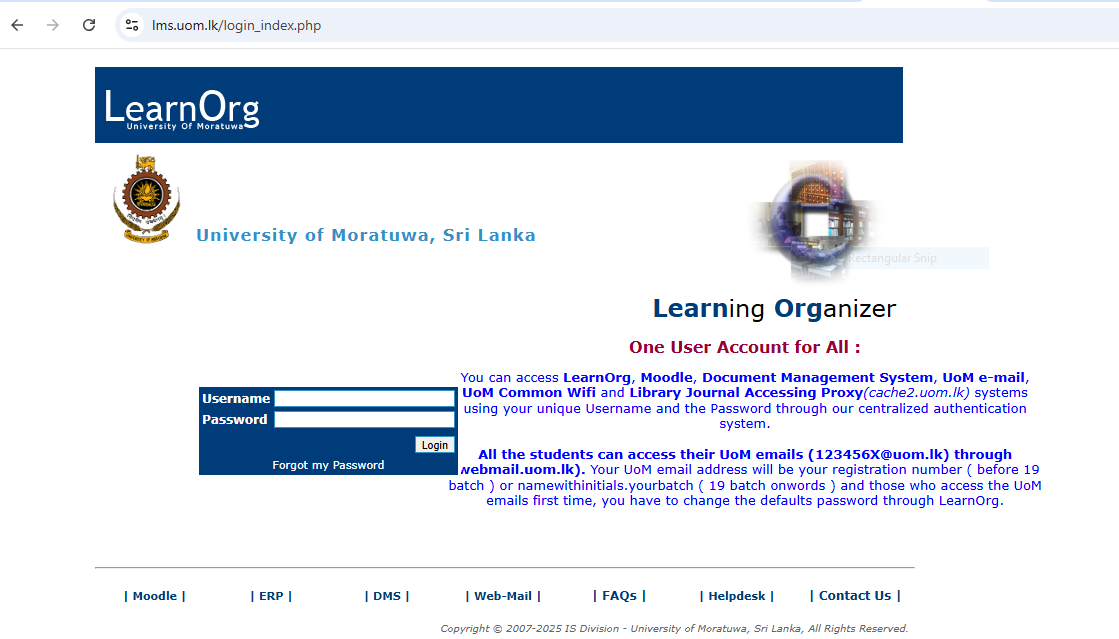
Figure 1: LMS Login Page
Step 2: Offering Initiation
Step 2: Offering Initiation
Once successfully logged into the Learning Management System (LMS), users can proceed to the UG Coordinator Area, where they are granted access to Course Management functionalities.
⚠️ Note: If you do not see or have access to the UG Coordinator Area, your Director or Head of the respective Division or Department can request access from the CITeS Division by opening a ticket through the IT Helpdesk at https://helpdesk.uom.lk.
Navigating to Offering Initiation
-
From the LMS dashboard, locate the menu on the left-hand side of the screen.
-
Click on the Offering Initiation option to begin the process of offering modules.
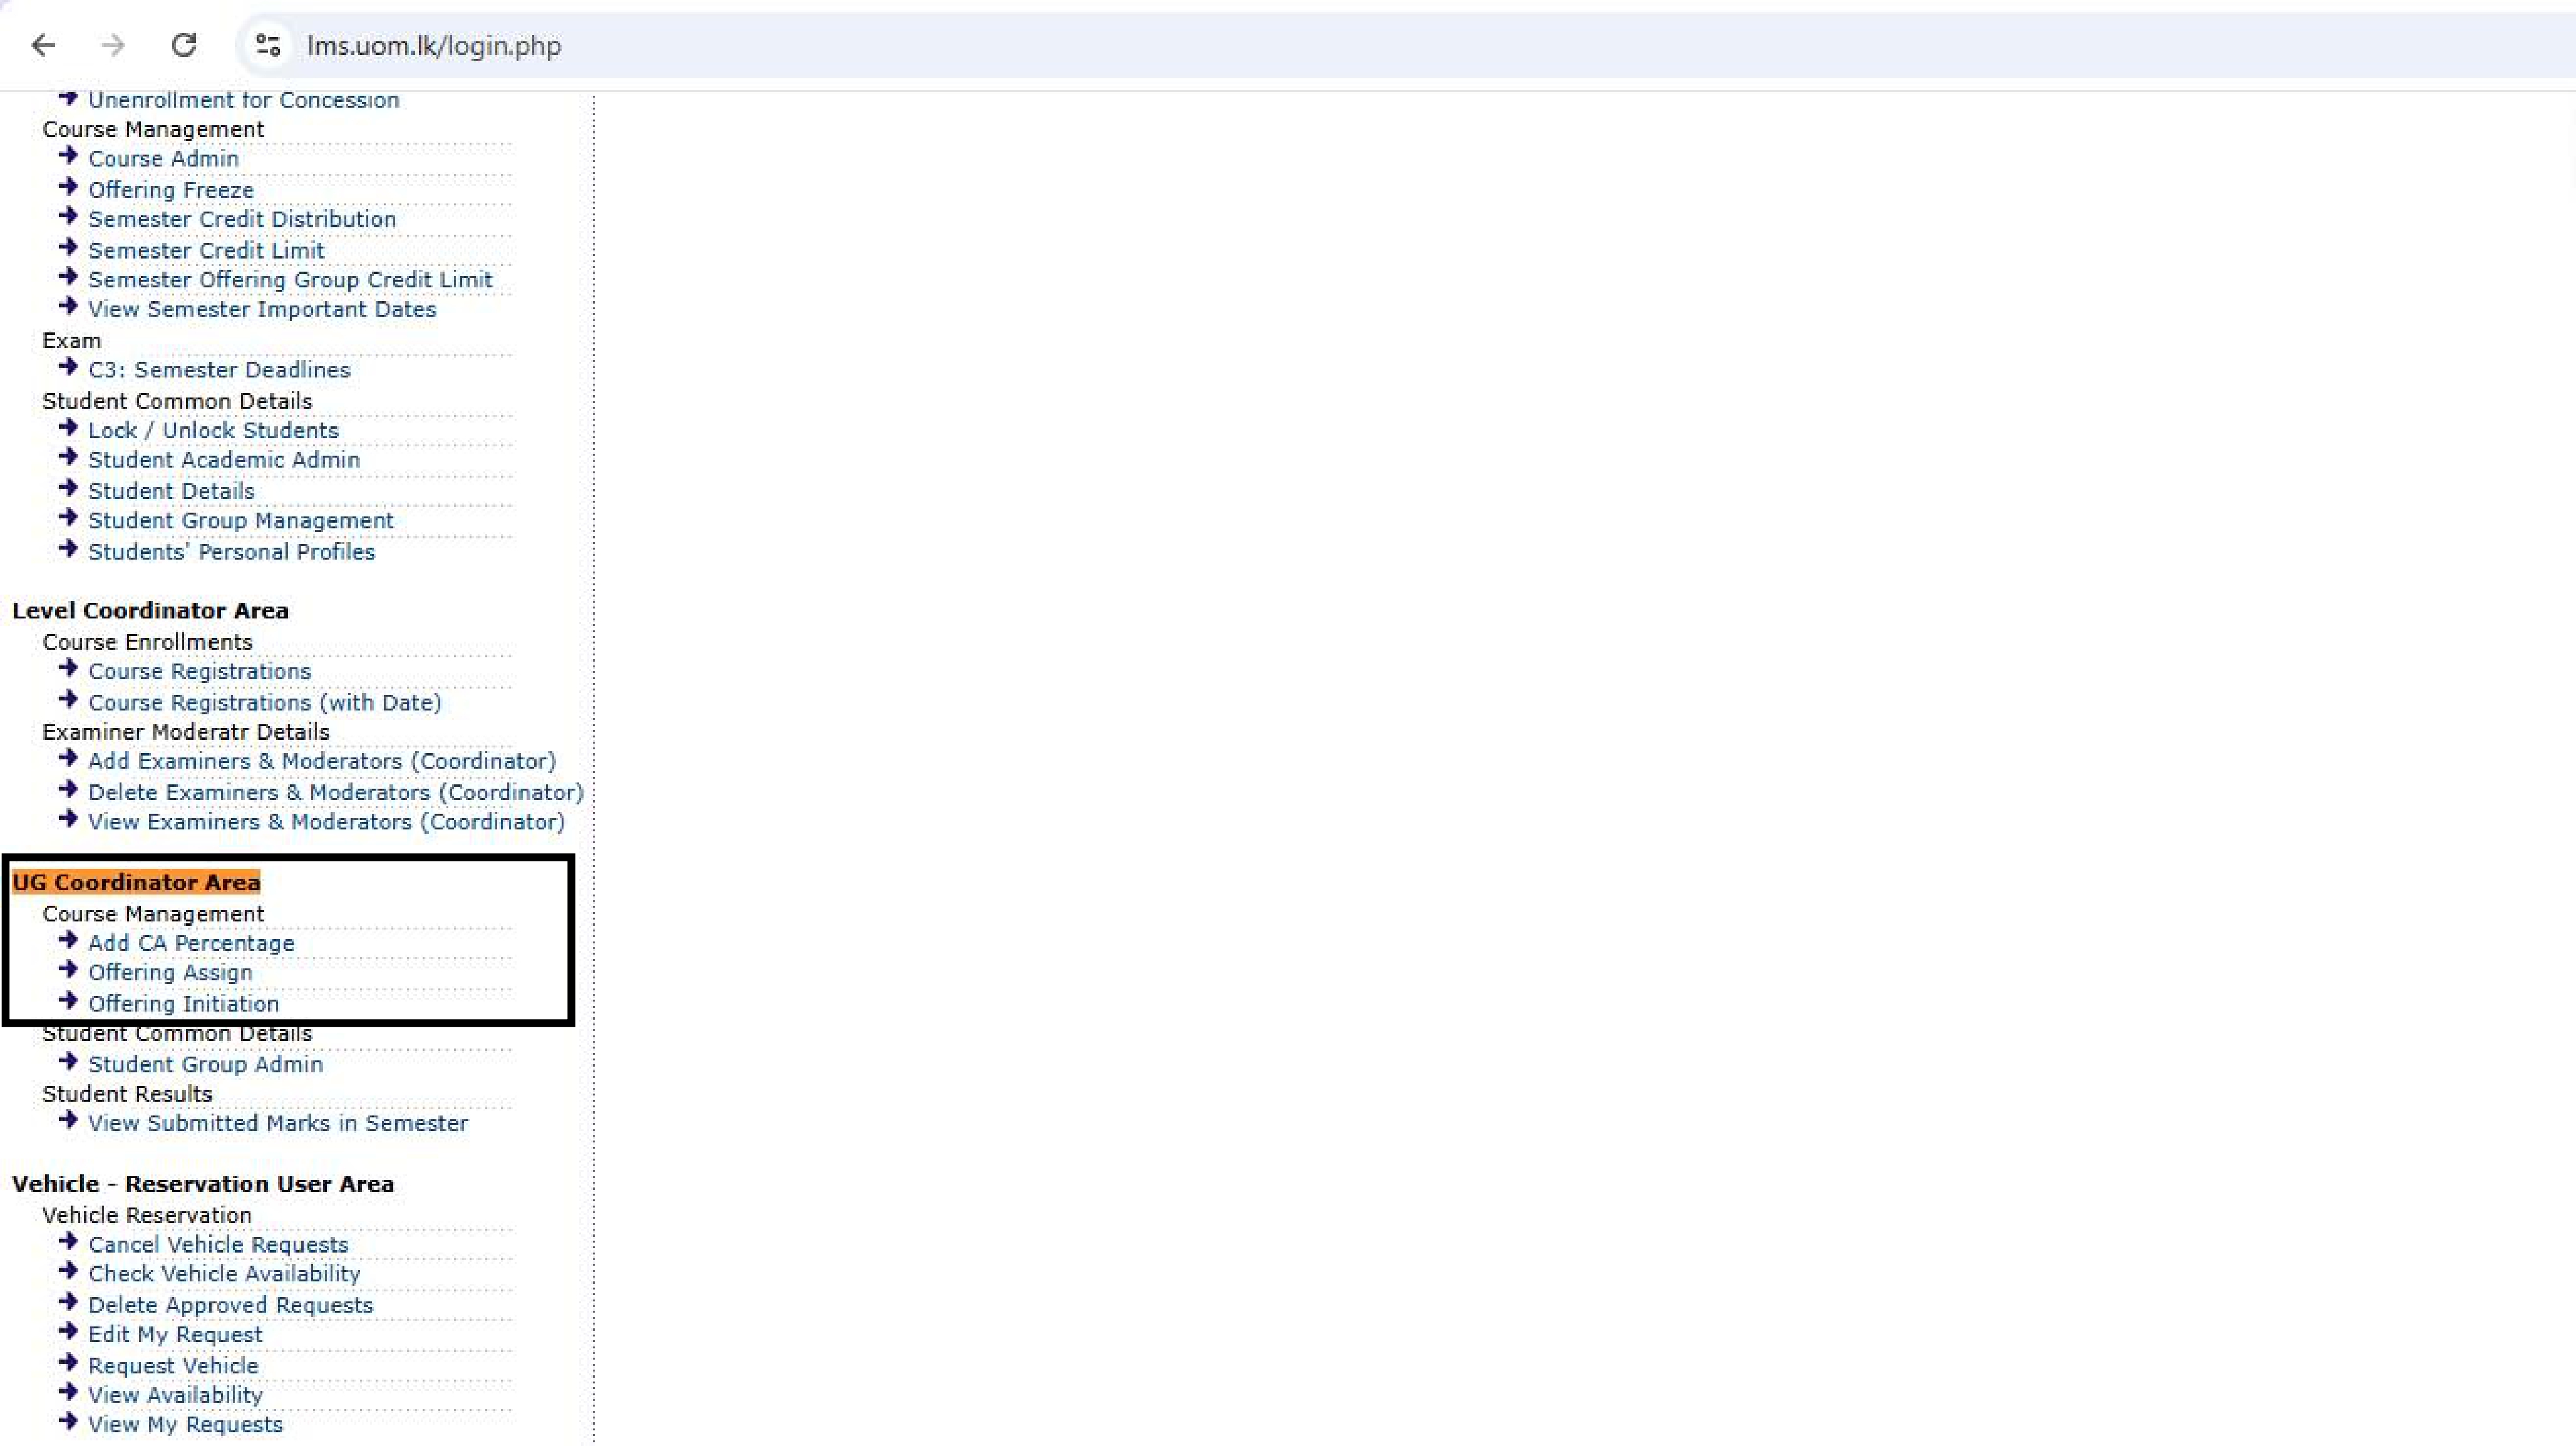
Figure 2: UG Coordinator Area and Offering Initiation Option
Searching for Course Code
After clicking on Offering Initiation, the system will display a search interface.
-
Use the Search Box to enter the Course Code you wish to offer.
-
Click the Search button to proceed.
-
After locating the course, click on the "Add" button next to the relevant course listing.
This will direct you to the Course Offering Interface, where module offering details can be entered.
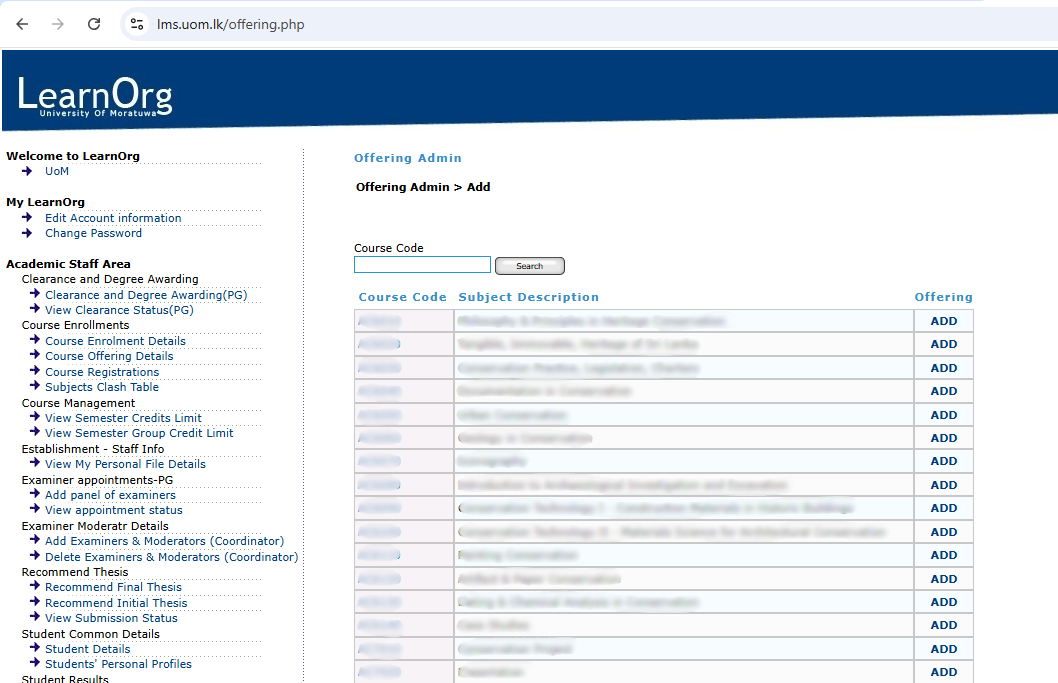
Figure 3: Course Code Search Interface
Accessing the Course Offering Interface
-
Once the “Add” button is clicked, the Course Offering Interface will appear.
-
This is where users can enter offering details.
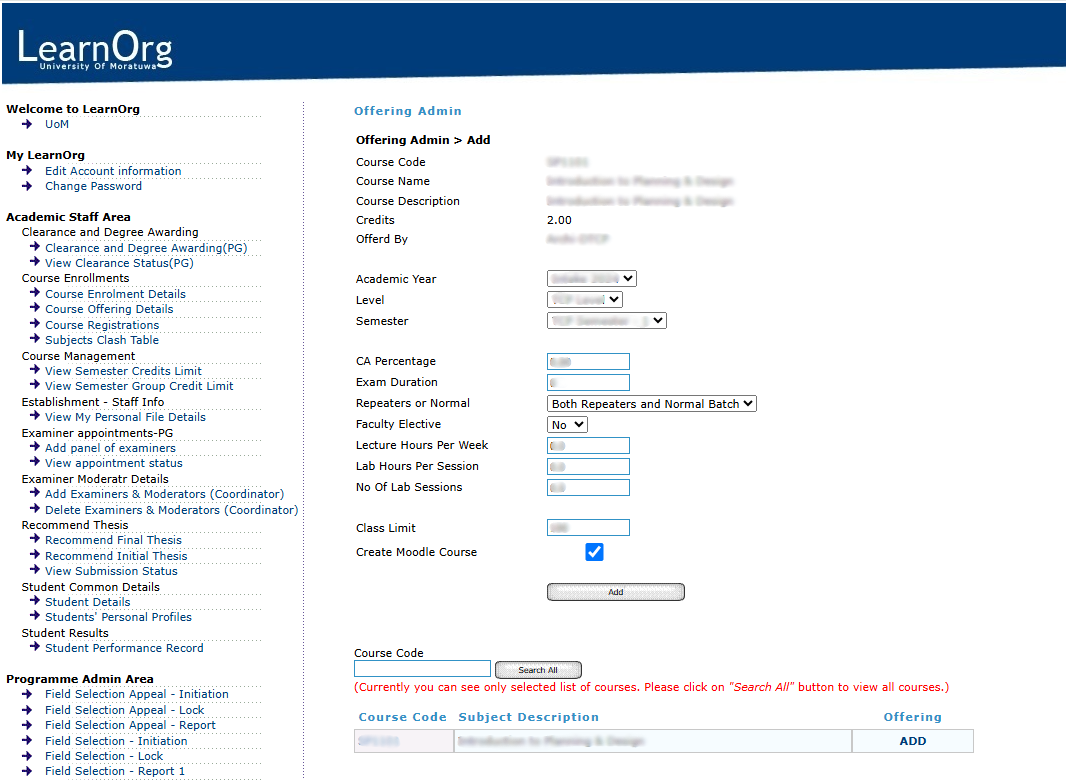
Figure 4: Course Offering Interface
Enter Offering Details
Once inside the Course Offering Interface, proceed to fill in the required fields with accurate information.
Required Fields
Fill in the following fields as per the course requirements:
| Field Name | Description |
|---|---|
| Academic Year | Select the appropriate academic year for the offering. |
| Level | Choose the level of study (e.g., Level 1, Level 2). |
| Semester | Select the relevant semester (e.g., Semester 1, Semester 2). |
| CA Parentage | Enter the percentage allocated for Continuous Assessment. |
| Exam Duration | Specify the duration of the final exam in hours or minutes. |
| Repeat or Normal | Dropdown options: – Both Repeaters and Normal Batch – Normal Batch Only – Repeaters Only |
| Faculty Elective | Dropdown options: – No – Yes |
| Lecture Hours Per Week | Number of lecture hours per week. |
| Lab Hours Per Session | Number of hours per lab session. |
| No. of Lab Sessions | Total number of lab sessions. |
| Class Limit | Use this if the course needs to be limited to fewer students. |
| Create Moodle Course | ✅ Ensure this checkbox is selected before clicking Add. |
⚠️ Note: All fields are mandatory. Leaving any field blank may prevent the submission from being processed correctly.
Once all the fields have been filled:
- Double-check all fields for completeness and accuracy.
- Confirm the Create Moodle Course checkbox is ticked.
-
Click the Add button to complete the offering.
Once successfully submitted, a confirmation message will be displayed at the top of the screen: “The Offering has been successfully saved.”
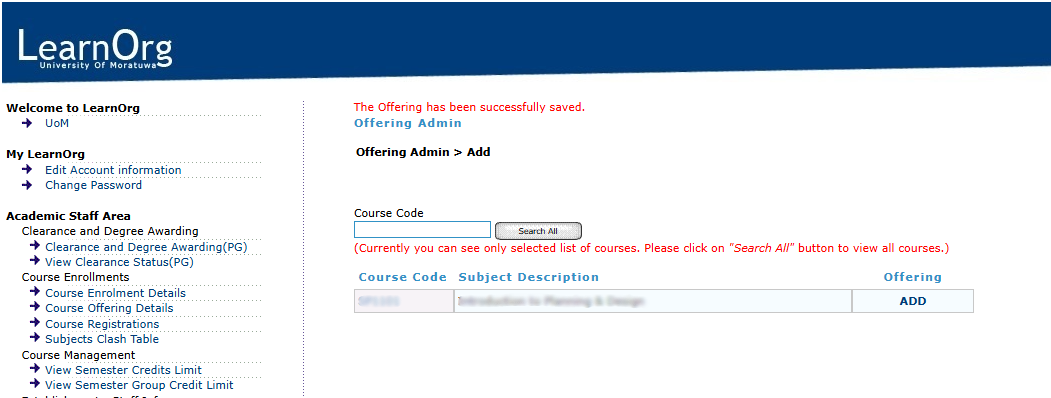
Figure 5: Success Message After Submission
Step 3: Offering Assign
Step 3: Offering Assign
After successfully initiating the module, you need to assign the module to the relevant student group.
3.1 Navigating to Offering Assignment
-
From the LMS dashboard, locate the menu on the left-hand side of the screen.
- Click on the “Offering Assign” option to begin the assignment process from the area highlighted in Figure 2.
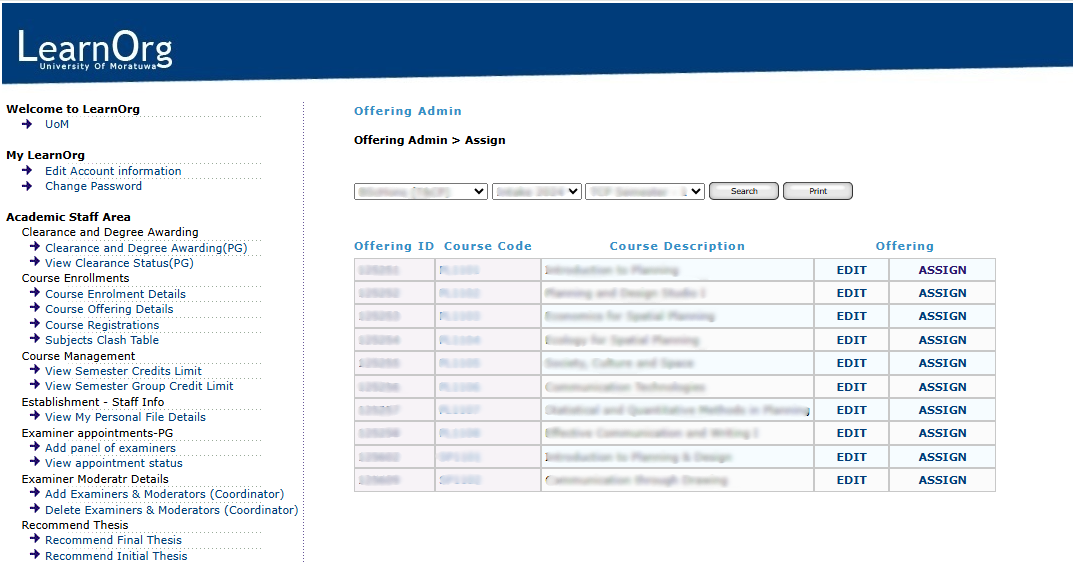
Figure 6: Offering Assign Selection Interface
3.2 Selecting Degree Programme, Intake/, and Semester
After clicking Offering Assign, the system will display the assignment interface. Follow the steps below:
-
Select the Degree Programme using the first dropdown.
-
Choose the Intake/Academic Year using the second dropdown.
-
Select the relevant Semester using the third dropdown.
-
Click the Search button to proceed.
Once the list of courses appears, click on the “Assign” button next to the relevant course.
This will take you to the Course Assigning Interface, where assignment details can be specified.
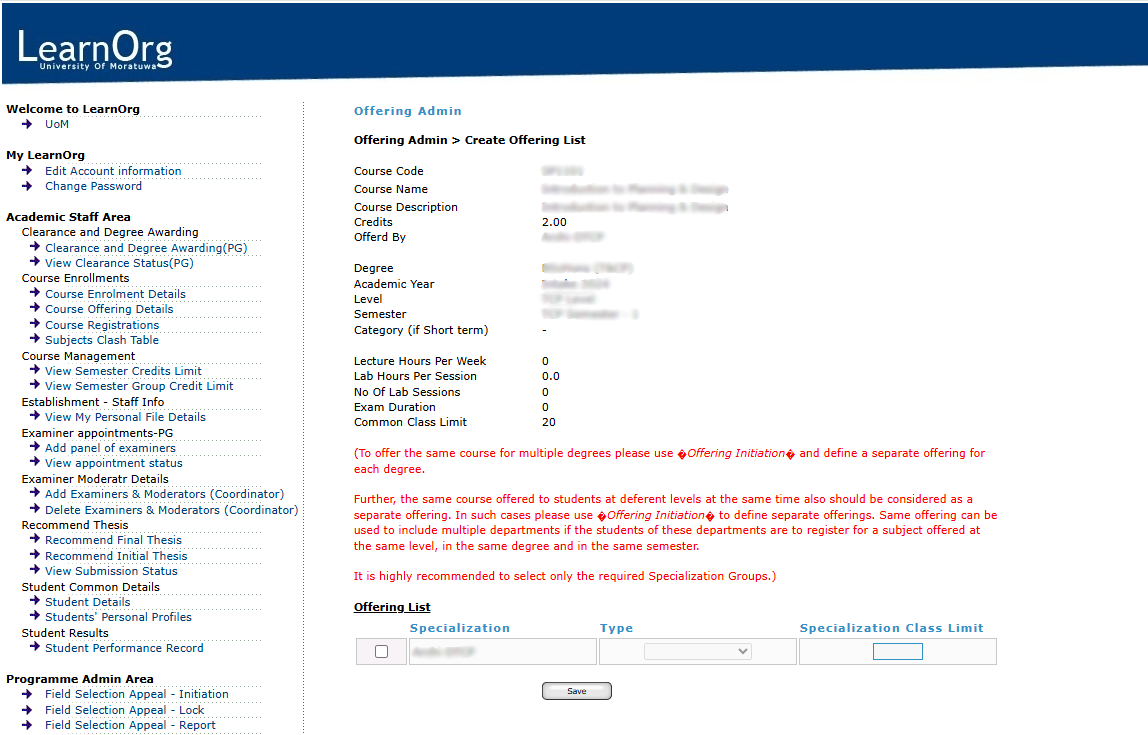
Figure 7: Course Assigning Interface
3.3 Completing the Assignment
At the bottom of the Course Assigning Interface, you will find the “Offering List” section.
Follow the steps below to complete the assignment:
-
Check the checkbox next to the appropriate course. This will activate the Type dropdown.
-
From the Type dropdown, select one of the following:
-
Compulsory
-
Elective
-
Optional
-
Faculty Elective
-
-
Enter the Class Limit, using the same value as provided during the course initiation.
-
Click the Save button to finalize the assignment.
Once saved successfully, the following confirmation message will appear at the top of the screen: “The Offering List has been successfully updated.”
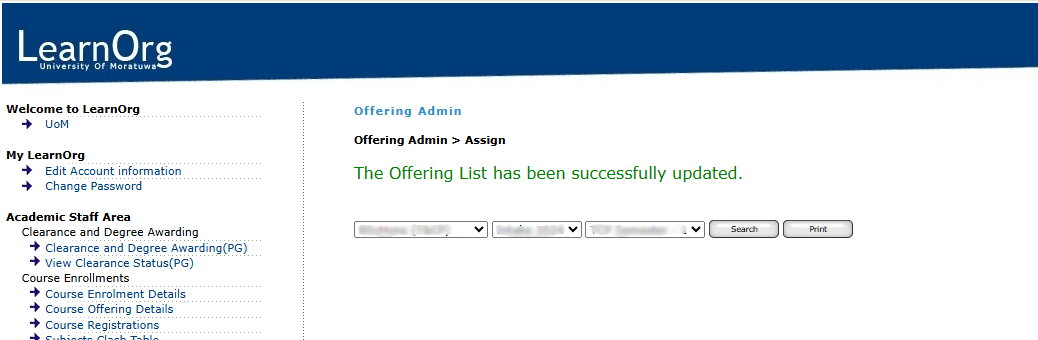
Figure 8: Offering Assignment Success Message
Step 4: Adding Examiners and Moderators
Step 4: Adding Examiners and Moderators
After successfully assigning the modules, you need to add Examiners and Moderators to the relevant modules.
You can follow the detailed user guide for this process by accessing the link below:
🔗 Click here to view the User Guide for Adding Examiners and Moderators
Step 5: Offering Freeze
Step 5: Offering Freeze
After successfully assigning lecturers to modules as Examiners or Moderators, the modules will become visible to students, allowing them to enroll in the relevant courses.
The Module Registration period is defined by the respective Performance Criteria for each degree programme. At the end of this registration period, module registrations must be frozen to finalize the offering.
5.1 Navigating to Offering Freeze
-
From the LMS dashboard, locate the menu on the left-hand side of the screen.
-
Click on the “Offering Freeze” option under the Course Management section to begin the process.

Figure 9: Programme Admin Area and Offering Freeze Option