
Guidelines for Registering Repeat Students (Manually)
Step 1: Login to the System
Login to the System
To begin the process of module offering, users must first log in to the Learning Management System (LMS) of the University of Moratuwa.
Accessing the LMS
-
Open a web browser (recommended: Mozilla Firefox or Google Chrome) and navigate to the following URL:
https://lms.uom.lk/login_index.php
Entering Login Credentials
-
Enter your Username and Password in the appropriate fields.
-
Click the Login button to access the LMS dashboard.
⚠️ Note: If you have forgotten your password, use the "Forgot Password" link on the login page.
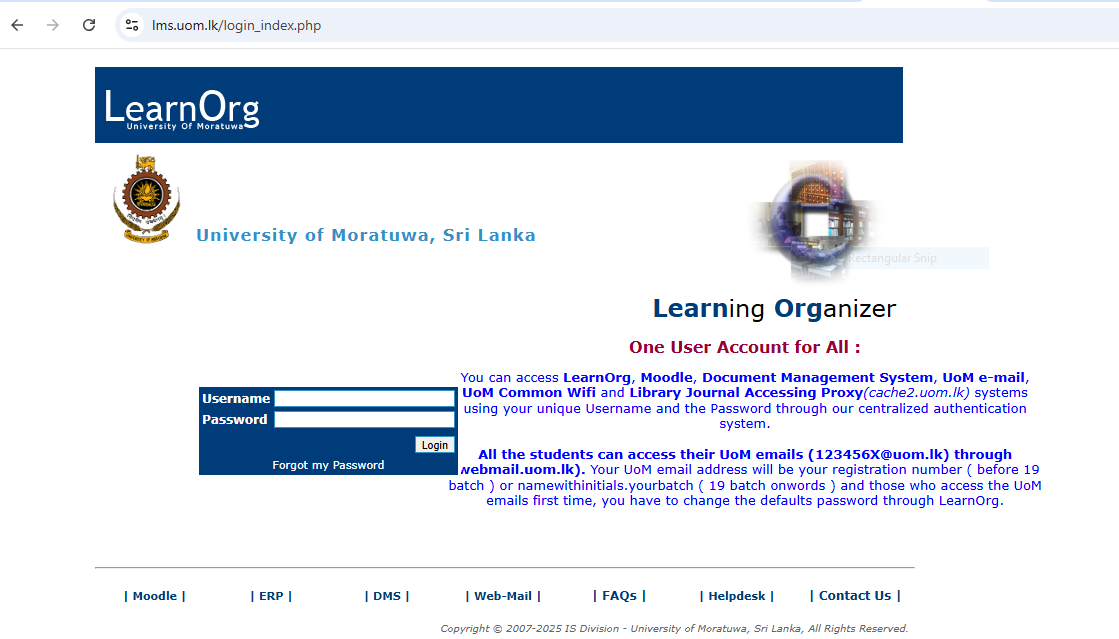
Figure 1: LMS Login Page
Step 2: Define Semester Lock Date
Define Semester Lock Date
After successfully logging into the Learning Management System (LMS), you must define the Semester Lock Date before enrolling repeat students. This is done via the Semester Deadlines functionality, accessible through the Programme Admin Area.
⚠️ Note: If you do not see or have access to the UG Coordinator Area, your Director or Head of the respective Division or Department can request access from the CITeS Division by opening a ticket through the IT Helpdesk at https://helpdesk.uom.lk.
Navigating to Offering Freeze
-
From the LMS dashboard, locate the menu on the left-hand side of the screen.
-
Click on the “Semester Deadlines” option under the Exam section to begin the process.
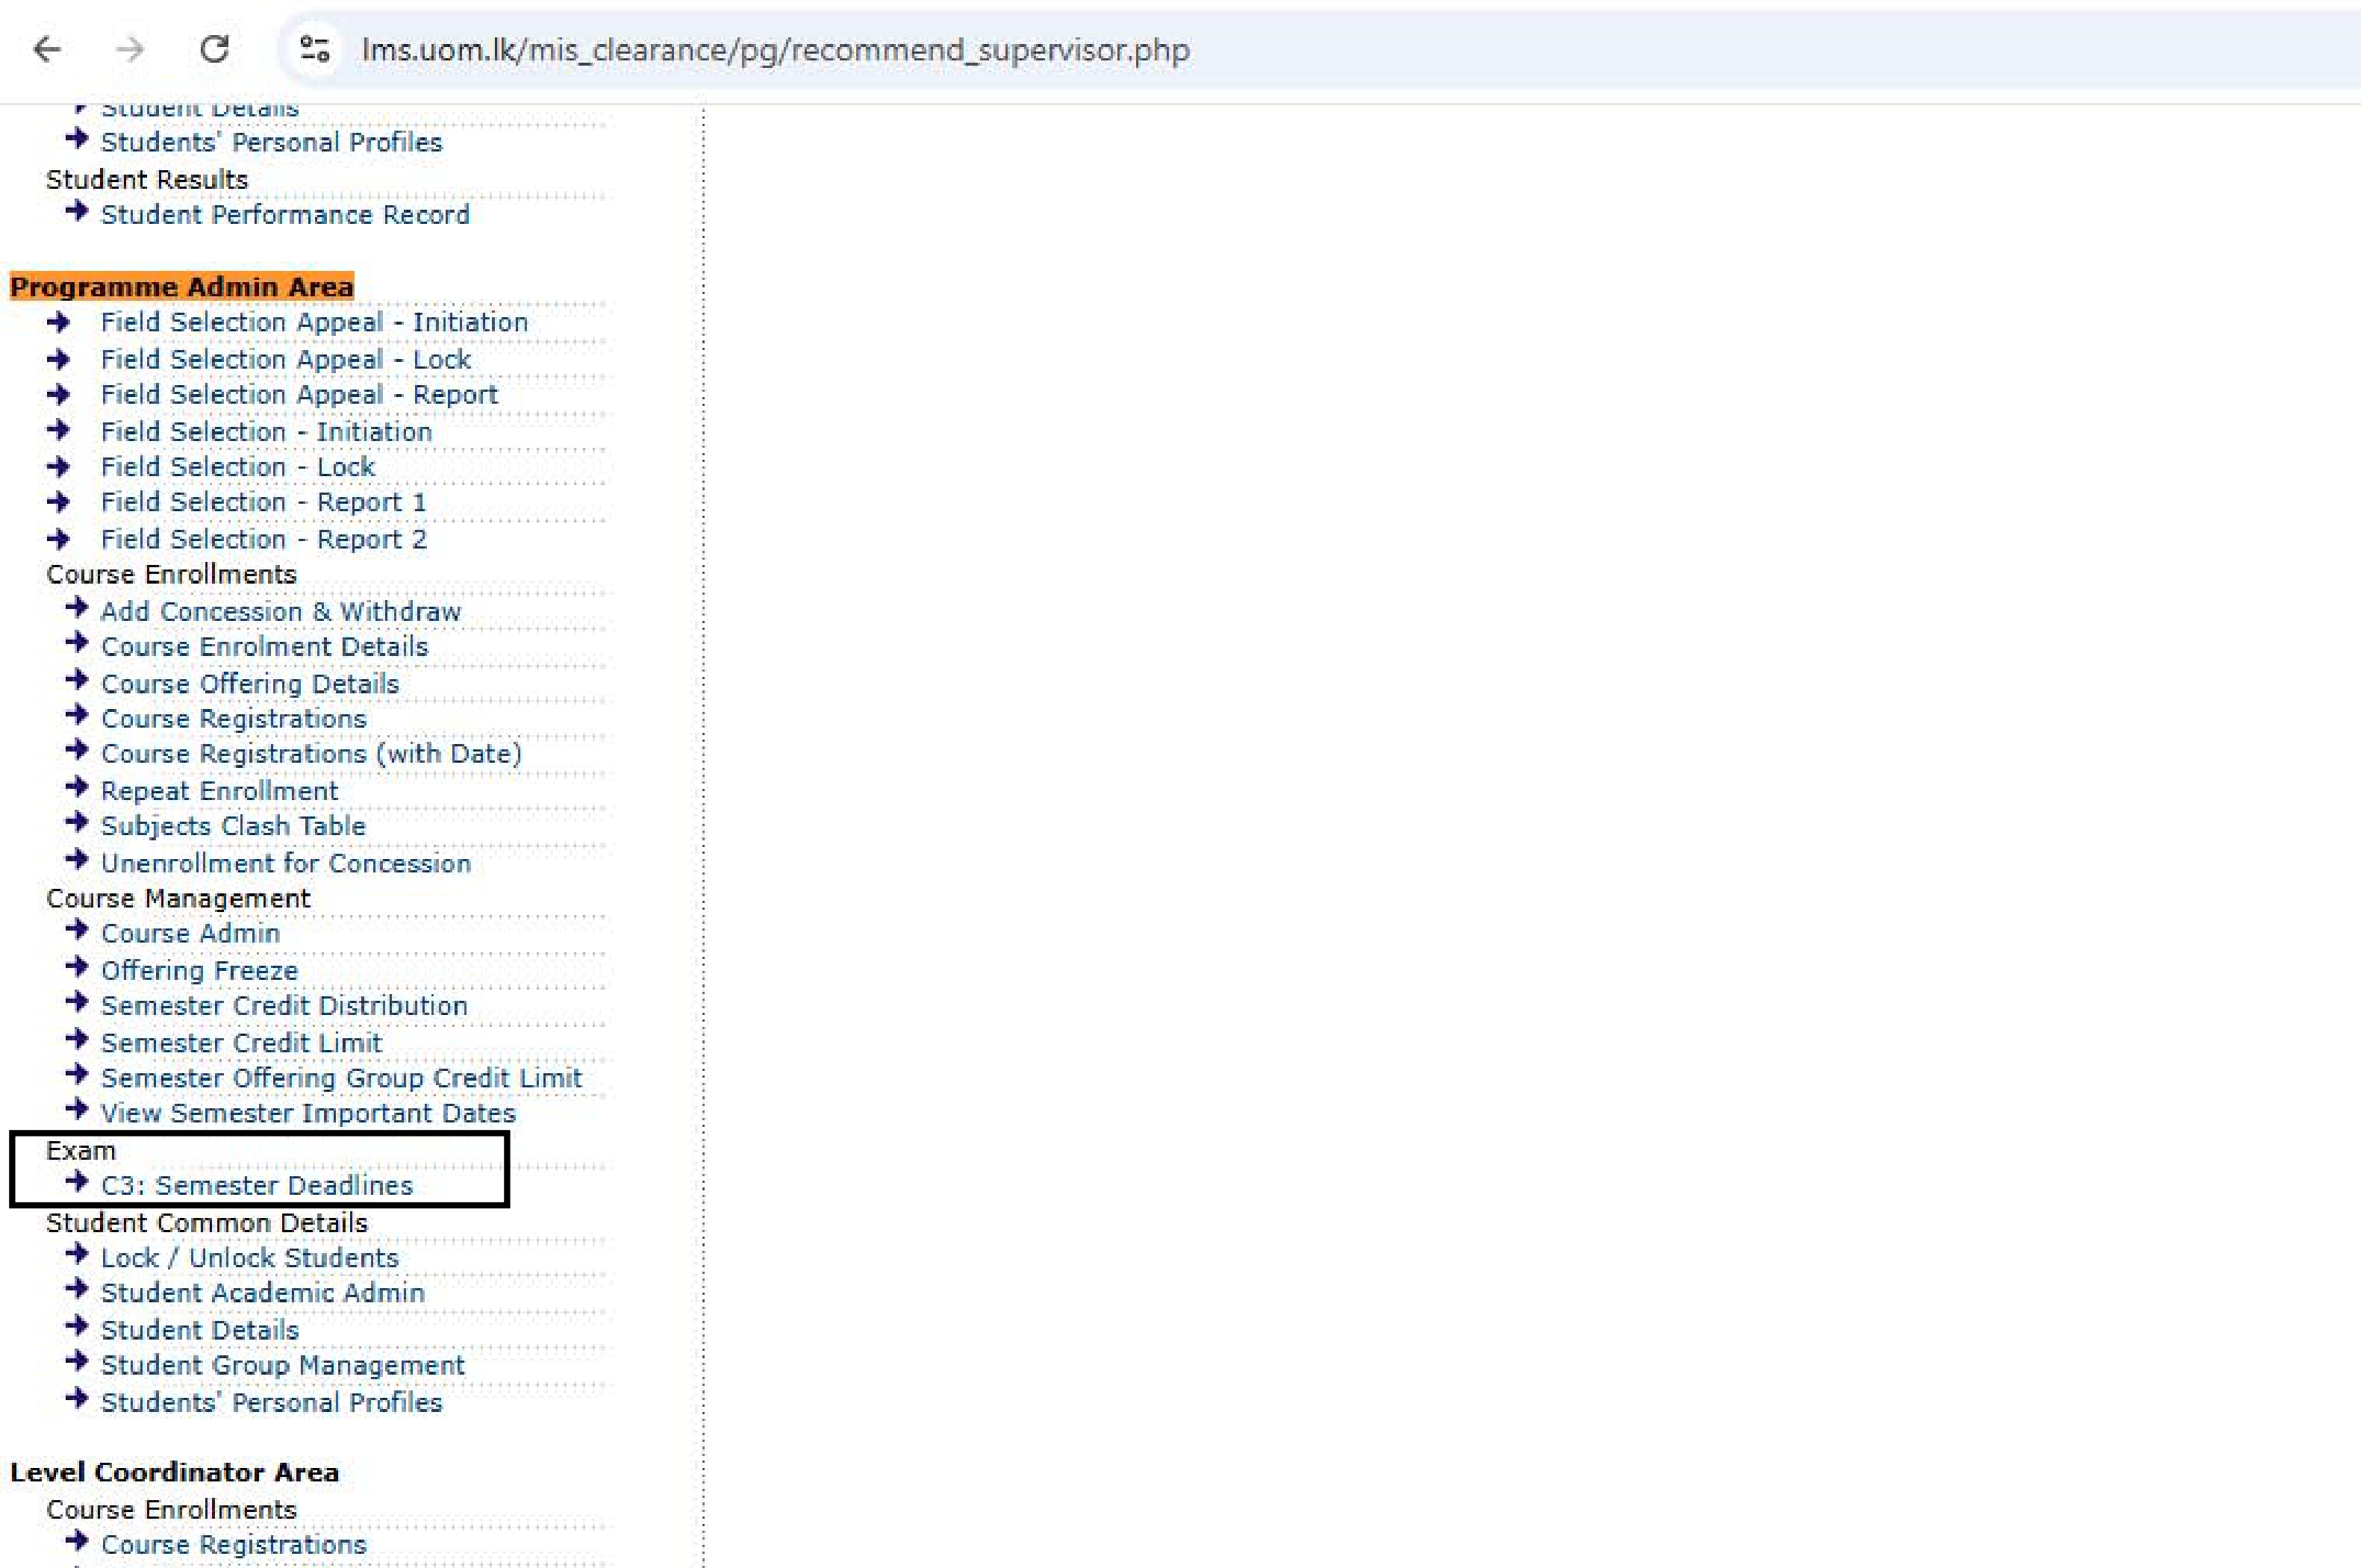
Figure 2: Programme Admin Area and Semester Deadlines
Selecting Degree Programme, Academic Year, Level & Semester
After clicking Semester Deadlines, the system will display the Interface to Define Semester Management Dates. Follow the steps below:
- Select the Degree Programme using the first dropdown.
- Choose the Academic Year using the second dropdown.
- Select the Level using the third dropdown.
- Select the Semester using the fourth dropdown.
- Click the Go button to proceed.
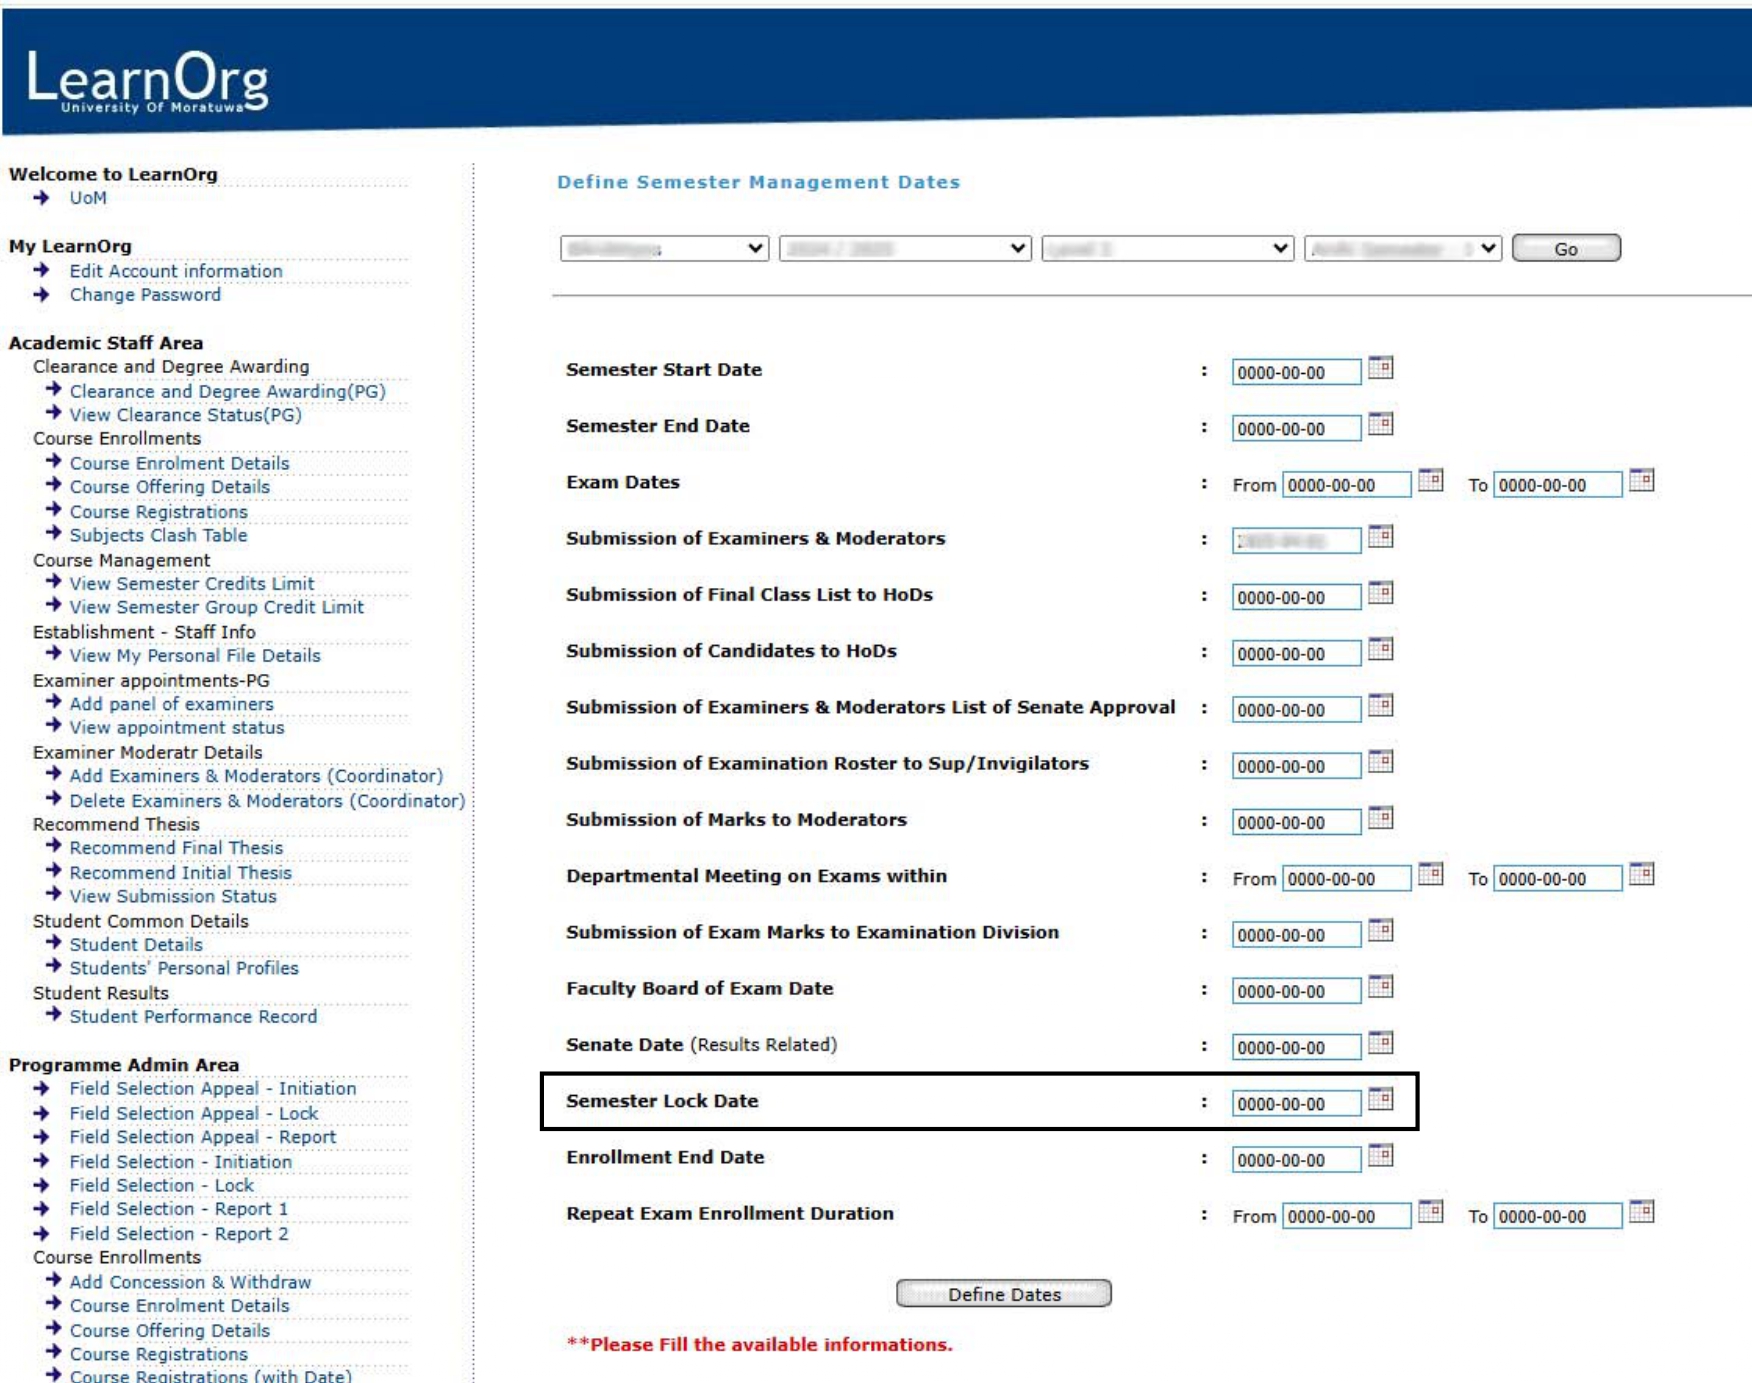
Figure 3: Interface to Define Semester Management Dates
Define the Semester Lock Date
To enroll students as repeat candidates, the Semester Lock Date must be either today’s date or a future date.
⚠️ Note: The Semester Lock Date impacts several functions handled by different departments. Please ensure that a date has not already been set before defining a new one.
-
If the field is empty or needs to be updated, you can proceed to define the lock date.
-
Click on the “Define” button to save the selected date.
Once defined successfully, a confirmation message will appear at the top of the screen: “Successfully defined.”
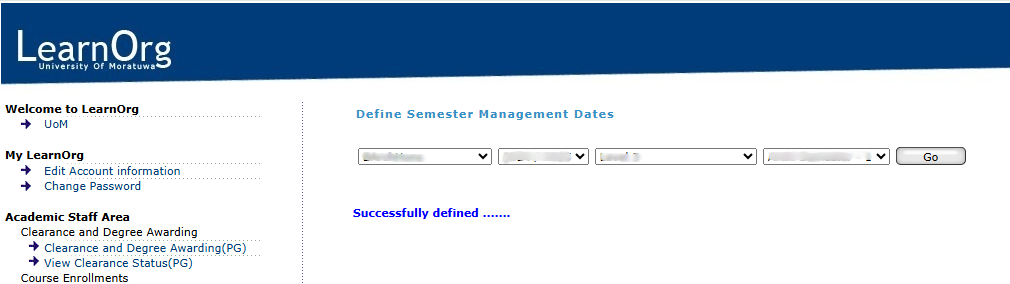
Figure 4: Define Date Success Message
Step 3: Repeat Enrollment
Repeat Enrollment
After successfully defining the Semester Lock Date, you can proceed to enroll students in relevant modules as repeat candidates.
Navigating to Repeat Enrollment
-
From the LMS dashboard, locate the menu on the left-hand side of the screen.
-
Click on the “Repeat Enrollment” option to begin the process, as shown in Figure 5.
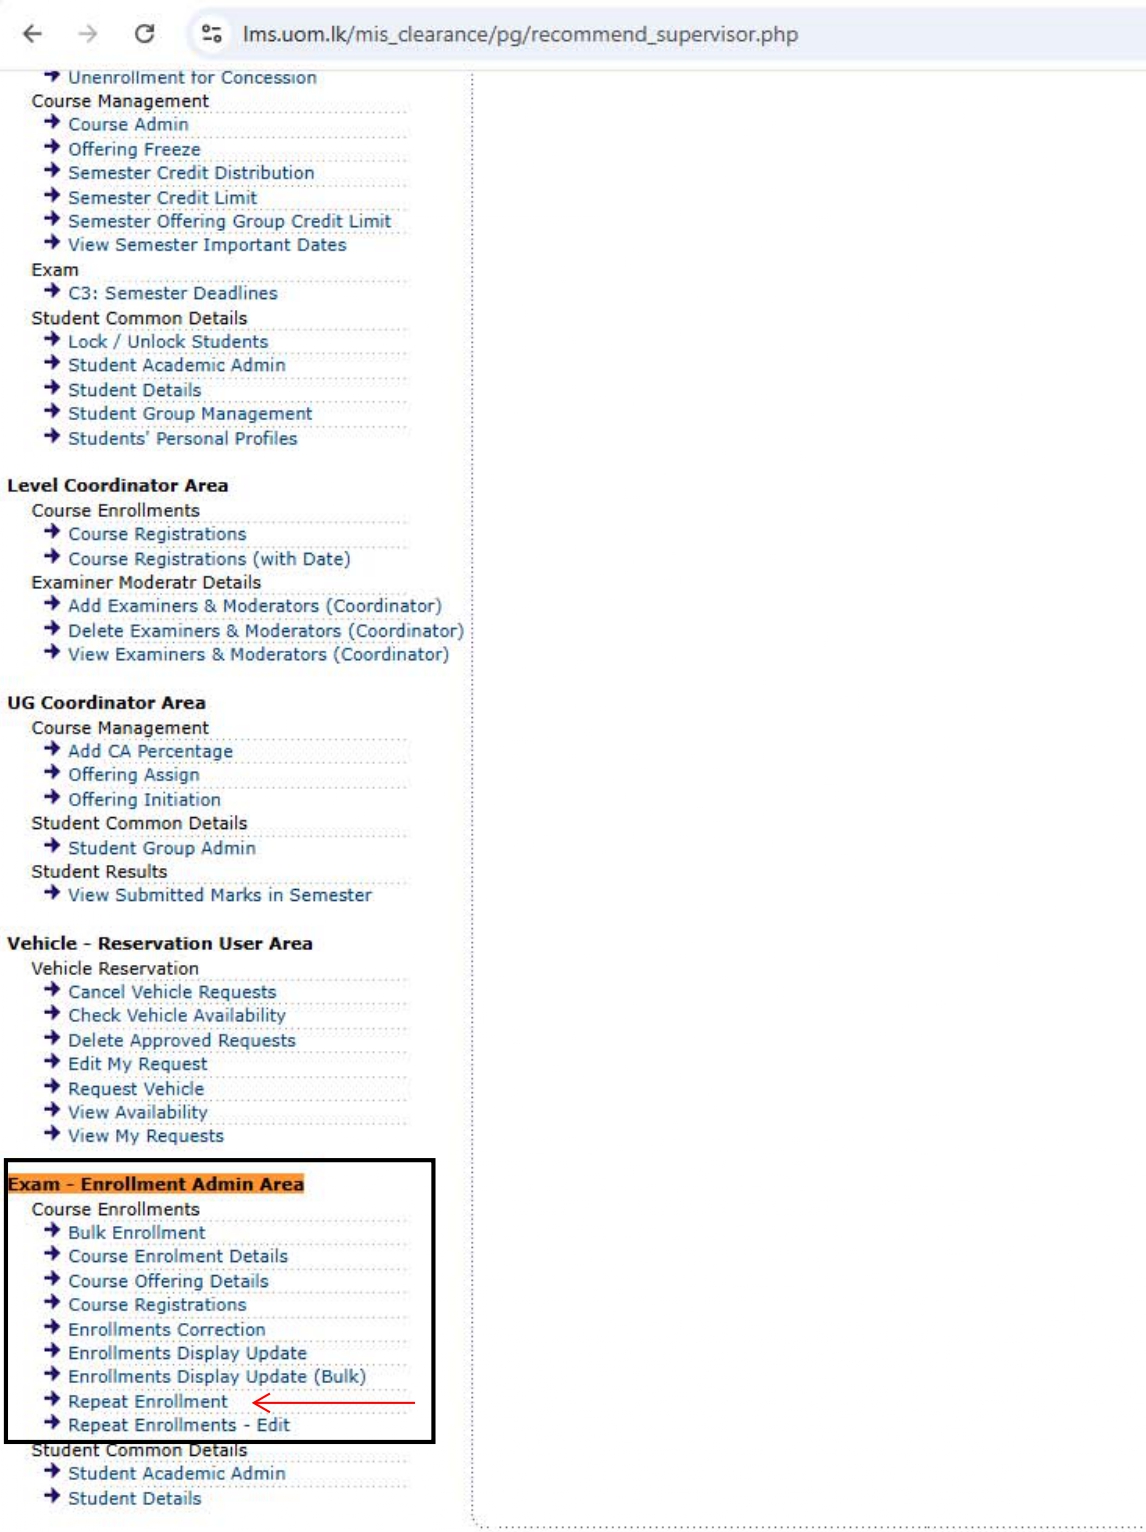
Figure 5: Accessing Repeat Enrollment Option
Selecting Degree Programme, Intake/Academic Year, and Semester
After clicking on Repeat Enrollment, the system will display the interface as shown in Figure 6. Follow the steps below:
-
Select the Degree Programme using the first dropdown.
-
Select the Department using the second dropdown. ⚠️ Note: This will only have one option — the department code relevant to the selected degree programme.
-
Choose the Intake/Academic Year using the third and fourth dropdowns.
-
Select the Semester using the fifth dropdown.
-
Click the Go button to proceed.
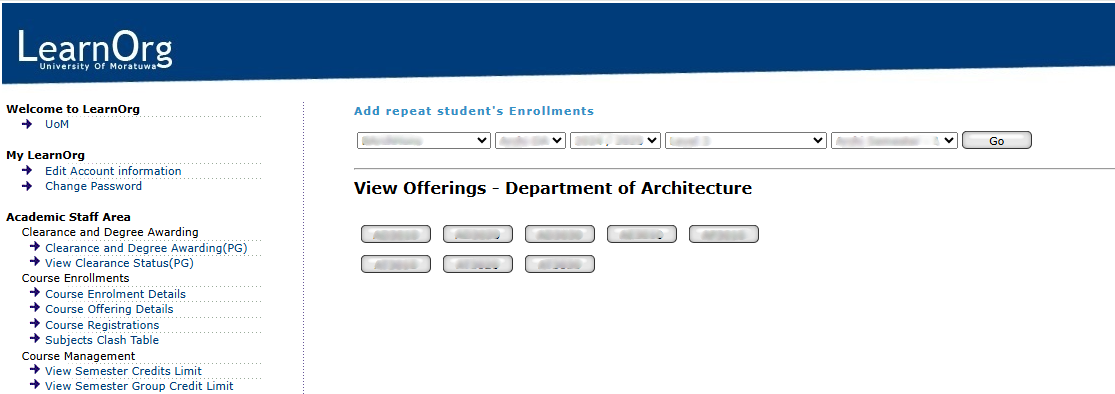
Figure 6: Repeat Enrollment Interface
Selecting the Course and Searching for a Student
-
Click on the relevant module to enroll repeat candidates.
-
The system will display a search interface as shown in Figure 7.
-
Use the Search Box to enter the Student Registration Number.
-
Click the Display button to proceed.
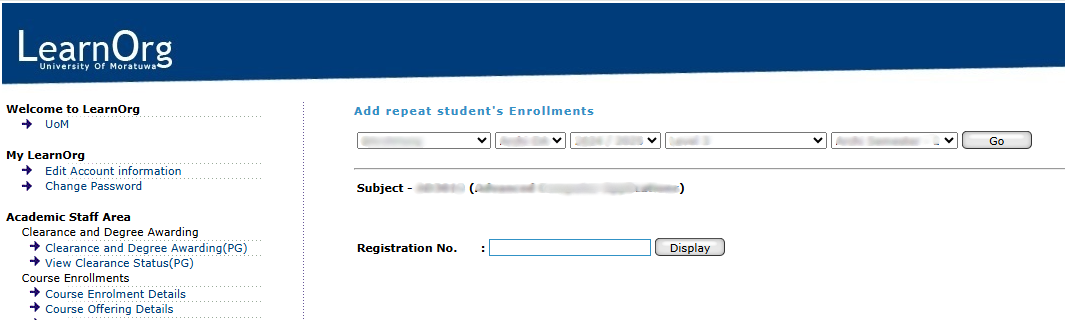
Figure 7: Search Interface for Student Enrollment
Accessing the Repeat Enrollment Interface for a Specific Student
Once the Display button is clicked, the Repeat Enrollment Interface for the specific student will appear, as shown in Figure 8. This interface allows users to enter enrollment details.
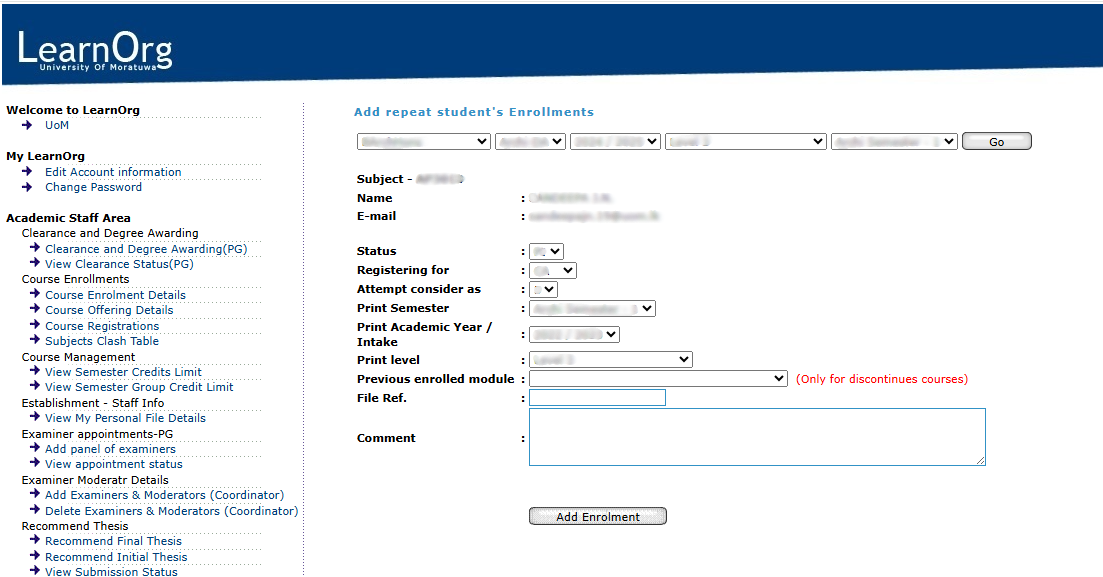
Figure 8: Repeat Enrollment Interface for Specific Student
Entering Repeat Enrollment Details
Fill in the following required fields accurately:
| Field Name | Description |
|---|---|
| Status | Dropdown options: • PF – Previous attempt result is 'Fail' • PI – Previous attempt result is 'Incomplete' • U – Request to update previous result • N – Approved concession for the module • W – Previously withdrawn module |
| Registering for | Dropdown options: • CA – Continuous Assessments only • FE – Final Examination only • Both – Both CA and FE |
| Attempt Considered As | Select the appropriate attempt (e.g., 2nd, 3rd, etc.) ⚠️ If the student has an approved concession, select "1st" |
| Print Semester | Select the relevant semester (Default value can be kept) |
| Print Academic Year / Intake | The academic year of the student’s first attempt (Default value can be kept) |
| Print Level | Select the relevant level (Default value can be kept) |
| Previous Enrolled Module | Fill this if registering for a discontinued module |
| File Ref. | Optional field for future reference |
| Comment | Optional comments for internal reference |
Table 1: Required Fields for Repeat Enrollment
Finalizing Enrollment
-
Double-check all entered information for accuracy.
-
Click the Add Enrollment button to complete the repeat registration.
Once submitted successfully, the following message will appear at the top of the screen: “Successfully enrolled...”
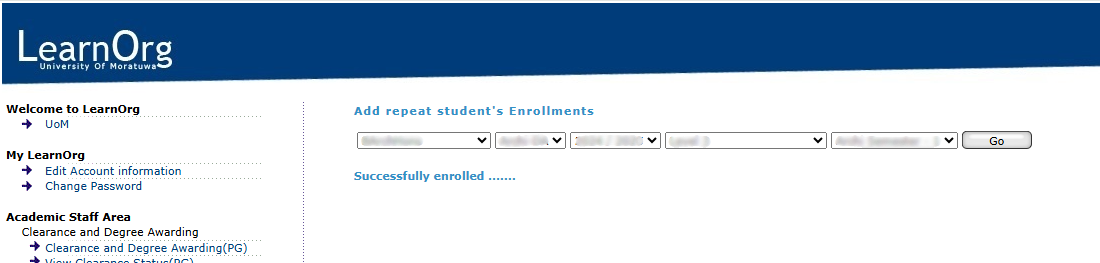
Figure 9: Success Message After Repeat Enrollment
Repeat Enrollments - Edit
Repeat Enrollments -– Edit
After completing thea repeat enrollmentenrollment, if you need to editmodify any of the fields thatpreviously youentered, filledsuch withinas repeatStatus, enrollmentRegistering process,for, or Attempt, you can editdo "Status",so "Registeringusing for",the or "Attempt" with "Repeat Enrollments -– Edit"Edit option.feature.
Once successfully logged into the Learning Management System (LMS), users can proceednavigate to the Exam -– Enrollment Admin Area, where they are granted access to the Repeat Enrollments -– Edit functionalities.
Navigating to Repeat Enrollments -– Edit
-
-
From the LMS dashboard, locate the menu on the left-hand side of the screen.
-
Click on the “Repeat Enrollment
-– Edit” option to begin the editing process, as shown in Figure 10.
-

Figure 10: Accessing Repeat Enrollment -– Edit Option
Searching for a Student
-
OnceAfterlickclicking ontheRepeat Enrollment-– Edit,thethe system will display a searchinterfaceinterface, as shown in Figure 11. -
Use the Search Box to enter the Student Registration Number.
-
Click the View button to proceed.
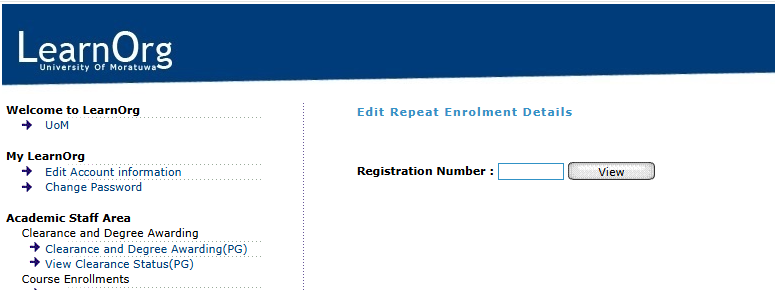
Figure 11: Search Interface for Student Enrollment
Editing Repeat Enrollment Details
-
Once the View button is clicked, an interface like Figure 12 will appear.
-
From this interface, you can edit the following fields:-
Status
-
Registering for
-
Attempt
-
-
After making the necessary changes, click the Save button to apply the updates.
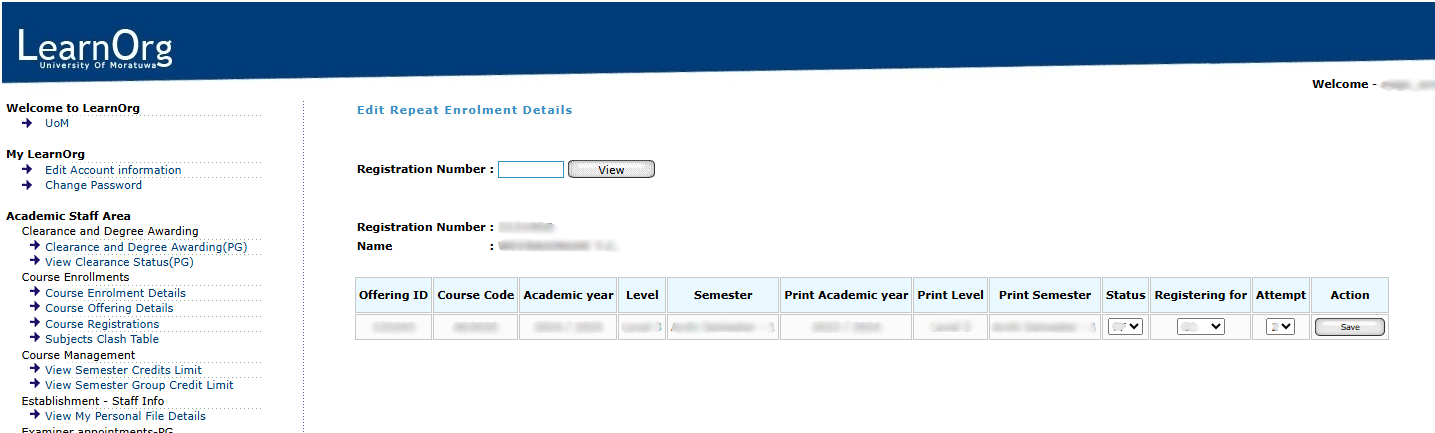
Figure 12: Edit Interface for Repeat Enrollment
Confirmation of Successful Update
Once the details are successfully updated, a confirmation message will appear at the top of the screen: “Successfully updated...”
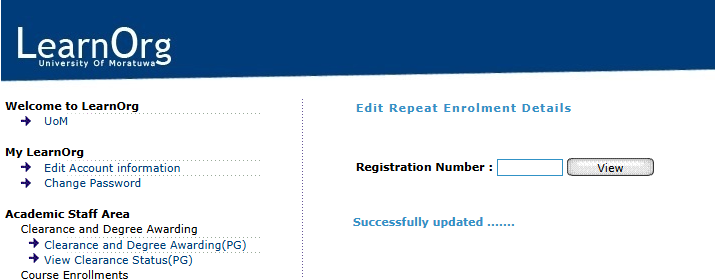
Figure 13: Success Message After Repeat Enrollment Edit