LearnOrg User Guide
User guide for UoM LearnOrg MIS system.
- Faculty of Engineering Examiners-Moderators appointment guidelines and information [Prepared by the EUGS Division]
- User Manual for Students
- Guidelines for Offering Modules
- Guidelines for Transferring Students Across Levels/Years
- Guidelines for Registering Repeat Students (Manually)
- Other
- Vehicle Reservation
Faculty of Engineering Examiners-Moderators appointment guidelines and information [Prepared by the EUGS Division]
-
Appointment of examiners and moderators must happen prior to the commencement of a semester and should be submitted to the EUGS division within the third week of a new semester for Faculty Board, Senate and Council approval [the process usually takes 3 months].
-
The students [including repeat] will be given 4 weeks for module enrollment. [2 weeks before the commencement of semester and 2 weeks of add-drop period]. Decision on module offering should be finalized within the first week of the semester and should be informed all the enrolled students.
-
It is a must to have a Coordinating Examiner and a Moderator for each module [and there can be additional Examiner(s), as required.
-
The Coordinating Examiner and Moderator must be permanent internal staff members.
-
The Moderator must be a Senior Lecturer with the relevant subject expertise. [In the absence of Senior Lecturers in a department, the Head of Department or a confirmed lecturer with postgraduate qualifications shall be appointed as the moderator].
-
Departments must appoint Senior Lecturers or above as examiners for Semesters 7 and Semester 8 [final year] modules.
-
Lecturers on contract or visiting must have equivalent qualifications to the internal examiner appointment requirements.
-
The semester coordinators, in consultation with the relevant examiners, moderators, and the HoD, shall make the appointments of examiners and moderators through the LearnOrg system [LMS]. The manual form should be used only for amendments or discontinued modules.
-
The department shall ensure that the internal academic staff member details appear on all documentation are accurate and up-to-date, before submitting for the Senate approval.
-
All visiting staff [intended to be nominated as examiners] should be finalized in advance to appear their information correctly on the system. If not, the department should take necessary corrective action, prior to submitting their names as examiners.
-
Only the Coordinating Examiner will be permitted to insert marks to the system and displaying the provisional-results to students and submitting for moderation, will be his/her responsibility.
-
The Moderator shall be responsible for moderating the marks and submitting to the Examinations Division adhering to the deadlines enforced by the Faculty.
To access the Learning Management Systems (LMS) of the University of Moratuwa, users are required to navigate to the following URL: https://lms.uom.lk/login_index.php.
In order to gain access to the systems, users are mandated to input the assigned username and password, as illustrated in Figure 1 below:
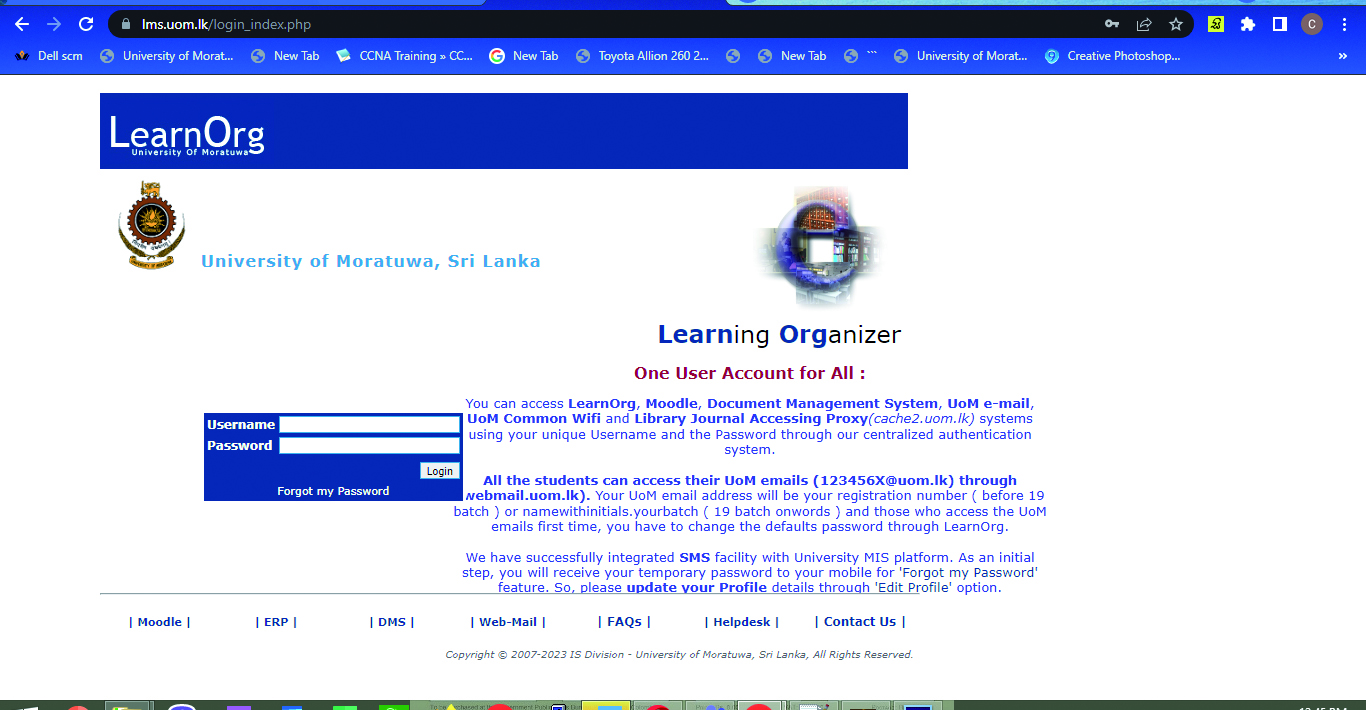
Figure 1: Process of Providing Username and Password for System Access
Once successfully logged into the Learning Management System (LMS), users can proceed to the "Level Coordinator Area" where they have the capability to "Add Examiners & Moderators (Coordinator)". This feature is depicted in Figure 2 below:
To initiate the process of adding examiners and moderators (coordinators) to the system, users are required to click on the "Add Examiners & Moderators (Coordinator)" option located on the left side of the screen.
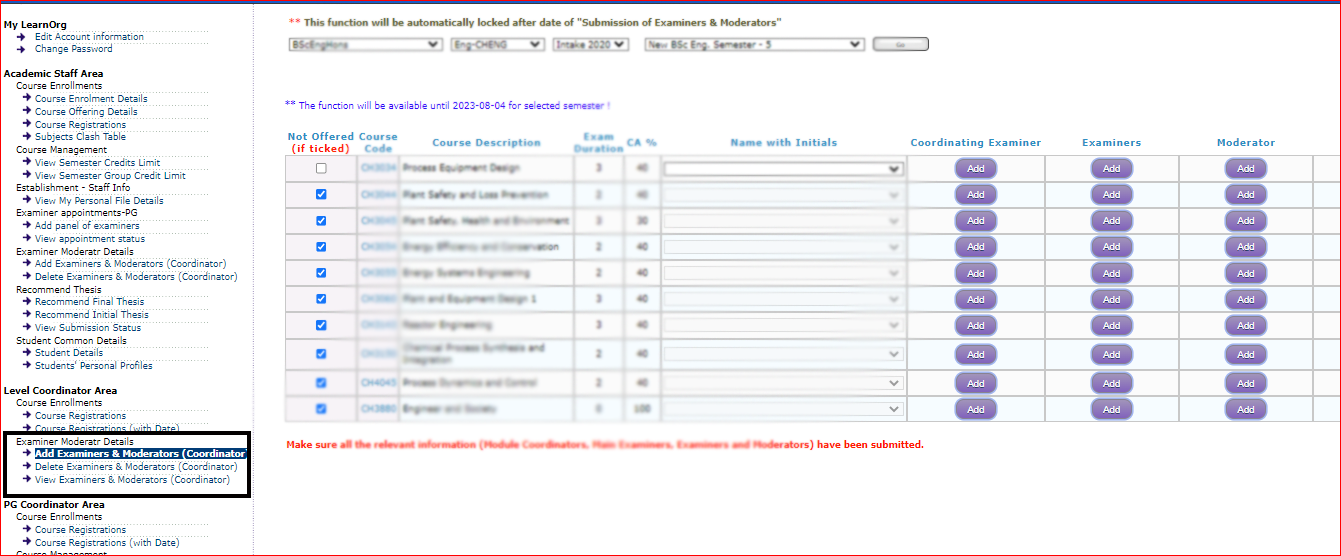 Figure 2: Adding Examiners & Moderators (Coordinator) in the Level Coordinator Area of the LMS
Figure 3 displays the interface where users can select the appropriate options for the Degree program, Department, Intake, and Semester. Once these selections are made, users must click the "GO" button adjacent to the said options.
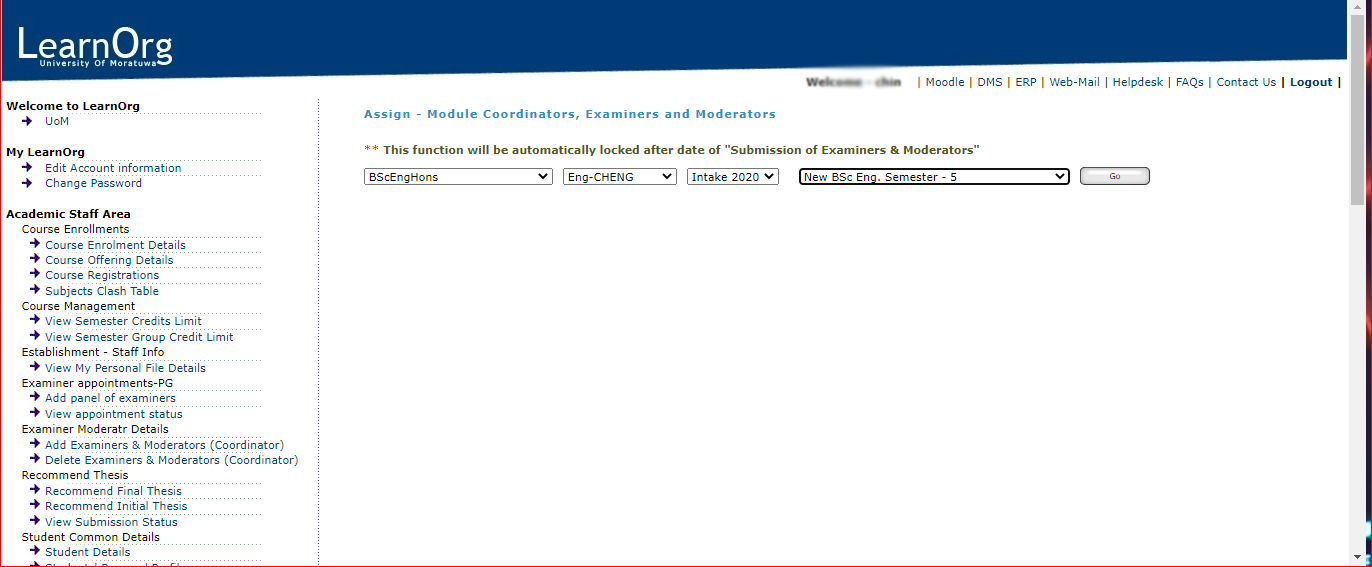 Figure 3: interface for users can select the appropriate options.
-
In order to locate the desired Academic member, users can utilize the search function by entering the surname of the individual. in Figure 4
-
Following the identification of the Academic member, users can proceed to click on the appropriate button, whether it is for assigning them as an examiner or a moderator.
-
When it comes to updating the class limits, the following guidelines must be adhered to:
-
If the course is considered compulsory, there should be no class limit specified.
-
If the course is categorized as a faculty elective (FE), users have the flexibility to modify the class limit.
-
If the course is considered a department elective (EE), users also have the option to update the class limit.
- In cases where the course is a faculty elective and not offered to department students, a selected checkbox will be displayed. Users are required to uncheck this checkbox, as demonstrated in Figure 5.
- Failure to uncheck the said checkbox implies that the course is being offered to department students as well, as demonstrated in Figure 5.
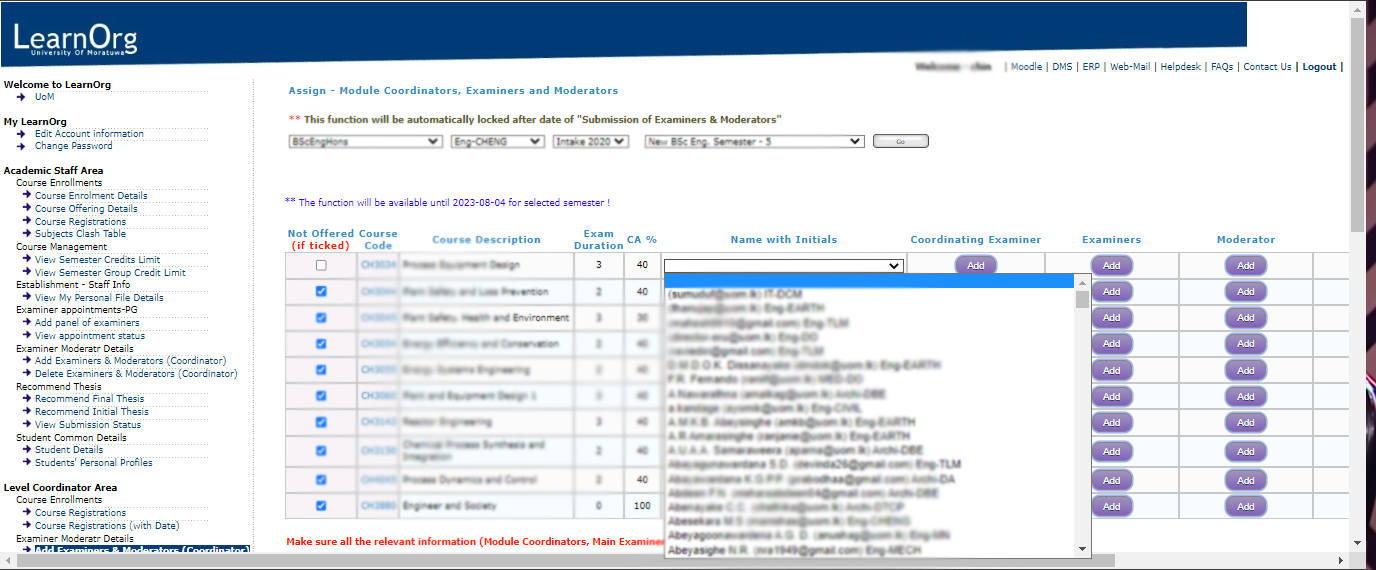
Figure 4: searching Academic member
 Figure 5: Class limits for faculty electives
User Manual for Students
Login to the system
Login to the system

User can access the University of Moratuwa Management Information System (LearnOrg) through https://lms.uom.lk by using any Web-browser (however recommend to Mozilla Firefox and Google Chrome) or any Operating System.
Username- surname-with-initials.<batch> without spaces (ex:- If you are Intake 19 and your name is Perera B.S.J, username is pererabsd.19 ) (You should have received your username from the examinations division.)
Password - If you access the system first time you can use “Index Number” as the default password. You can contact the Examination division or CITeS helpdesk (https://helpdesk.uom.lk) for any issues.
Initial Interface
Initial Interface

When you login to the system you also will an interface as shown above. The system shows you last login details such as IP address, time and date for security purposes.
If you still using default password, system will automatically prompt password resetting options.
[If it is a public computer (such as a lab computer), make sure that you have logged out after using the system by using top-right corner “Logout” option.]
Change profile information
Change profile information

Users are allowed to change basic information such as Title, First Name, Last Name, Date of Birth, Gender, Current Address, Current Home Telephone number, Mobile Number, Permanent Home Telephone number and Personal e-Mail address. User has to click on “Update” button to apply the changes.
[It is recommended to keep these information up to date.]
Change Password
Change Password
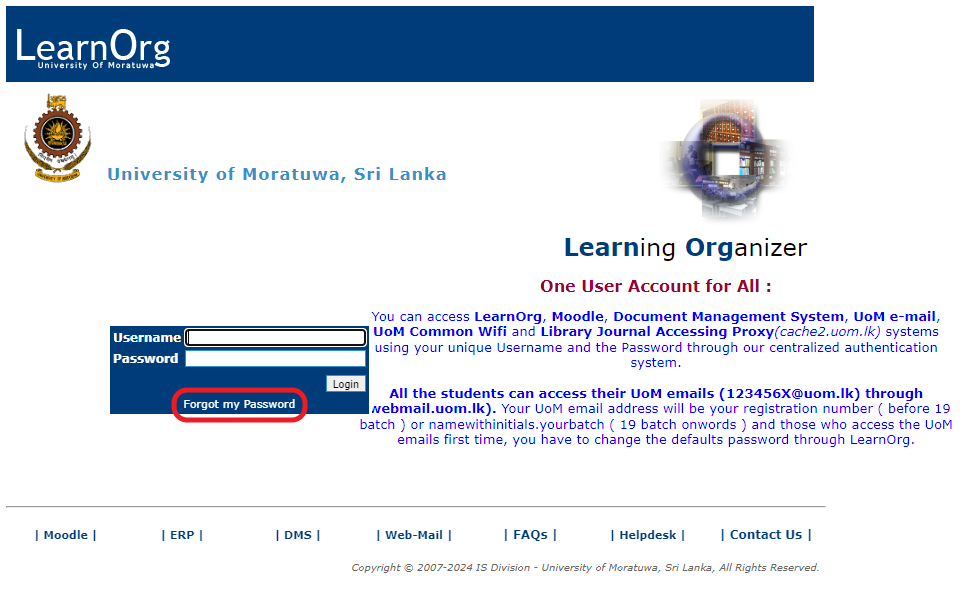
Step 1: Click on "Forgot my password."
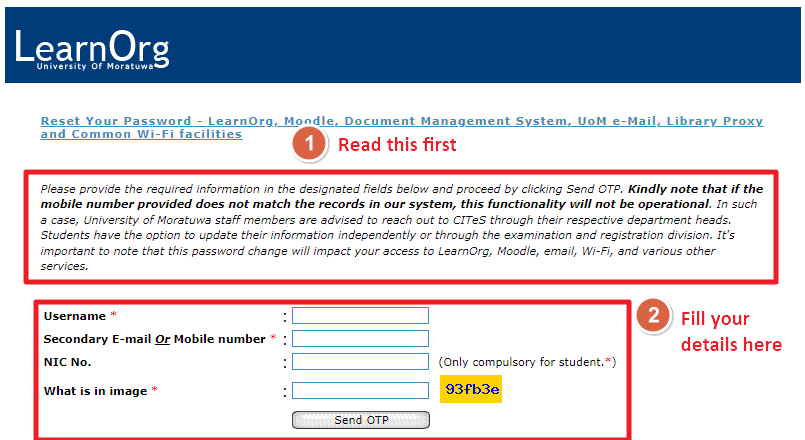
Step 2: Read the instructions first, and then enter the requested details in the given text boxes. Then press "Send OTP."
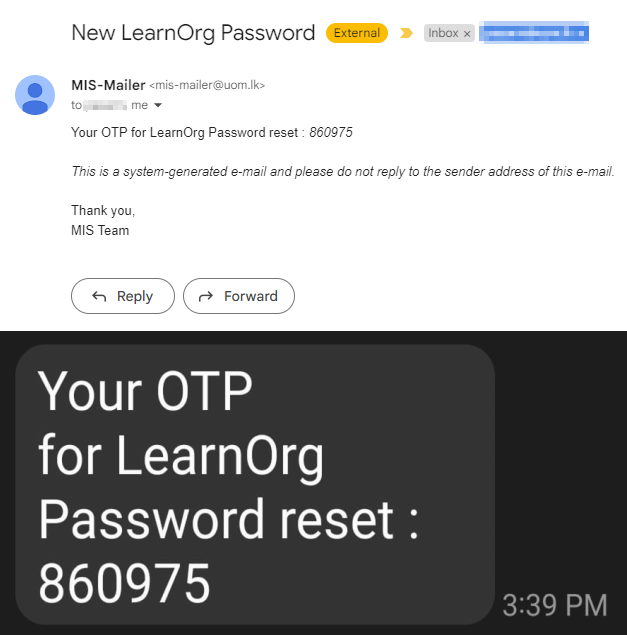
Step 4: Wait for the OTP. An OTP will be sent to your secondary email and to your mobile number.
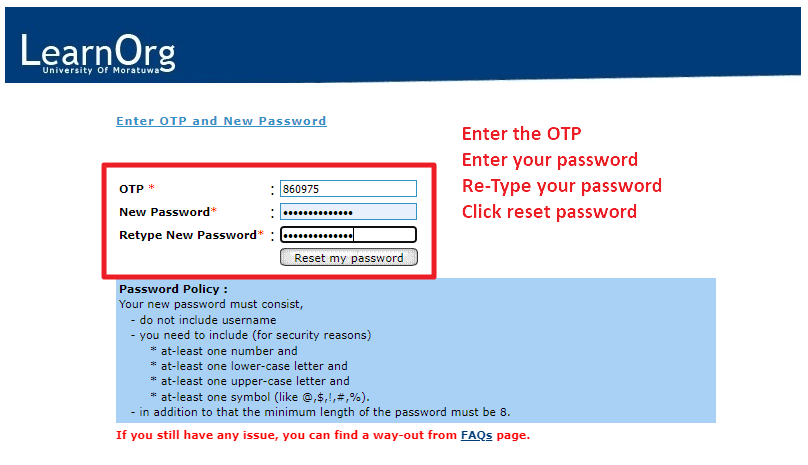
Step 5: Set a new password for your account. Make sure to read the password policy first.
Course Enrolment
Course Enrolment

Student should enroll to semester offerings by using the LearnOrg system. Click on “Enrol” button for relevant and required course modules. If it is successful you will see success message top of the page.
[Students are responsible for enrolling to semester offerings within the permitted period. Make sure that your number of enrolled credits within the required credit limit. Student is responsible to enroll for required compulsory modules. Students should follow the University, Faculty or Department guidelines when enrolling for modules.]
[Contact relevant Undergraduate Studies Division-for UG students/Postgraduate Studies Division-for PG students regarding repeat registrations or any other registration related inquiry]
Course Un-enrollment
Course Unenrollment

Students can un-enroll (de-register) from registered semester offerings by using the LearnOrg within the permitted period. Click on “Unenrol” button for course modules that you need to unenrol. If it is successful you will see the success message top of the page.
[Make sure that your number of enrolled credits is within the required credit limit. Students are required to follow the University, Faculty or Department guidelines]
Enrollment history
Enrollment history

Students may view their total enrollment and enrollment history by using this function.
Guidelines for Offering Modules
Step 1: Login to the System
Login to the System
To begin the process of module offering, users must first log in to the Learning Management System (LMS) of the University of Moratuwa.
Accessing the LMS
-
Open a web browser (recommended: Mozilla Firefox or Google Chrome) and navigate to the following URL:
https://lms.uom.lk/login_index.php
Entering Login Credentials
-
Enter your Username and Password in the appropriate fields.
-
Click the Login button to access the LMS dashboard.
⚠️ Note: If you have forgotten your password, use the "Forgot Password" link on the login page.
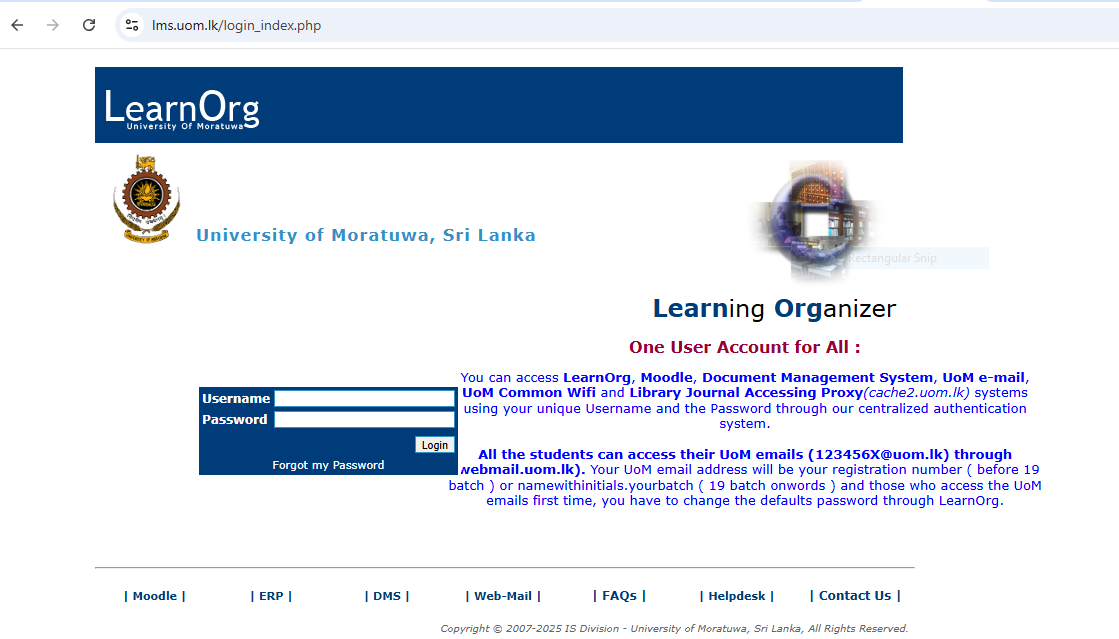
Figure 1: LMS Login Page
Step 2: Offering Initiation
Offering Initiation
Once successfully logged into the Learning Management System (LMS), users can proceed to the UG Coordinator Area, where they are granted access to Course Management functionalities.
⚠️ Note: If you do not see or have access to the UG Coordinator Area, your Director or Head of the respective Division or Department can request access from the CITeS Division by opening a ticket through the IT Helpdesk at https://helpdesk.uom.lk.
Navigating to Offering Initiation
-
From the LMS dashboard, locate the menu on the left-hand side of the screen.
-
Click on the Offering Initiation option to begin the process of offering modules.
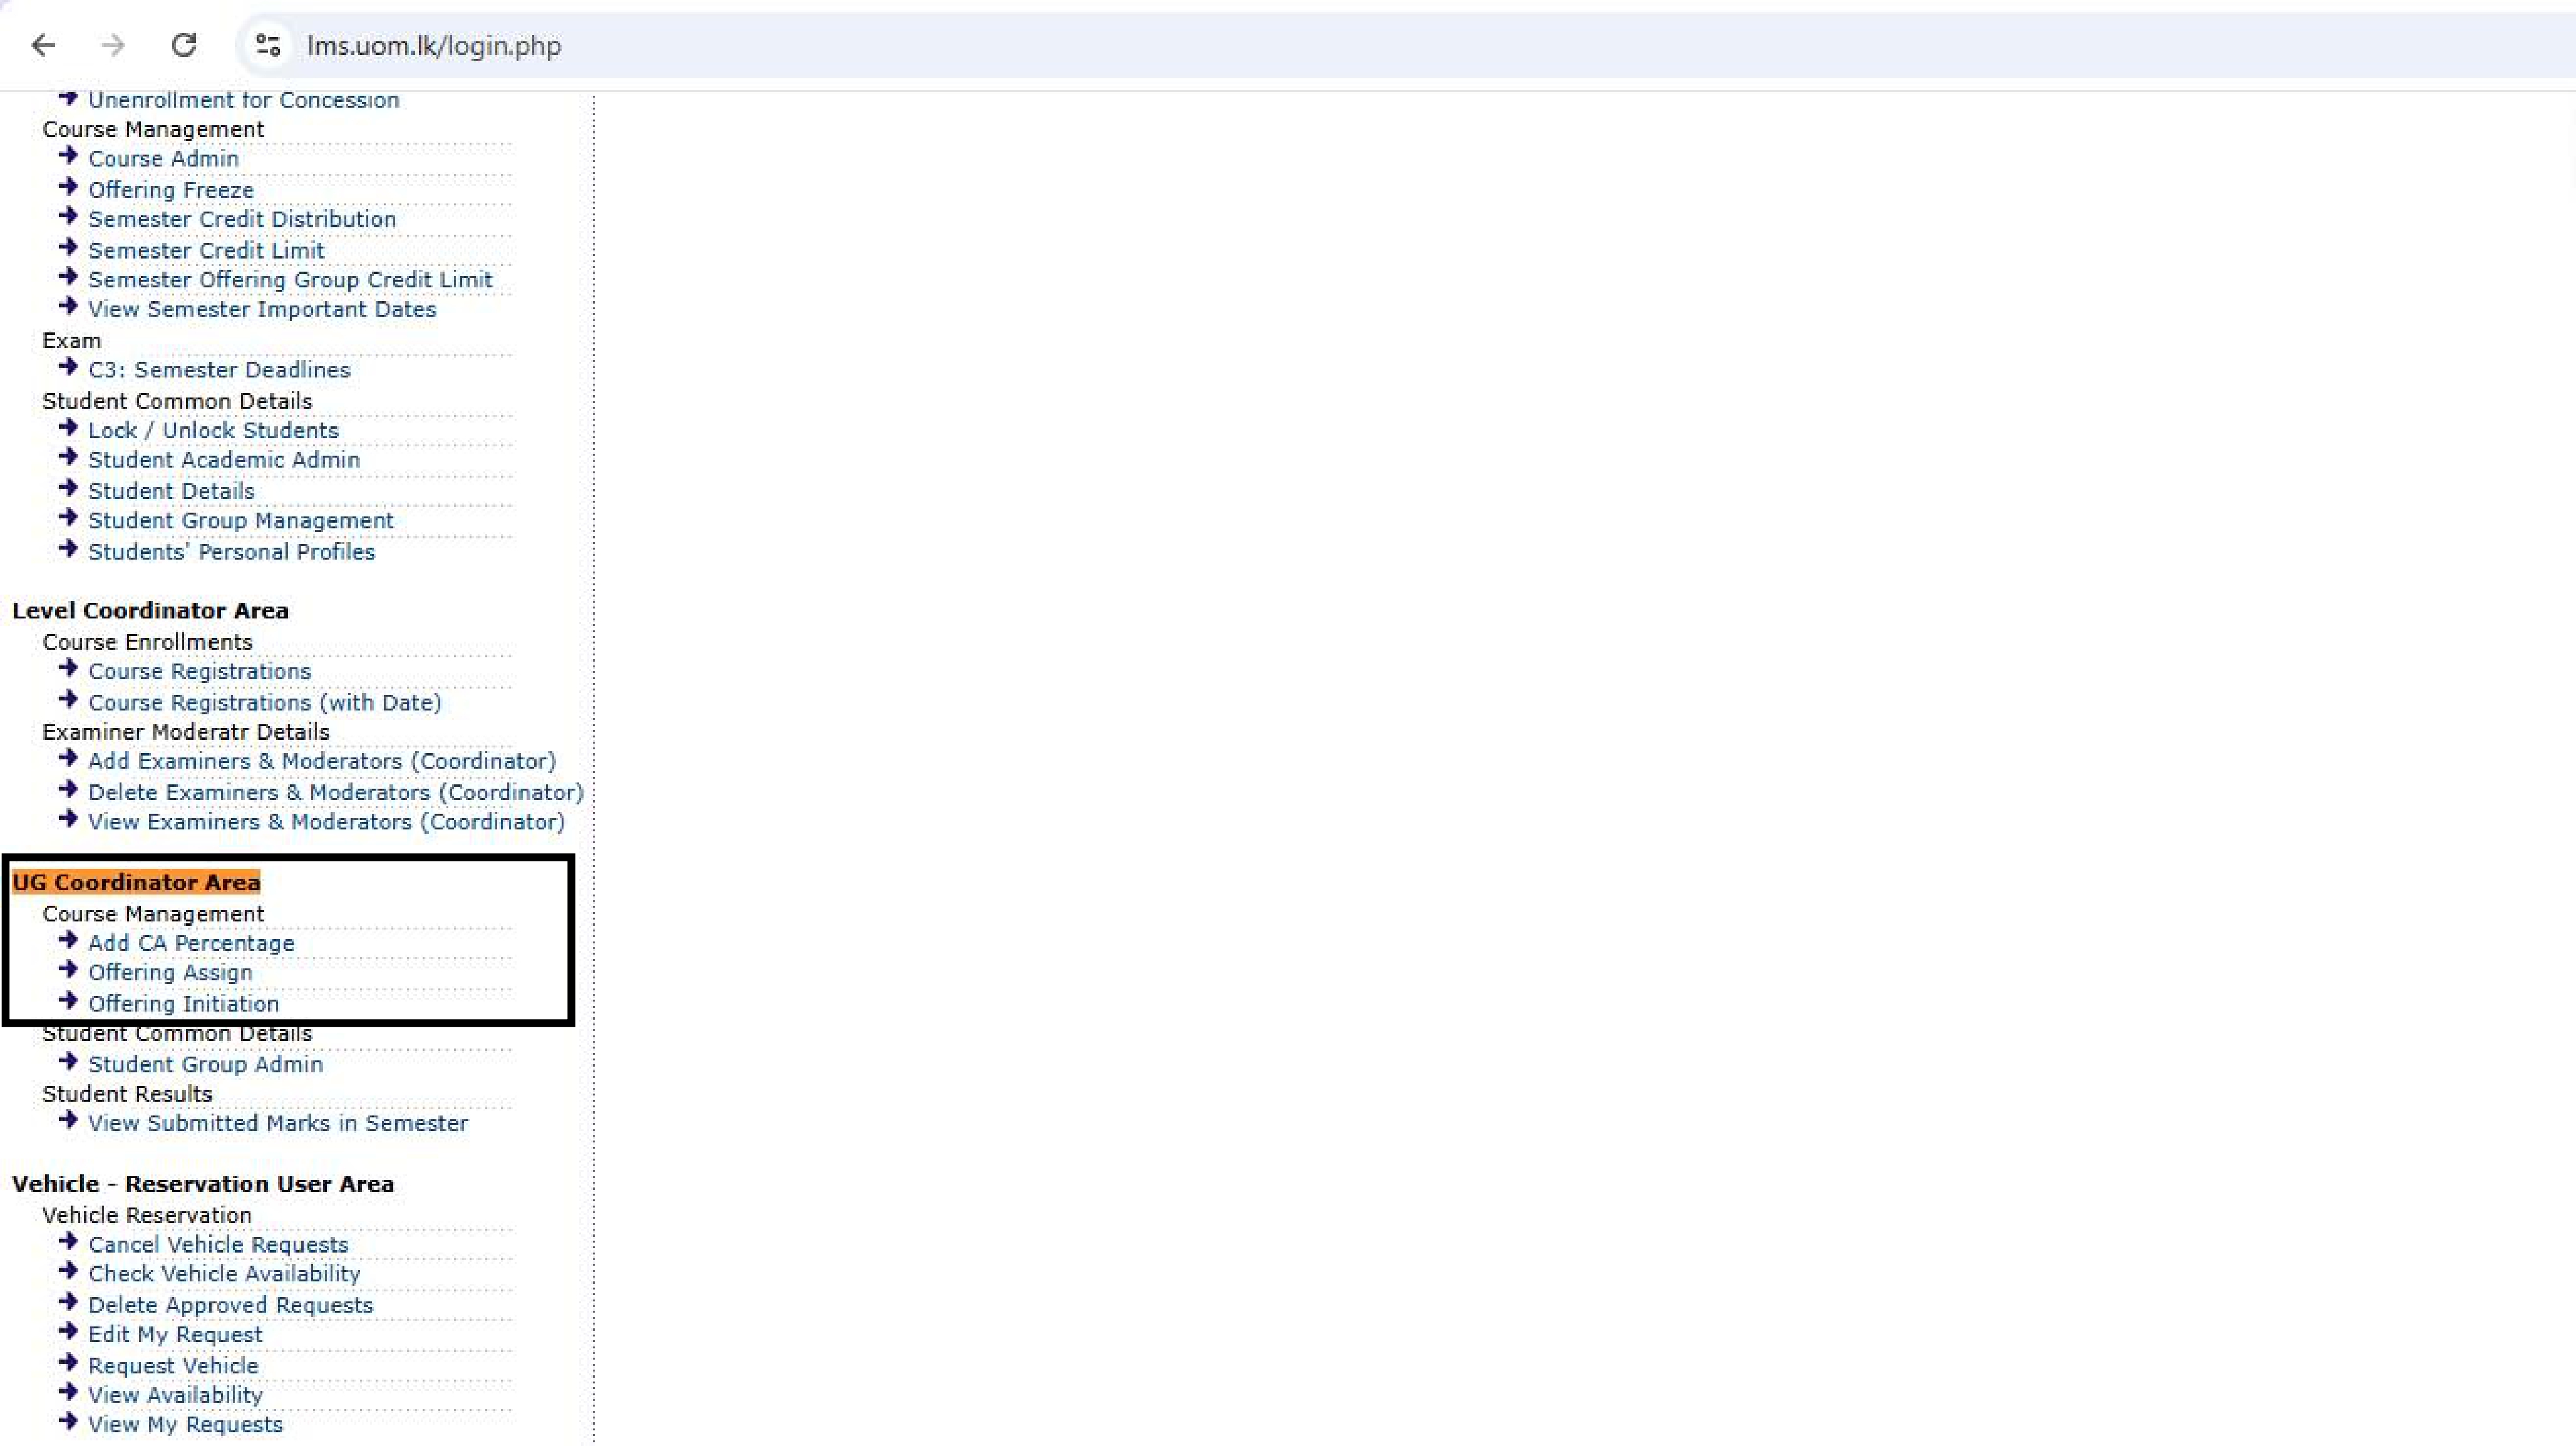
Figure 2: UG Coordinator Area and Offering Initiation Option
Searching for Course Code
After clicking on Offering Initiation, the system will display a search interface.
-
Use the Search Box to enter the Course Code you wish to offer.
-
Click the Search button to proceed.
-
After locating the course, click on the "Add" button next to the relevant course listing.
This will direct you to the Course Offering Interface, where module offering details can be entered.
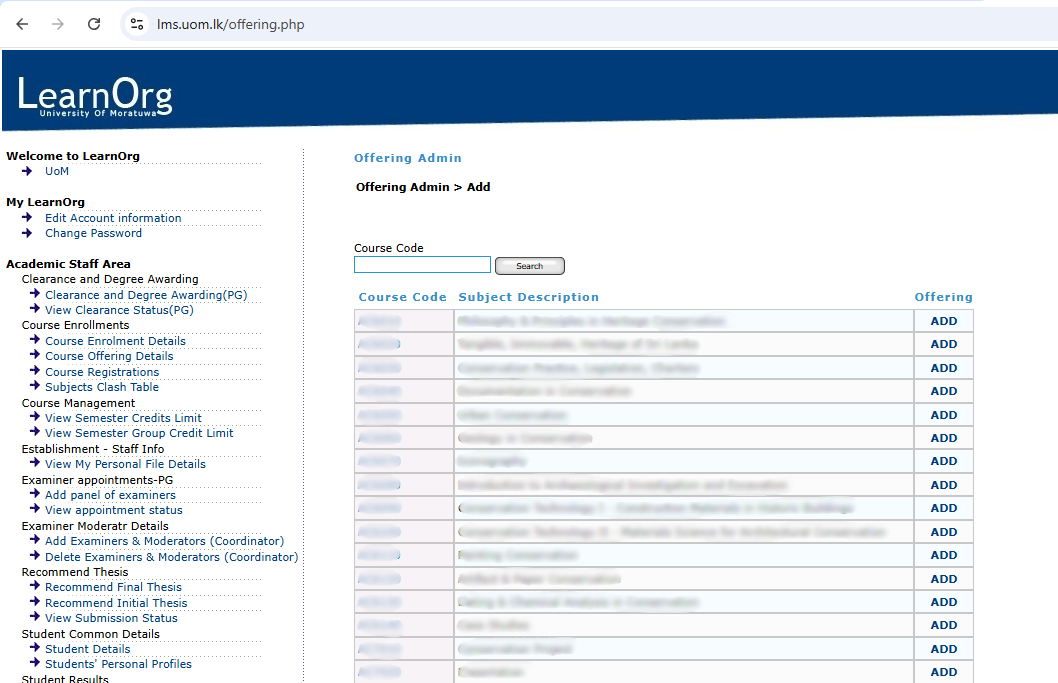
Figure 3: Course Code Search Interface
Accessing the Course Offering Interface
-
Once the “Add” button is clicked, the Course Offering Interface will appear.
-
This is where users can enter offering details.
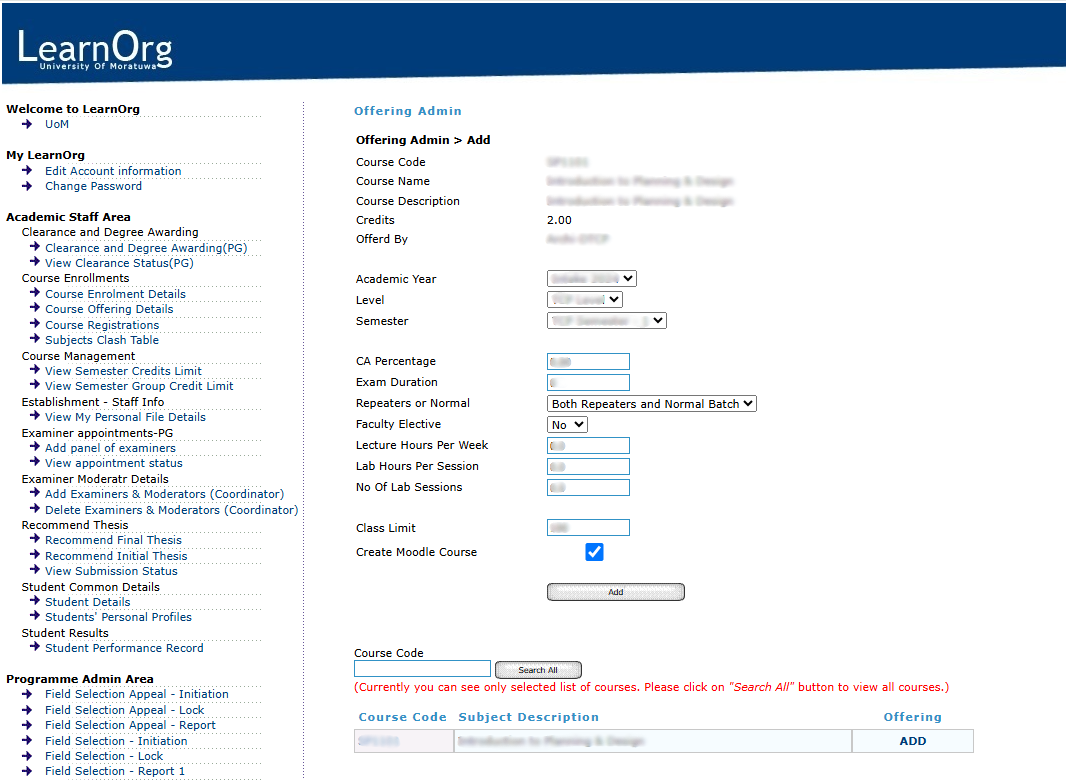
Figure 4: Course Offering Interface
Enter Offering Details
Once inside the Course Offering Interface, proceed to fill in the required fields with accurate information.
Required Fields
Fill in the following fields as per the course requirements:
| Field Name | Description |
|---|---|
| Academic Year | Select the appropriate academic year for the offering. |
| Level | Choose the level of study (e.g., Level 1, Level 2). |
| Semester | Select the relevant semester (e.g., Semester 1, Semester 2). |
| CA Parentage | Enter the percentage allocated for Continuous Assessment. |
| Exam Duration | Specify the duration of the final exam in hours or minutes. |
| Repeat or Normal | Dropdown options: – Both Repeaters and Normal Batch – Normal Batch Only – Repeaters Only |
| Faculty Elective | Dropdown options: – No – Yes |
| Lecture Hours Per Week | Number of lecture hours per week. |
| Lab Hours Per Session | Number of hours per lab session. |
| No. of Lab Sessions | Total number of lab sessions. |
| Class Limit | Use this if the course needs to be limited to fewer students. |
| Create Moodle Course | ✅ Ensure this checkbox is selected before clicking Add. |
Table 1: Required Fields
⚠️ Note: All fields are mandatory. Leaving any field blank may prevent the submission from being processed correctly.
Once all the fields have been filled:
- Double-check all fields for completeness and accuracy.
- Confirm the Create Moodle Course checkbox is ticked.
-
Click the Add button to complete the offering.
Once successfully submitted, a confirmation message will be displayed at the top of the screen: “The Offering has been successfully saved.”
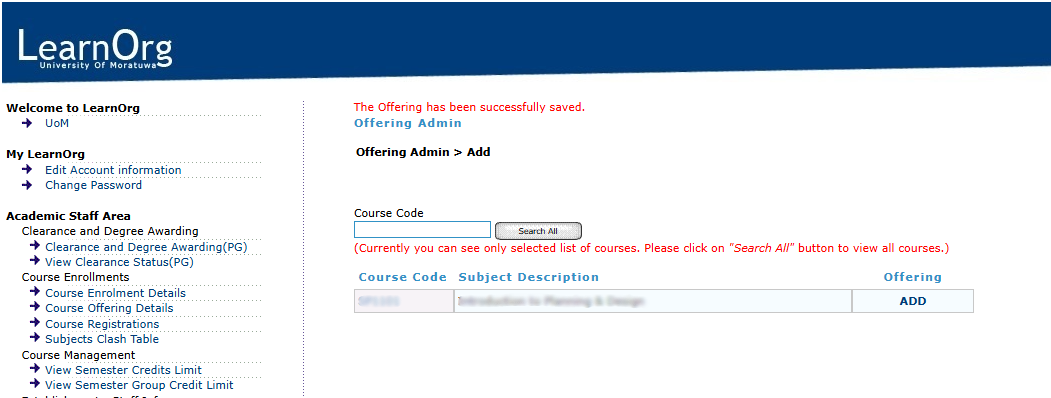
Figure 5: Success Message After Submission
Step 3: Offering Assign
Offering Assign
After successfully initiating the module, you need to assign the module to the relevant student group.
Navigating to Offering Assignment
-
From the LMS dashboard, locate the menu on the left-hand side of the screen.
- Click on the “Offering Assign” option to begin the assignment process from the area highlighted in Figure 2.
Selecting Degree Programme, Intake/Academic Year, and Semester
After clicking Offering Assign, the system will display the assignment interface. Follow the steps below:
-
Select the Degree Programme using the first dropdown.
-
Choose the Intake/Academic Year using the second dropdown.
-
Select the relevant Semester using the third dropdown.
-
Click the Search button to proceed.
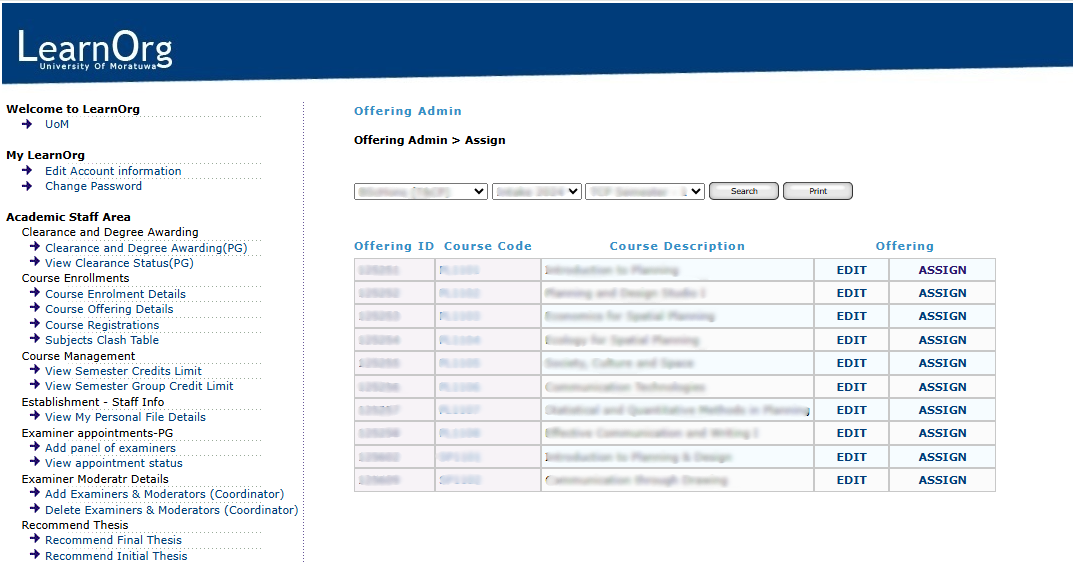
Figure 6: Offering Assign Selection Interface
Completing the Assignment
Once the list of courses appears, click on the “Assign” button next to the relevant course.
This will take you to the Course Assigning Interface, where assignment details can be specified.
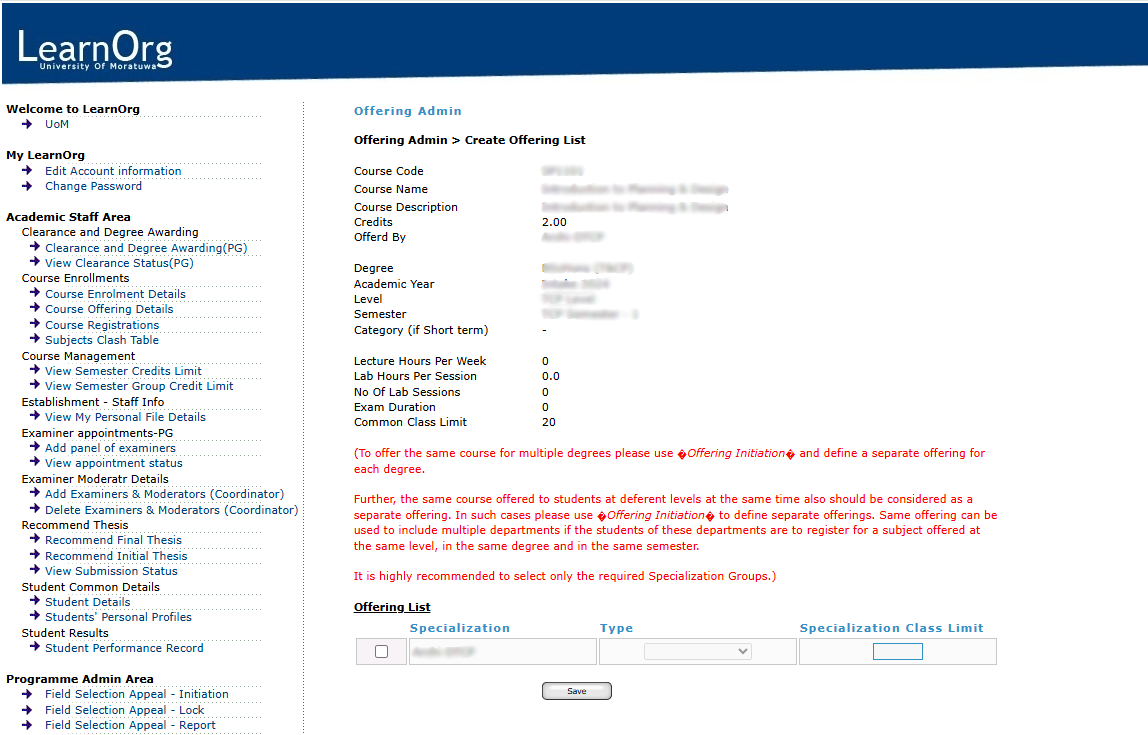
Figure 7: Course Assigning Interface
At the bottom of the Course Assigning Interface, you will find the “Offering List” section.
Follow the steps below to complete the assignment:
-
Check the checkbox next to the appropriate course. This will activate the Type dropdown.
-
From the Type dropdown, select one of the following:
-
Compulsory
-
Elective
-
Optional
-
Faculty Elective
-
-
Enter the Class Limit, using the same value as provided during the course initiation.
-
Click the Save button to finalize the assignment.
Once saved successfully, the following confirmation message will appear at the top of the screen: “The Offering List has been successfully updated.”
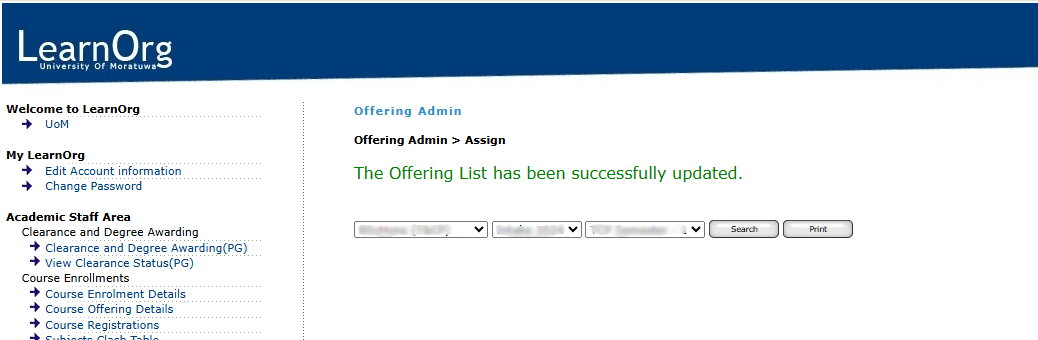
Figure 8: Offering Assignment Success Message
Step 4: Adding Examiners and Moderators
Adding Examiners and Moderators
After successfully assigning the modules, you need to add Examiners and Moderators to the relevant modules.
You can follow the detailed user guide for this process by accessing the link below:
🔗 Click here to view the User Guide for Adding Examiners and Moderators
Step 5: Offering Freeze
Offering Freeze
After successfully assigning lecturers to modules as Examiners or Moderators, the modules will become visible to students, allowing them to enroll in the relevant courses.
The Module Registration period is defined by the respective Performance Criteria for each degree programme. At the end of this registration period, module registrations must be frozen to finalize the offering.
Navigating to Offering Freeze
-
From the LMS dashboard, locate the menu on the left-hand side of the screen.
-
Click on the “Offering Freeze” option under the Course Management section to begin the process.

Figure 9: Programme Admin Area and Offering Freeze Option
Selecting Degree Programme, Intake/Academic Year
After clicking Offering Freeze, the system will display the offering freeze interface. Follow the steps below:
-
Select the Degree Programme using the first dropdown.
-
Choose the Intake/Academic Year using the second dropdown.
-
The third dropdown will appear only for degree programmes that follow the Academic Year system. Use this to select the relevant Semester.
-
Click the Goo button to proceed.
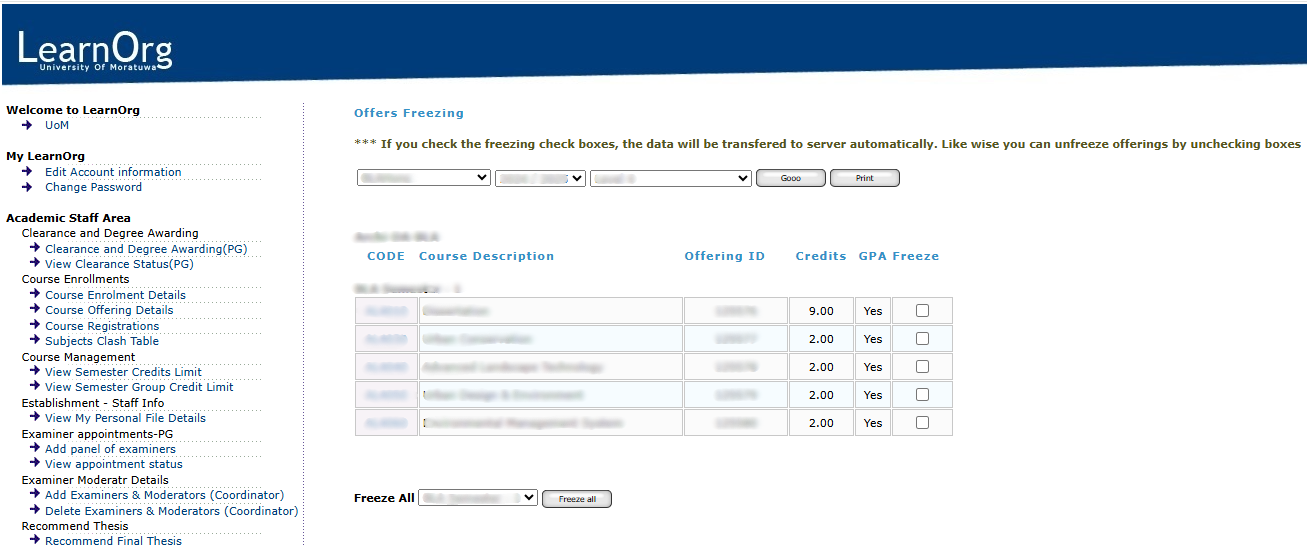
Figure 10 - Offering Freeze Interface
Completing Offering Freeze
Once the list of courses appears, you can complete the offering freeze process using one of the following methods:
-
Individually: Check the freezing checkbox next to each relevant course to freeze them one by one.
-
Bulk Action: Use the dropdown below the module list to freeze all modules belonging to a specific semester.
⚠️ Note: When you check the freezing checkboxes, the data is automatically transferred to the server. Once a module is frozen, it cannot be unfrozen by unchecking the box.
If any changes are required after freezing, please contact the MIS Division by opening a ticket through the IT Helpdesk at https://helpdesk.uom.lk.
Once the modules are successfully frozen, a confirmation message will appear depending on the method used:
-
Individually: A message will appear at the top of the screen stating: “Offering [........] was frozen.”
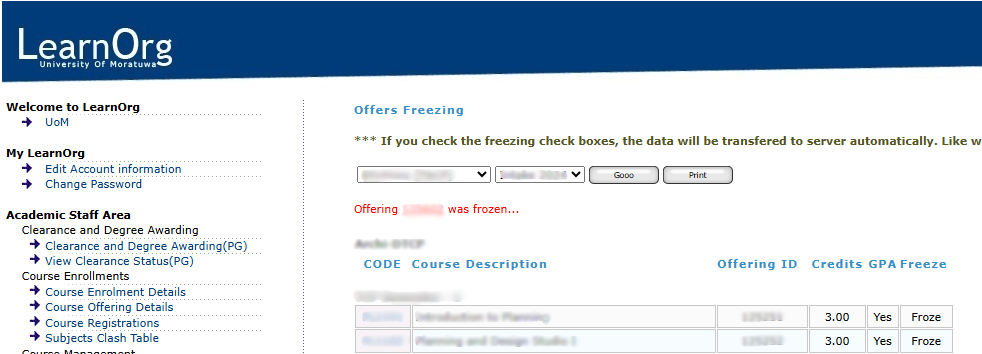
Figure 11A: Offering Freeze Success Message (Individually)
-
Bulk Action: A message will appear at the bottom of the screen stating: “All the offerings in [........] in Intake [........] were frozen.”

Figure 11B: Offering Freeze Success Message (Bulk Action)
Additionally, the interface will display the frozen status next to each course, confirming that the offerings have been finalized for the selected semester.
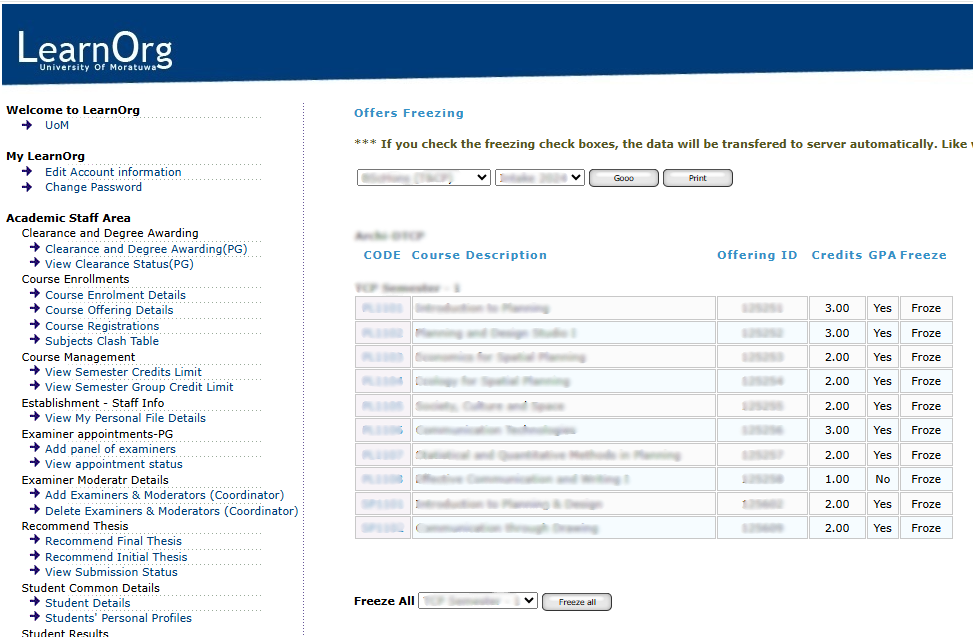
Figure 12: Frozen Modules Display Interface
Guidelines for Transferring Students Across Levels/Years
Step 1: Login to the System
Login to the System
To begin the process of module offering, users must first log in to the Learning Management System (LMS) of the University of Moratuwa.
Accessing the LMS
-
Open a web browser (recommended: Mozilla Firefox or Google Chrome) and navigate to the following URL:
https://lms.uom.lk/login_index.php
Entering Login Credentials
-
Enter your Username and Password in the appropriate fields.
-
Click the Login button to access the LMS dashboard.
⚠️ Note: If you have forgotten your password, use the "Forgot Password" link on the login page.
Figure 1: LMS Login Page
Step 2: Transfer All Students to a Different Academic Year/Level
Transfer All Students to a Different Academic Year/Level
Once successfully logged into the Learning Management System (LMS), users can proceed to the Programme Admin Area, where they are granted access to Student Common Details functionalities.
Navigating to Student Academic Admin
-
From the LMS dashboard, locate the menu on the left-hand side of the screen.
-
Click on the “Student Academic Admin” option to begin the process, as shown in Figure 2.
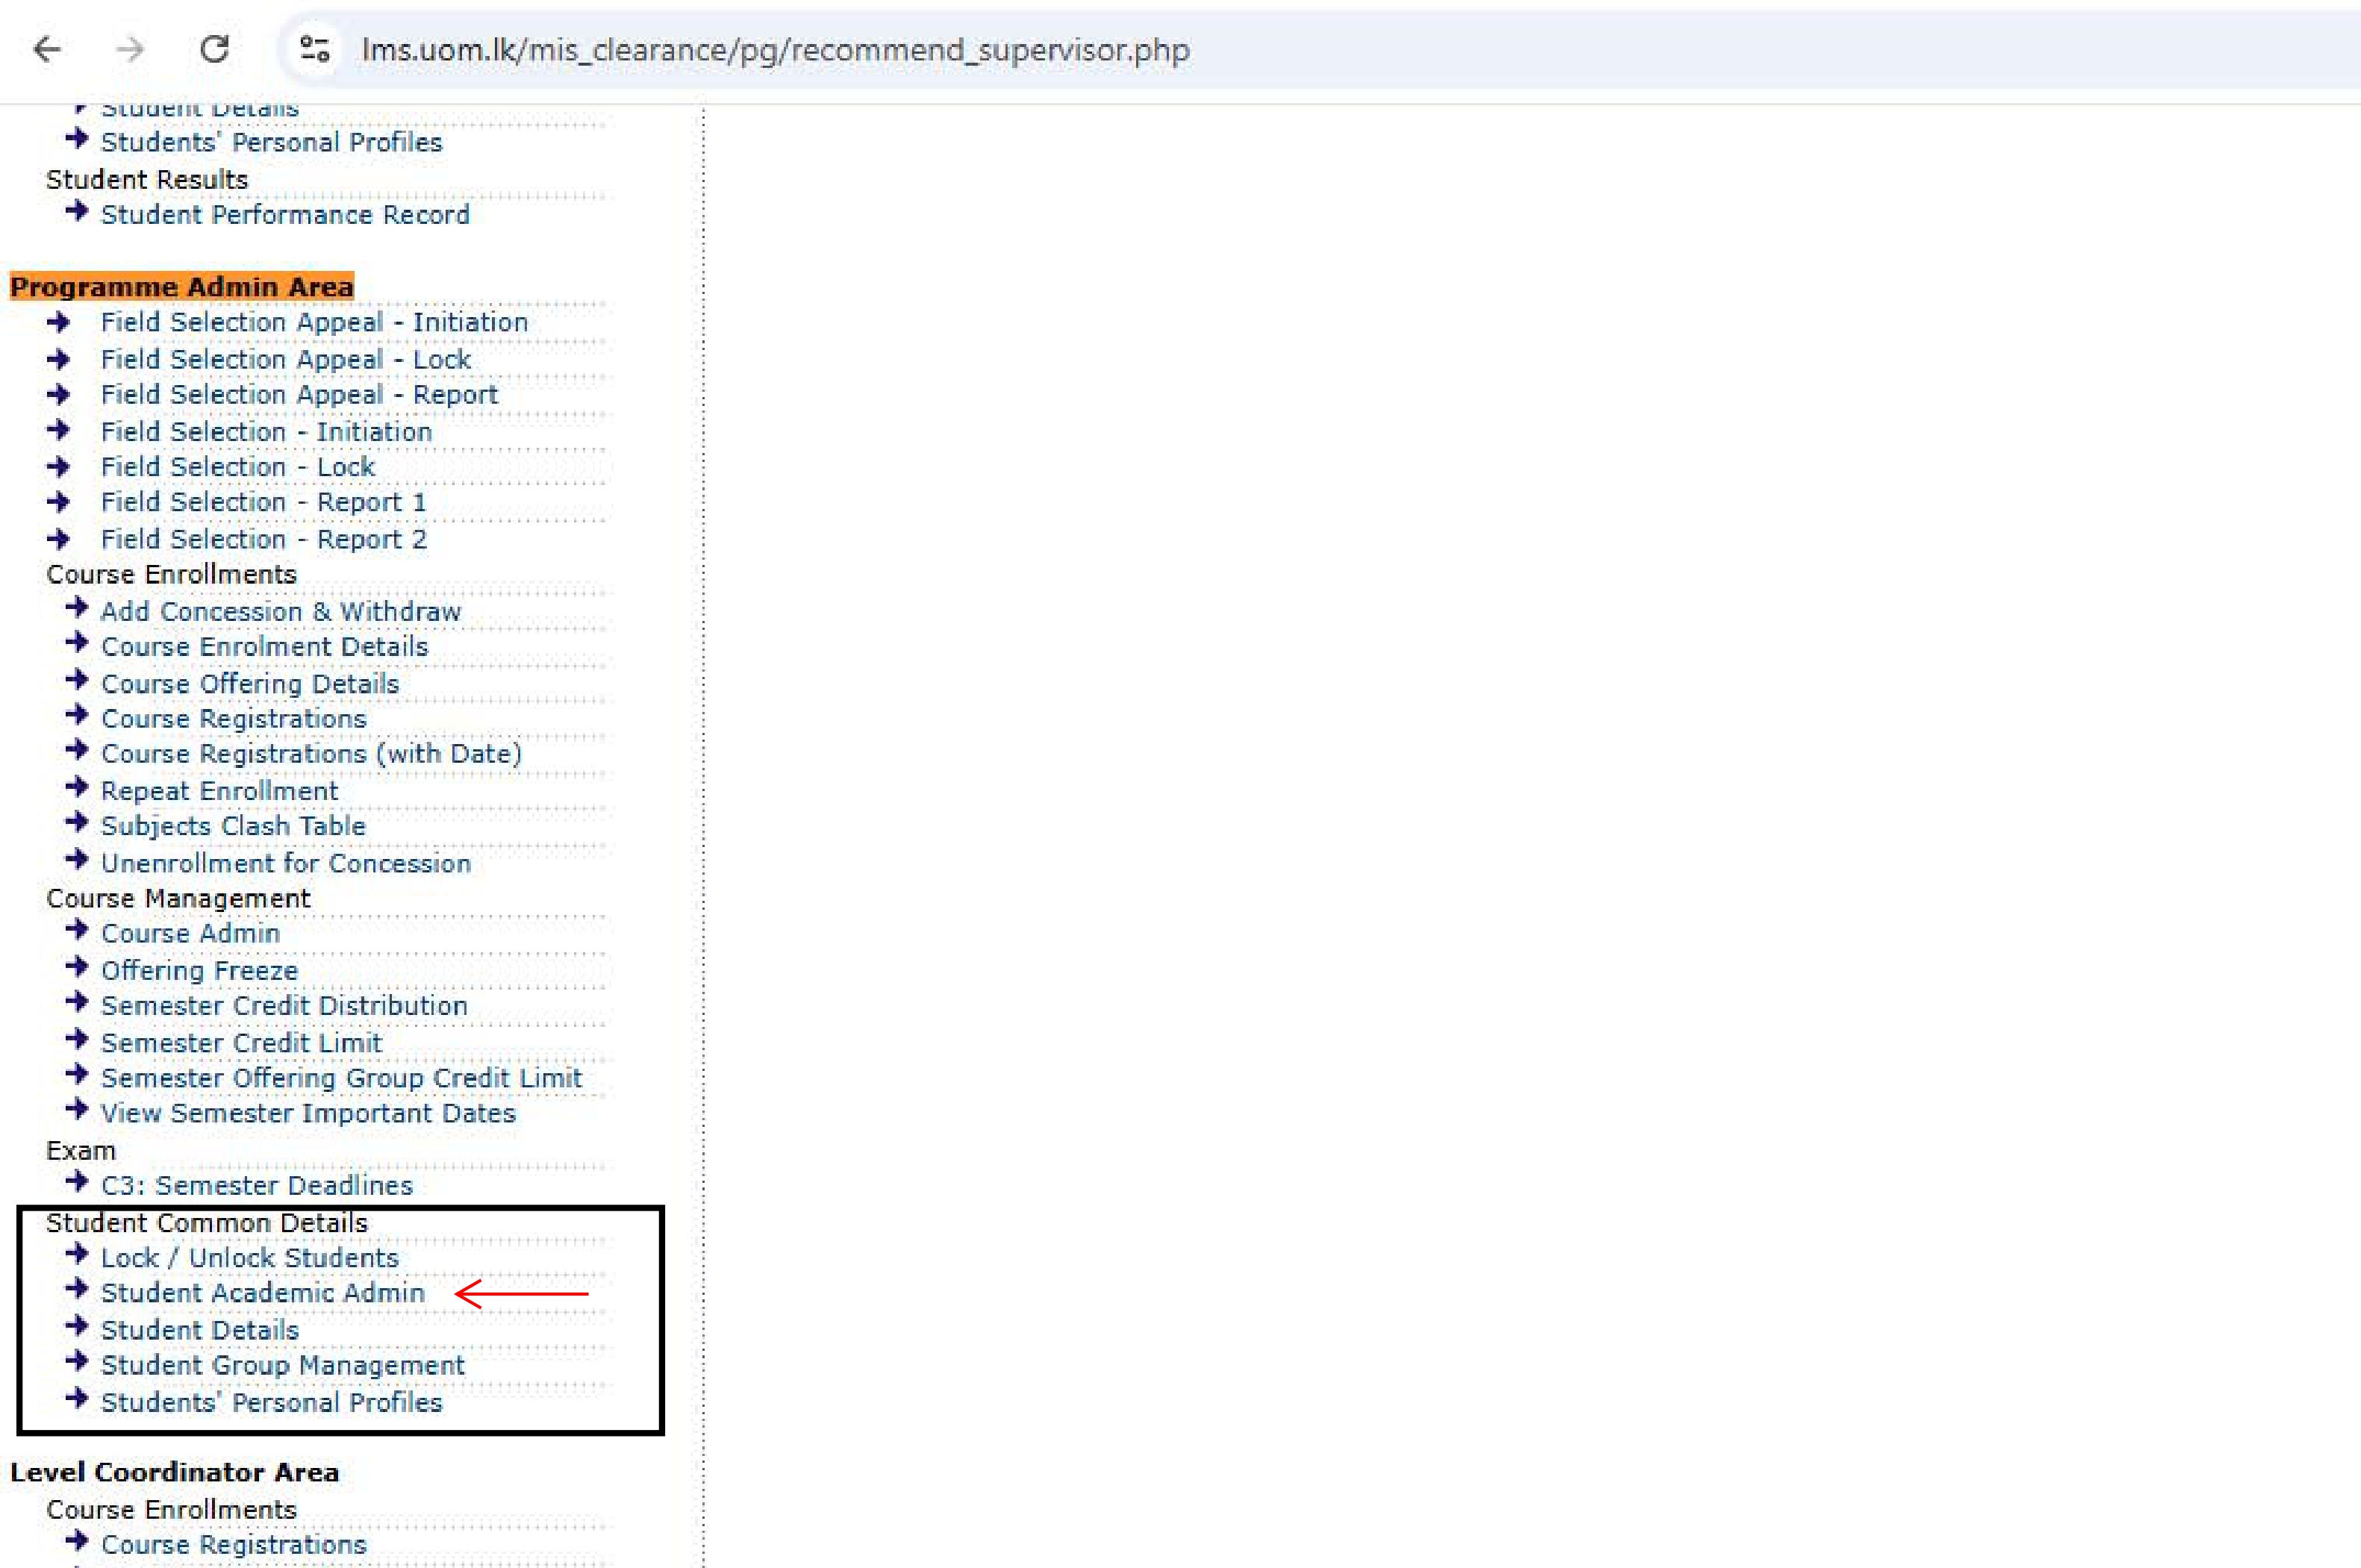
Figure 2: Programme Admin Area and Student Academic Admin
Selecting Degree Programme, Intake/Academic Year
After clicking on Student Academic Admin, the system will display the interface as shown in Figure 3. Follow the steps below:
-
Select the Degree Programme using the first dropdown.
-
Select the Department using the second dropdown. ⚠️ Note: This will only have one option — the department code relevant to the selected degree programme.
-
Choose the Intake/Academic Year using the third and fourth dropdowns.
-
Click the Go button to proceed.
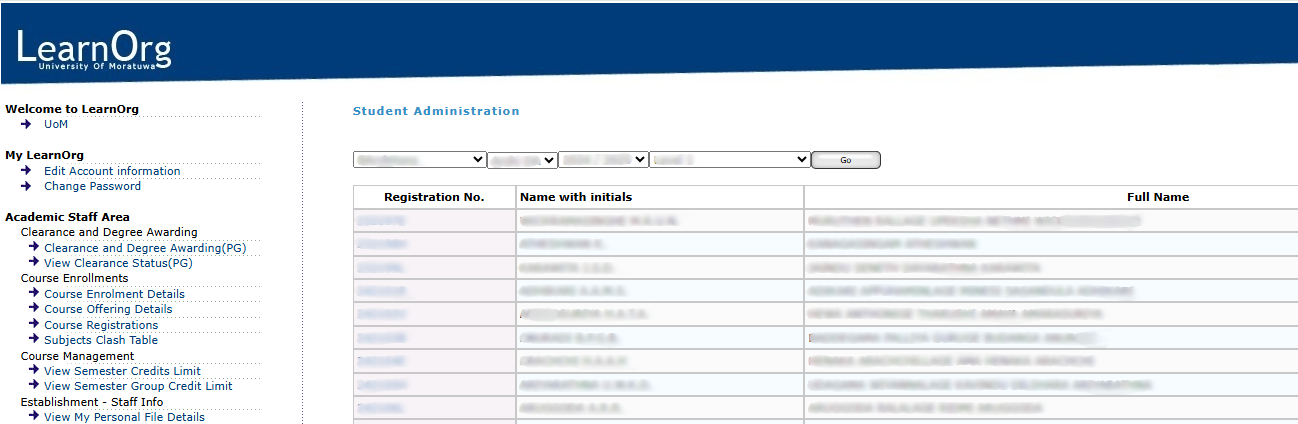
Figure 3: Student Academic Admin Interface
Accessing the Student Transferring Section
After clicking the Go button, the Student Transferring Section for the selected batch will appear beneath the student list, as shown in Figure 4. This interface allows users to transfer all students to a different level or academic year.
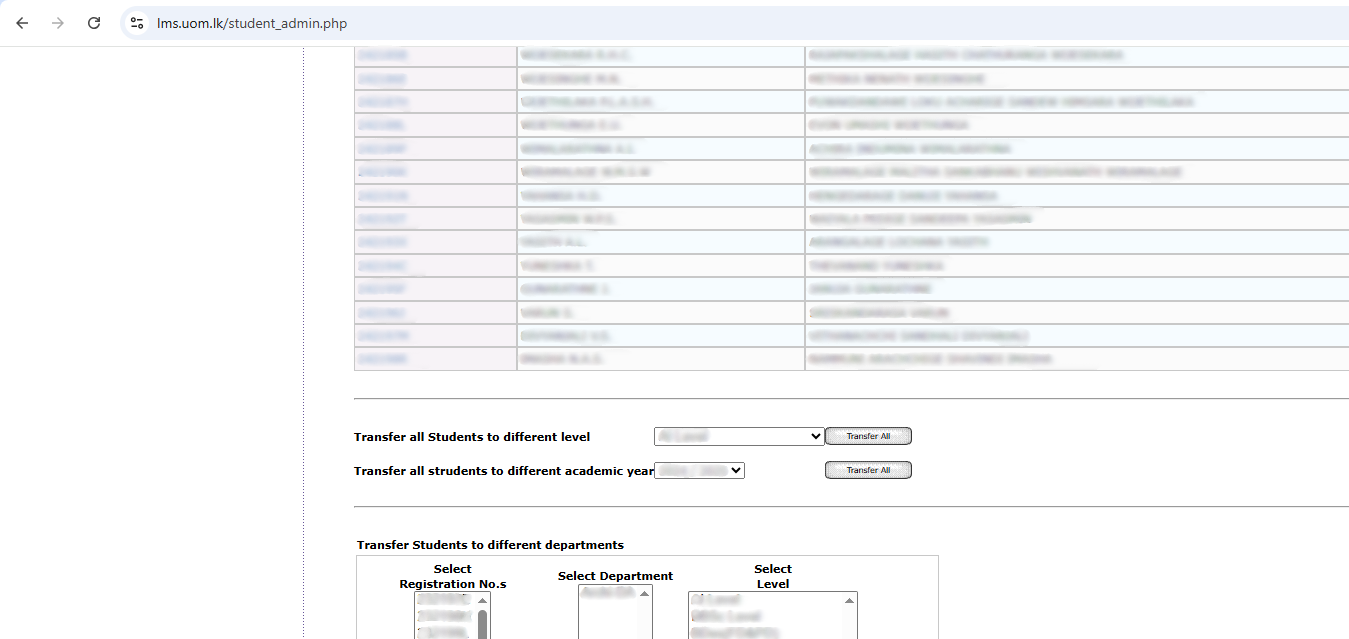
Figure 4: Student Transferring Section
Transferring All Students to Level 6 (Temporary Step)
Important Note: Not all students progress to the next level simultaneously. Use "Level 6" as a temporary supportive level to avoid potential inconsistencies or system conflicts.
-
Select “Level 6” from the Transfer all Students to different level dropdown.
-
Click on the "Transfer All" button.
All students will be moved to Level 6 while keeping their current academic year unchanged.
Transferring Students to the Correct Academic Year
-
In the Student Academic Admin interface (see Figure 3), search for students who are currently at Level 6 with their current academic year.
-
From the Transfer all Students to different academic year dropdown, select the correct academic year.
-
Click on the "Transfer All" button.
Students will now be assigned to the correct academic year, while still remaining at Level 6.
Transferring Students to the Correct Level
-
Again, use the dropdowns in the Student Academic Admin interface to search for students with the updated academic year and Level 6.
-
From the Transfer all Students to different level dropdown, select the correct level.
-
Click on the "Transfer All" button.
Students will now be fully transferred to the correct academic year and correct level.
Final Verification
To ensure the transfer process is completed correctly:
-
Use the dropdown filters in Figure 3 to search for students with the updated academic year and level.
-
Confirm that all records have been updated accordingly.
Guidelines for Registering Repeat Students (Manually)
Step 1: Login to the System
Login to the System
To begin the process of module offering, users must first log in to the Learning Management System (LMS) of the University of Moratuwa.
Accessing the LMS
-
Open a web browser (recommended: Mozilla Firefox or Google Chrome) and navigate to the following URL:
https://lms.uom.lk/login_index.php
Entering Login Credentials
-
Enter your Username and Password in the appropriate fields.
-
Click the Login button to access the LMS dashboard.
⚠️ Note: If you have forgotten your password, use the "Forgot Password" link on the login page.
Figure 1: LMS Login Page
Step 2: Define Semester Lock Date
Define Semester Lock Date
After successfully logging into the Learning Management System (LMS), you must define the Semester Lock Date before enrolling repeat students. This is done via the Semester Deadlines functionality, accessible through the Programme Admin Area.
⚠️ Note: If you do not see or have access to the UG Coordinator Area, your Director or Head of the respective Division or Department can request access from the CITeS Division by opening a ticket through the IT Helpdesk at https://helpdesk.uom.lk.
Navigating to Offering Freeze
-
From the LMS dashboard, locate the menu on the left-hand side of the screen.
-
Click on the “Semester Deadlines” option under the Exam section to begin the process.
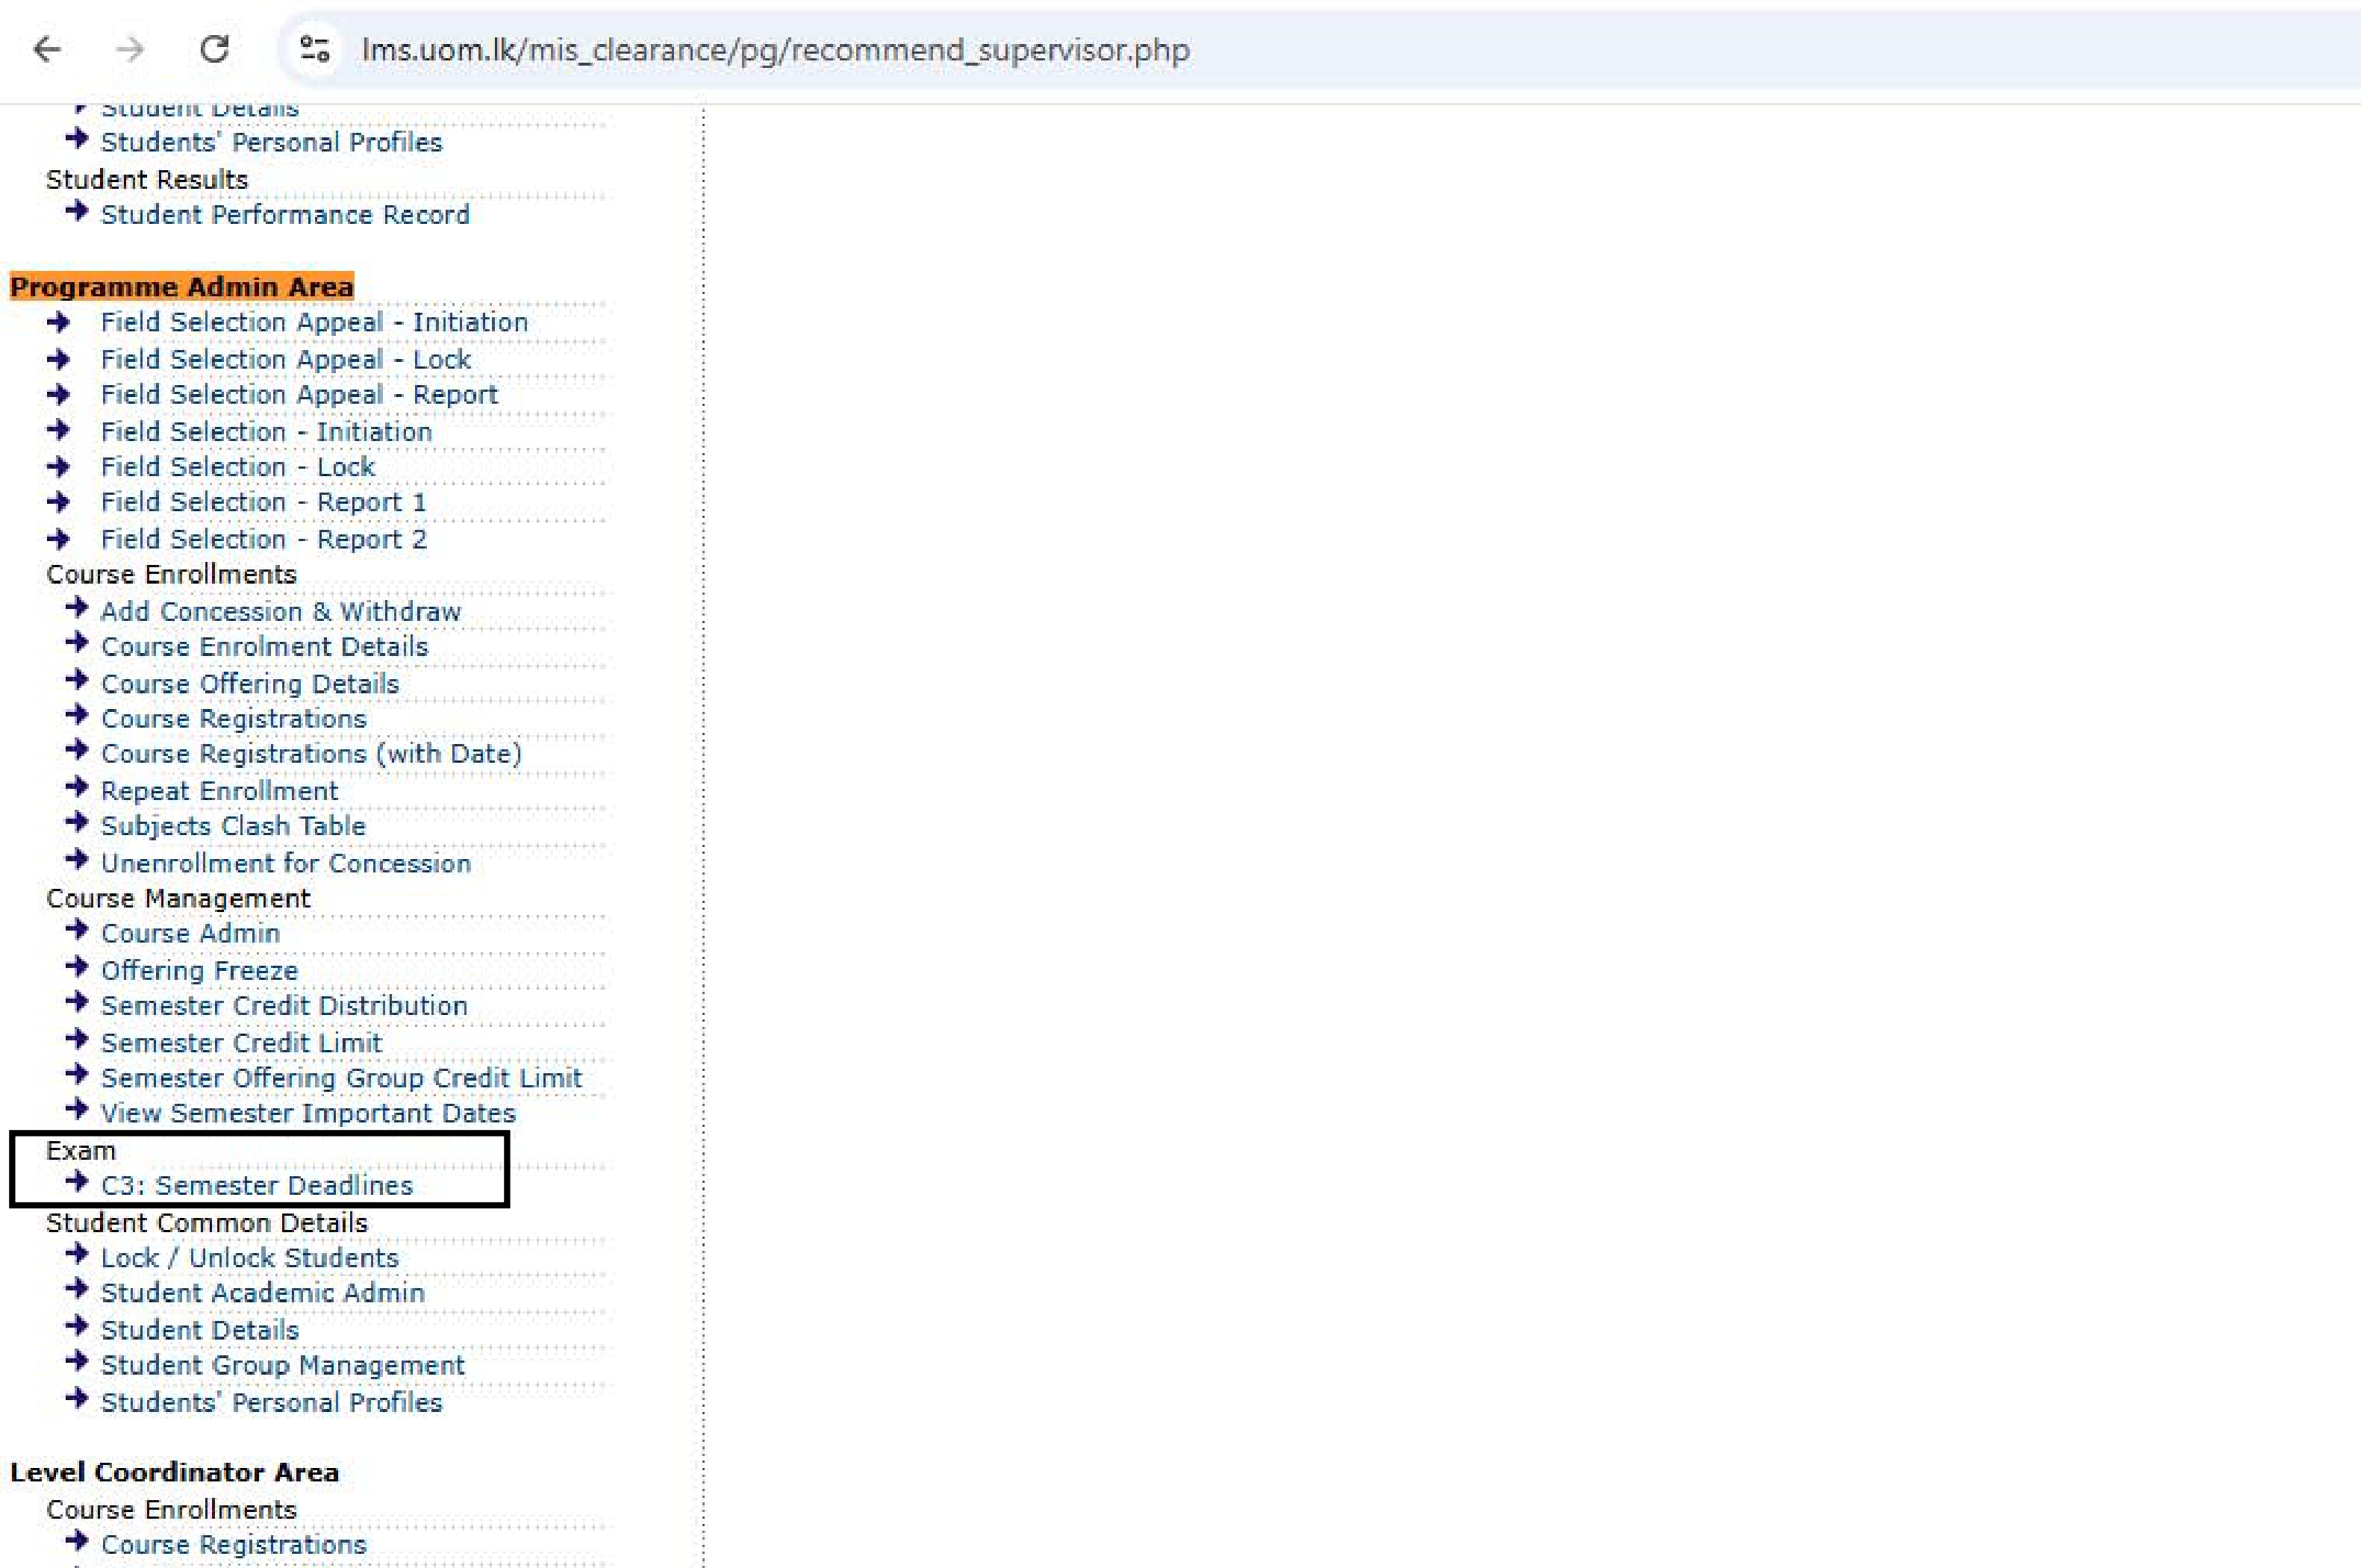
Figure 2: Programme Admin Area and Semester Deadlines
Selecting Degree Programme, Academic Year, Level & Semester
After clicking Semester Deadlines, the system will display the Interface to Define Semester Management Dates. Follow the steps below:
- Select the Degree Programme using the first dropdown.
- Choose the Academic Year using the second dropdown.
- Select the Level using the third dropdown.
- Select the Semester using the fourth dropdown.
- Click the Go button to proceed.
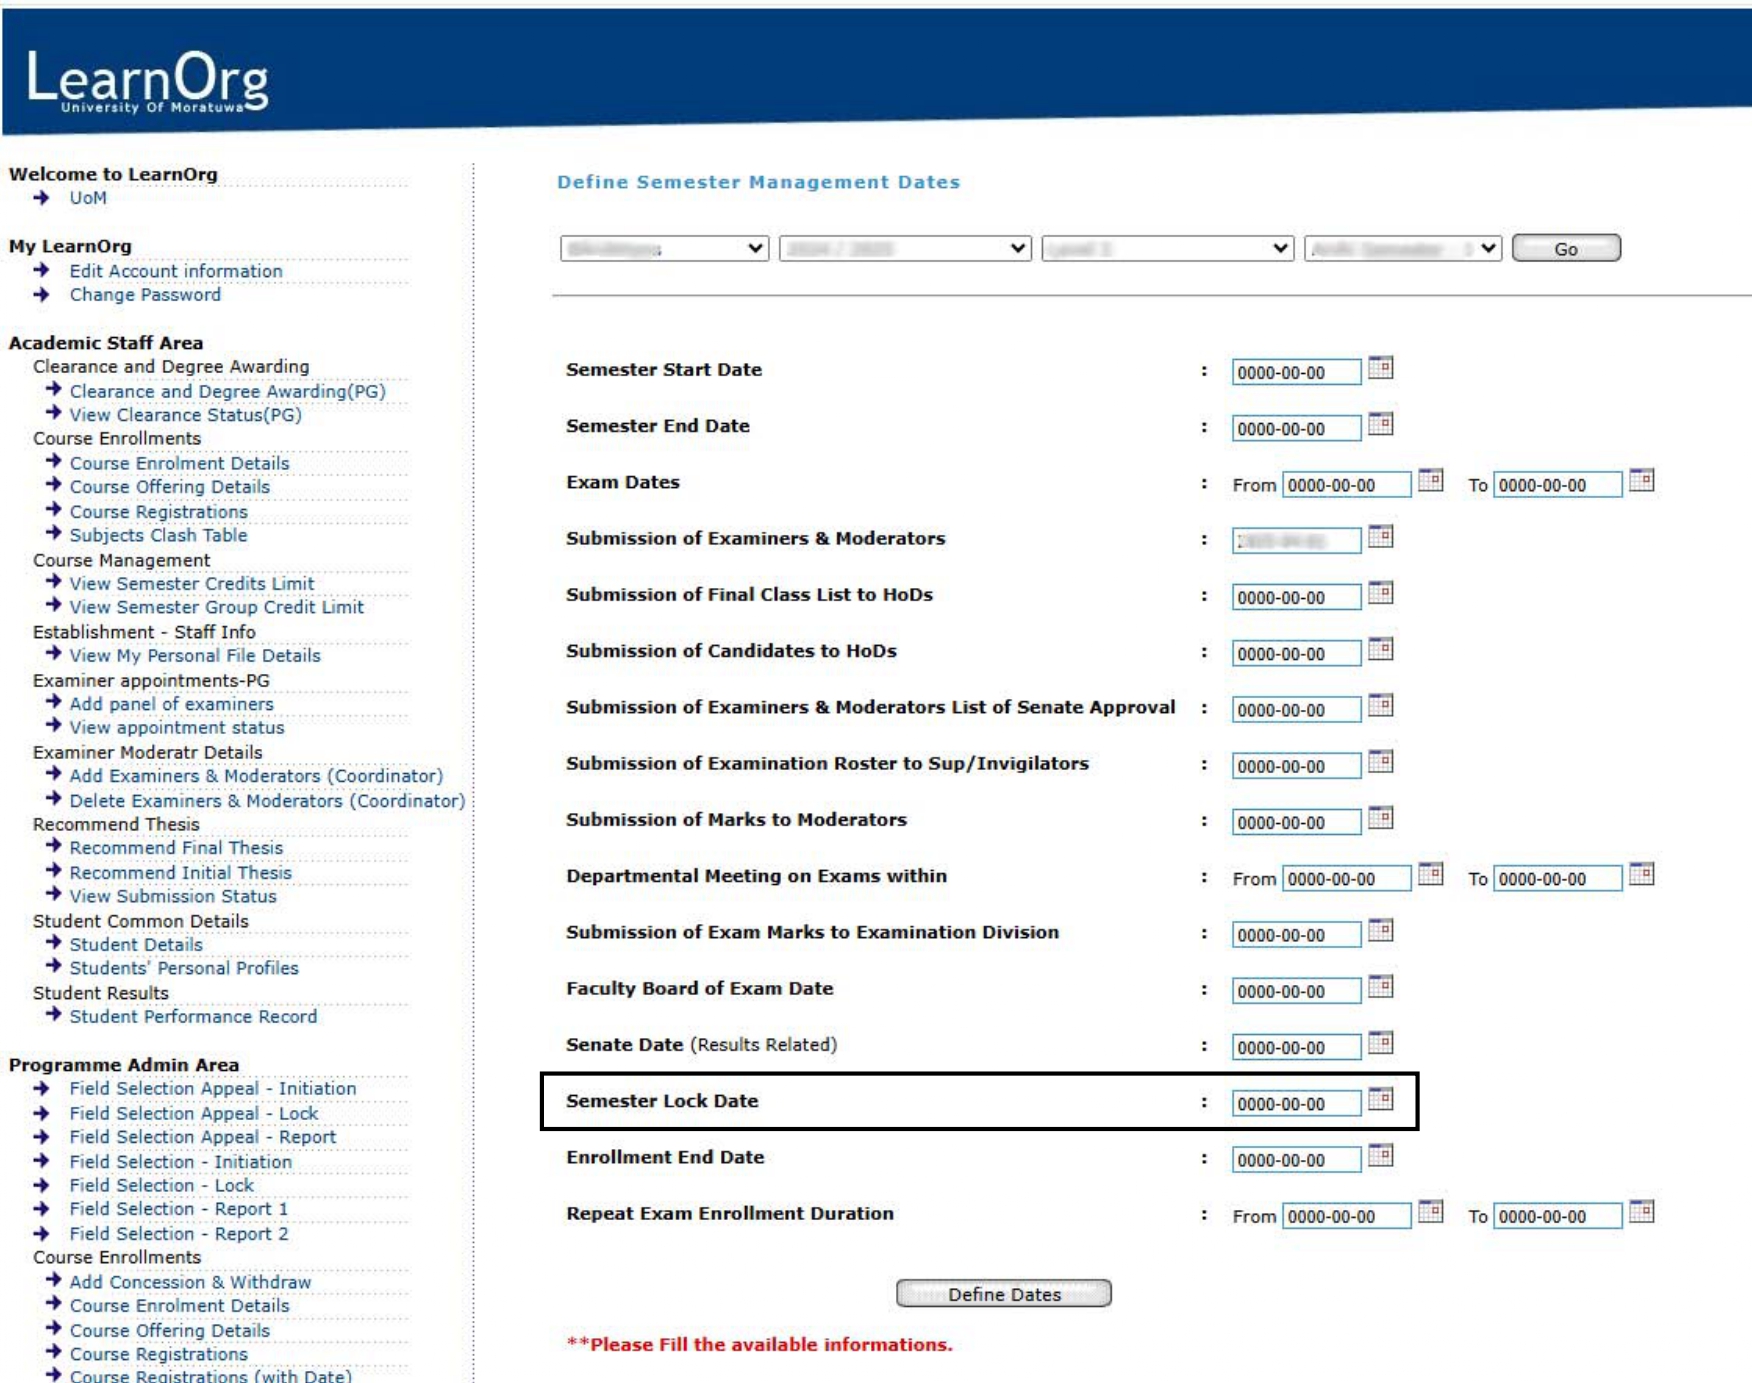
Figure 3: Interface to Define Semester Management Dates
Define the Semester Lock Date
To enroll students as repeat candidates, the Semester Lock Date must be either today’s date or a future date.
⚠️ Note: The Semester Lock Date impacts several functions handled by different departments. Please ensure that a date has not already been set before defining a new one.
-
If the field is empty or needs to be updated, you can proceed to define the lock date.
-
Click on the “Define” button to save the selected date.
Once defined successfully, a confirmation message will appear at the top of the screen: “Successfully defined.”
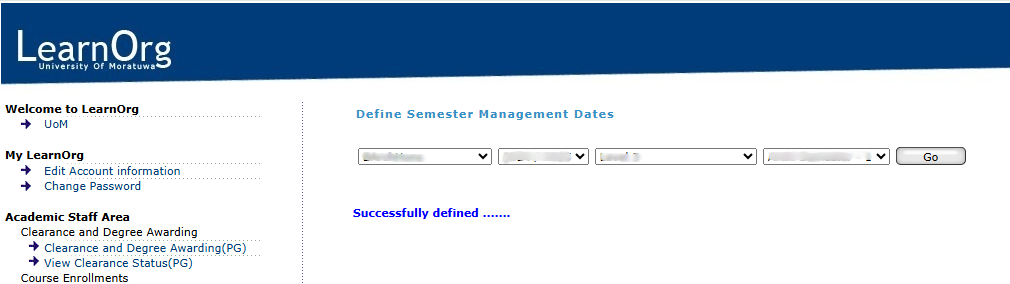
Figure 4: Define Date Success Message
Step 3: Repeat Enrollment
Repeat Enrollment
After successfully defining the Semester Lock Date, you can proceed to enroll students in relevant modules as repeat candidates.
Navigating to Repeat Enrollment
-
From the LMS dashboard, locate the menu on the left-hand side of the screen.
-
Click on the “Repeat Enrollment” option to begin the process, as shown in Figure 5.
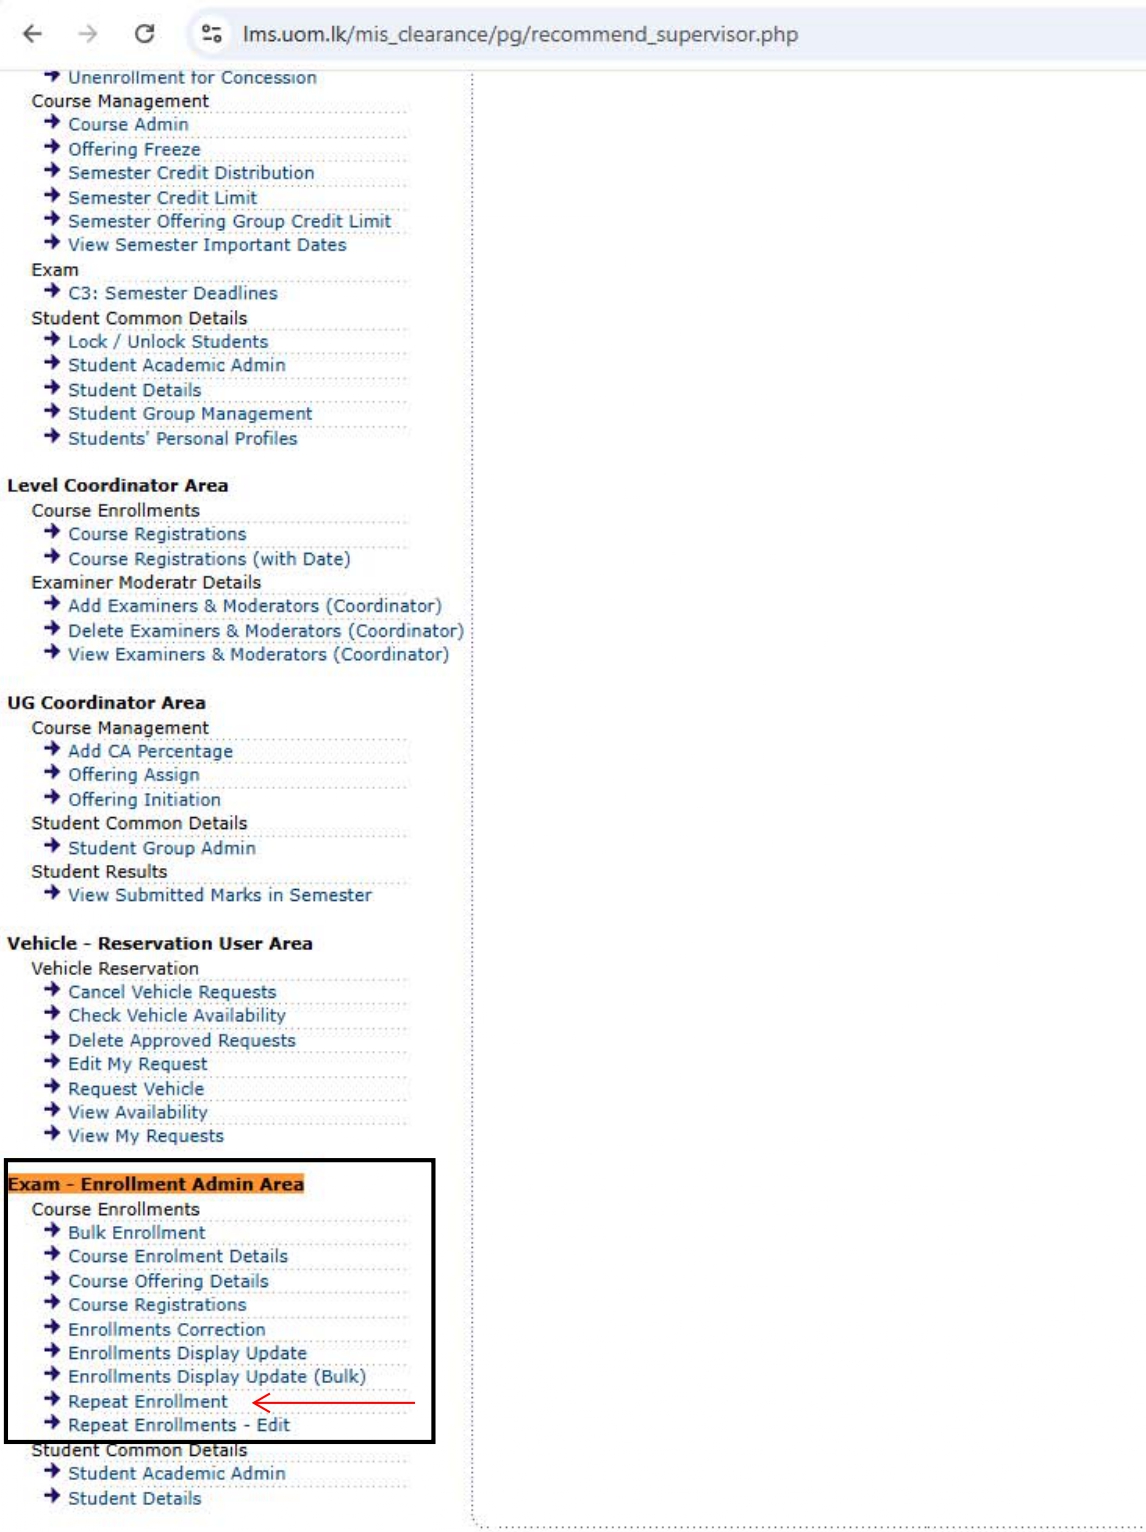
Figure 5: Accessing Repeat Enrollment Option
Selecting Degree Programme, Intake/Academic Year, and Semester
After clicking on Repeat Enrollment, the system will display the interface as shown in Figure 6. Follow the steps below:
-
Select the Degree Programme using the first dropdown.
-
Select the Department using the second dropdown. ⚠️ Note: This will only have one option — the department code relevant to the selected degree programme.
-
Choose the Intake/Academic Year using the third and fourth dropdowns.
-
Select the Semester using the fifth dropdown.
-
Click the Go button to proceed.
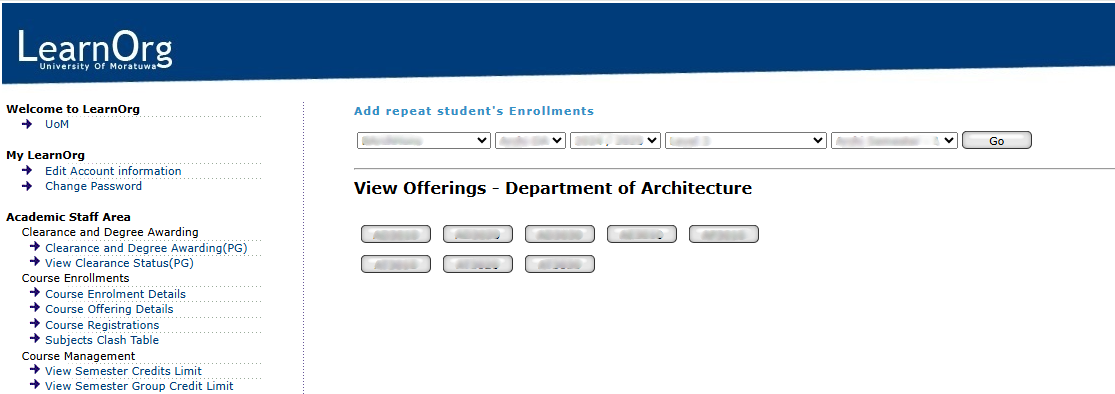
Figure 6: Repeat Enrollment Interface
Selecting the Course and Searching for a Student
-
Click on the relevant module to enroll repeat candidates.
-
The system will display a search interface as shown in Figure 7.
-
Use the Search Box to enter the Student Registration Number.
-
Click the Display button to proceed.
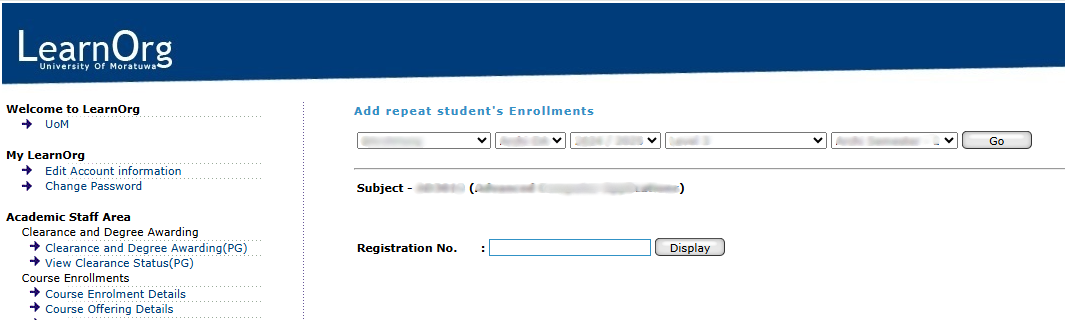
Figure 7: Search Interface for Student Enrollment
Accessing the Repeat Enrollment Interface for a Specific Student
Once the Display button is clicked, the Repeat Enrollment Interface for the specific student will appear, as shown in Figure 8. This interface allows users to enter enrollment details.
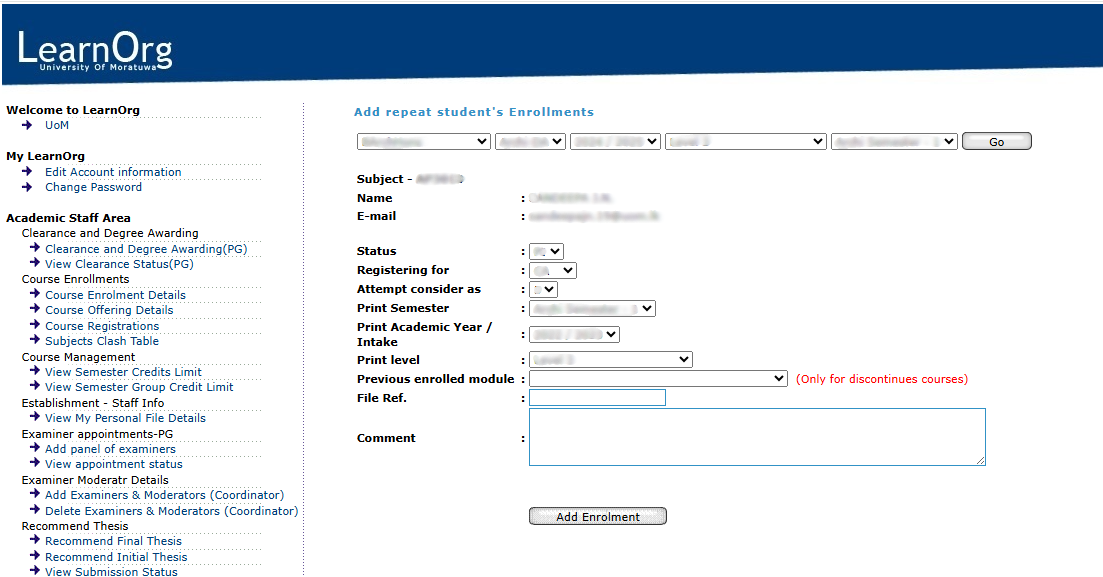
Figure 8: Repeat Enrollment Interface for Specific Student
Entering Repeat Enrollment Details
Fill in the following required fields accurately:
| Field Name | Description |
|---|---|
| Status | Dropdown options: • PF – Previous attempt result is 'Fail' • PI – Previous attempt result is 'Incomplete' • U – Request to update previous result • N – Approved concession for the module • W – Previously withdrawn module |
| Registering for | Dropdown options: • CA – Continuous Assessments only • FE – Final Examination only • Both – Both CA and FE |
| Attempt Considered As | Select the appropriate attempt (e.g., 2nd, 3rd, etc.) ⚠️ If the student has an approved concession, select "1st" |
| Print Semester | Select the relevant semester (Default value can be kept) |
| Print Academic Year / Intake | The academic year of the student’s first attempt (Default value can be kept) |
| Print Level | Select the relevant level (Default value can be kept) |
| Previous Enrolled Module | Fill this if registering for a discontinued module |
| File Ref. | Optional field for future reference |
| Comment | Optional comments for internal reference |
Table 1: Required Fields for Repeat Enrollment
Finalizing Enrollment
-
Double-check all entered information for accuracy.
-
Click the Add Enrollment button to complete the repeat registration.
Once submitted successfully, the following message will appear at the top of the screen: “Successfully enrolled...”
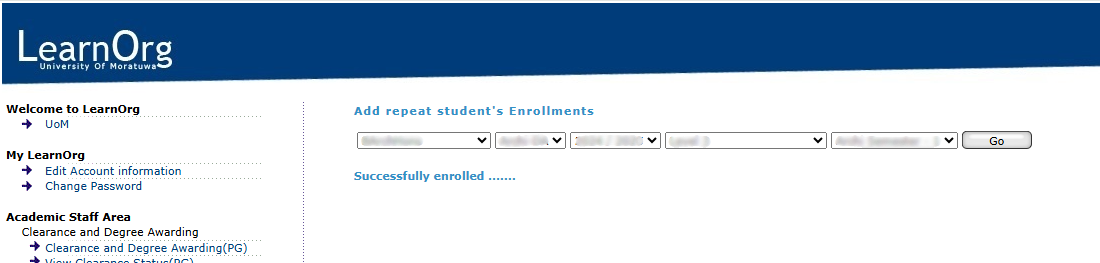
Figure 9: Success Message After Repeat Enrollment
Repeat Enrollments - Edit
Repeat Enrollments – Edit
After completing a repeat enrollment, if you need to modify any of the fields previously entered, such as Status, Registering for, or Attempt, you can do so using the Repeat Enrollments – Edit feature.
Once successfully logged into the Learning Management System (LMS), users can navigate to the Exam – Enrollment Admin Area, where they are granted access to the Repeat Enrollments – Edit functionalities.
Navigating to Repeat Enrollments – Edit
-
From the LMS dashboard, locate the menu on the left-hand side of the screen.
-
Click on the “Repeat Enrollment – Edit” option to begin the editing process, as shown in Figure 10.

Figure 10: Accessing Repeat Enrollment – Edit Option
Searching for a Student
-
After clicking on Repeat Enrollment – Edit, the system will display a search interface, as shown in Figure 11.
-
Use the Search Box to enter the Student Registration Number.
-
Click the View button to proceed.
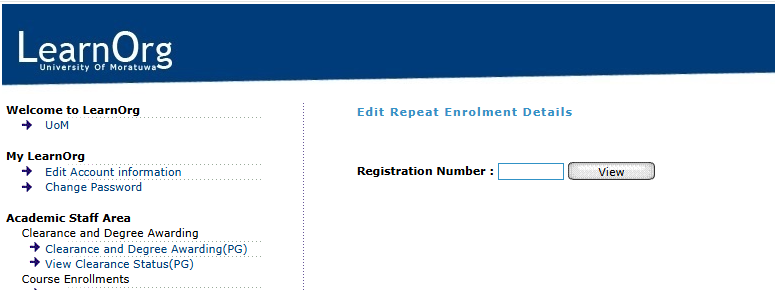
Figure 11: Search Interface for Student Enrollment
Editing Repeat Enrollment Details
-
Once the View button is clicked, an interface like Figure 12 will appear.
-
From this interface, you can edit the following fields:
-
Status
-
Registering for
-
Attempt
-
-
After making the necessary changes, click the Save button to apply the updates.
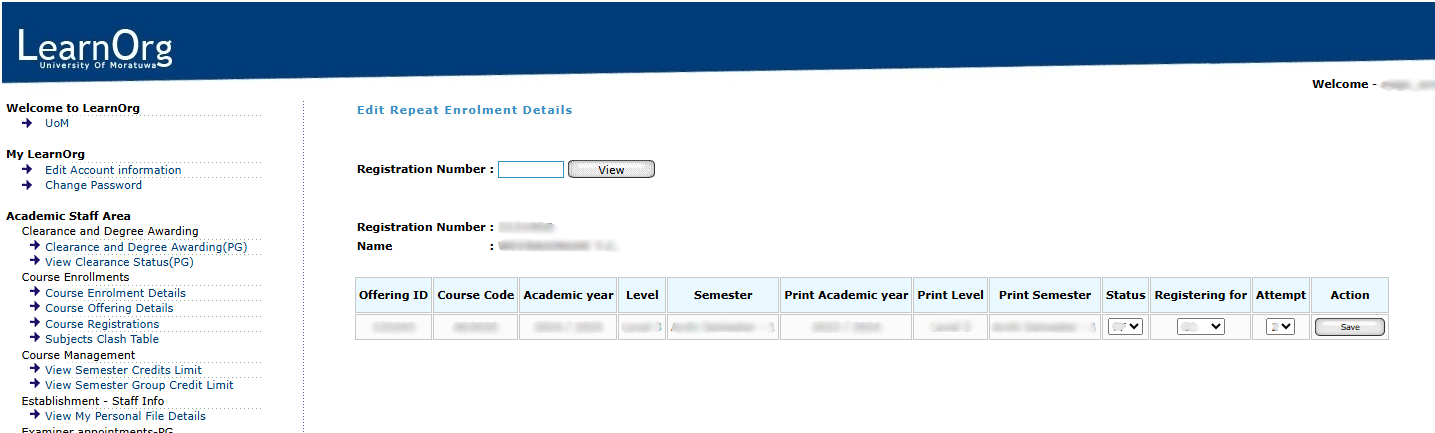
Figure 12: Edit Interface for Repeat Enrollment
Confirmation of Successful Update
Once the details are successfully updated, a confirmation message will appear at the top of the screen: “Successfully updated...”
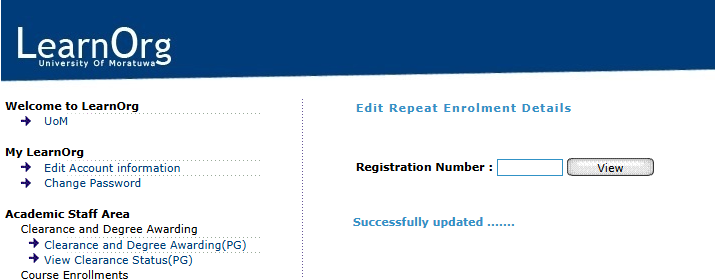
Figure 13: Success Message After Repeat Enrollment Edit
Other
Check Course Offering Details
Check Course Offering Details
Once successfully logged into the Learning Management System (LMS), users can proceed to the Academic Staff Area, where they are granted access to the Course Offering Details functionalities.
To view the module details, select the relevant Degree Programme, Academic Year/Intake, and Level/Semester.
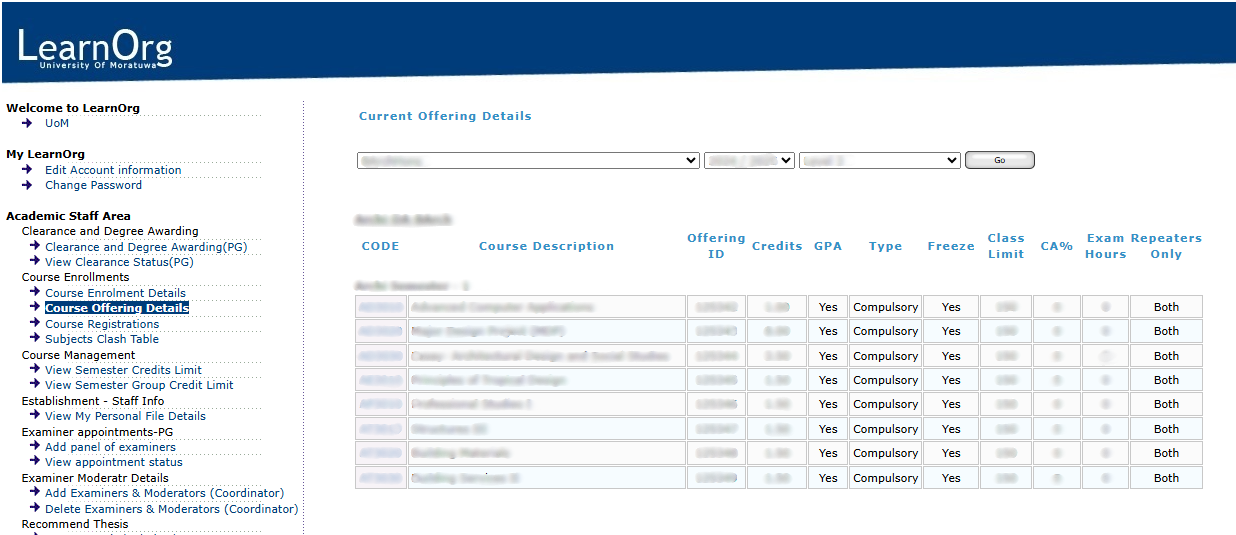
Figure 1: Course Offering Details Interface
Check Course Registration Details
Check Course Registration Details
Option 1:
Once successfully logged into the Learning Management System (LMS), users can proceed to the Academic Staff Area, where they are granted access to the Course Registration functionalities.
To view the module details, select the relevant Degree Programme, Academic Year/Intake, Level and Semester.
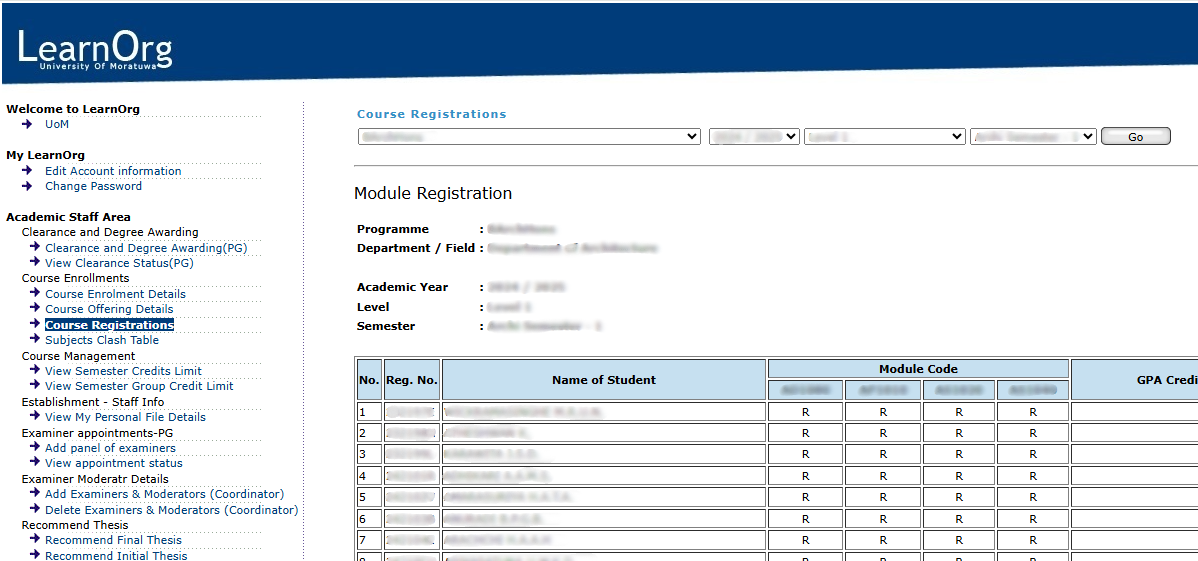
Figure 2: Course Registration Details Interface
Student Module Registration List
If you need to get the student module registration list you can use the "Download PDF" button under the student list as shown in Figure 3. You can use this pdf document as shown in Figure 4 to get the confirmation from the students about their registration.
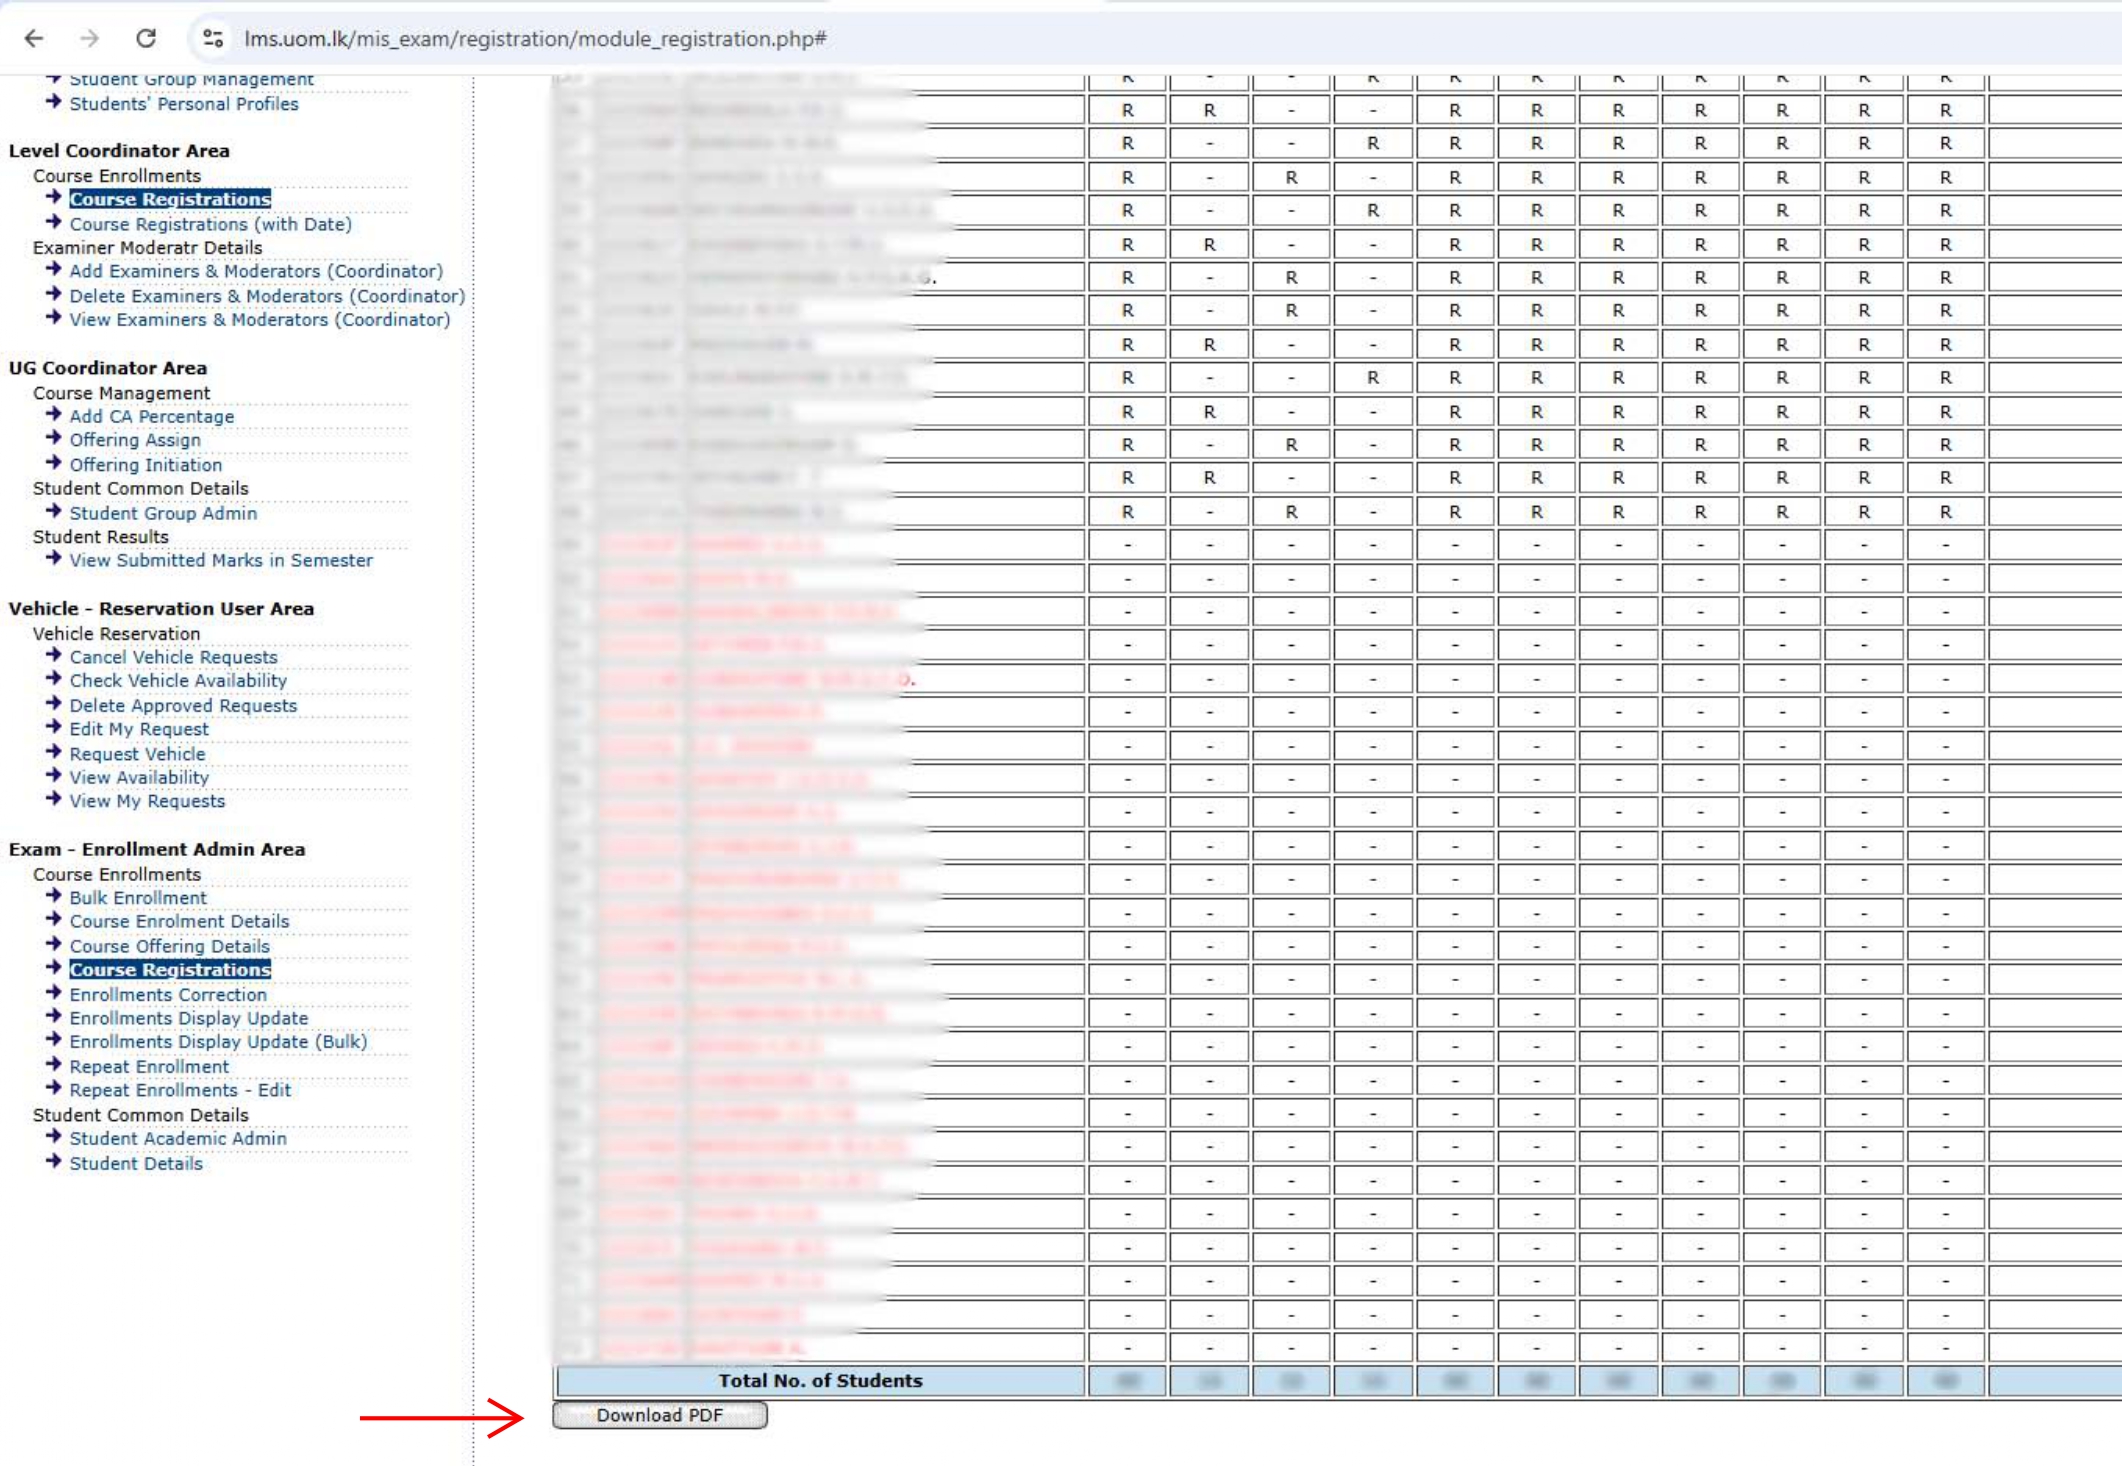
Figure 3: Section for Download Student Module Registration List
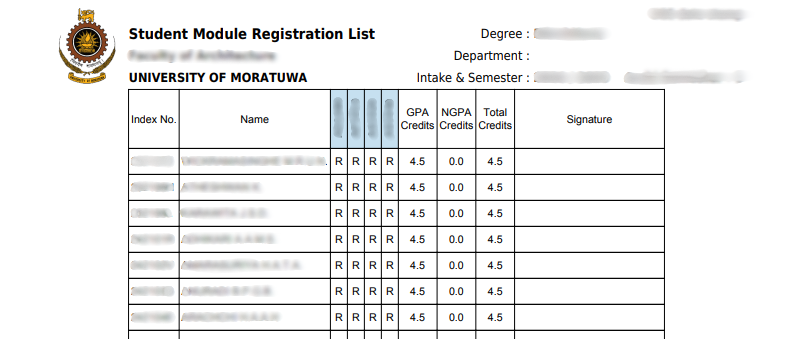
Figure 4: Student Module Registration List
Option 2:
If You need to get Course Registration details with date You can access Course Registrations (with Date) option.
Once successfully logged into the Learning Management System (LMS), users can proceed to the Academic Staff Area, where they are granted access to the Course Registration functionalities.
To view the module details with registration date, select the relevant Degree Programme, Academic Year/Intake, Level and Semester.
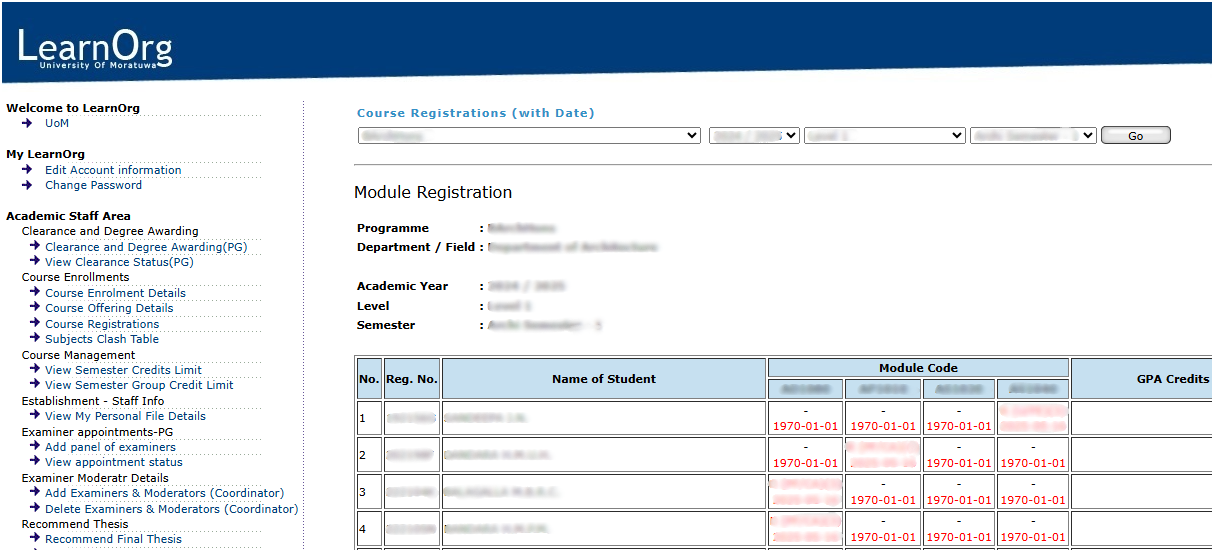
Figure 5:
Student Lock/Unlock
Student Lock/Unlock
Once successfully logged into the Learning Management System (LMS), users can proceed to the Programme Admin Area, where they are granted access to the Student Common Details functionalities.
Click on the Lock / Unlock Students option to lock or unlock a student within the system.
To search for a specific student, select the relevant Degree Programme, Department, Academic Year/Intake, and Level and click on the "Go" button.
Once the student list appears you can "Lock" or "Unlock" students by click on specific radio button and then need to click on the "Save" button which is appear under the student list.
If needed, we can Lock/Unlock complete student list at once by using "Lock All" or "Unlock All" buttons appear under the student list. To complete need to click on "Save" button.
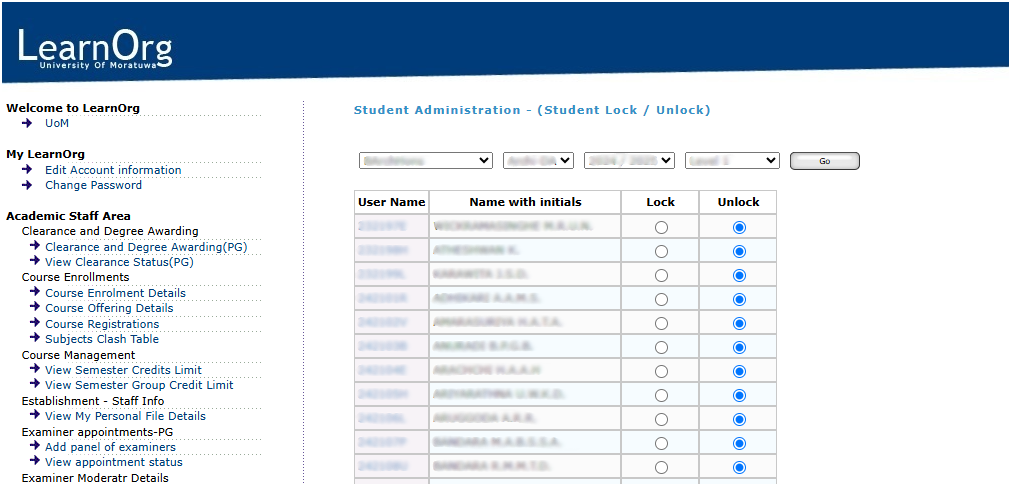
Figure 6 -
Check Student Details
Check Student Details
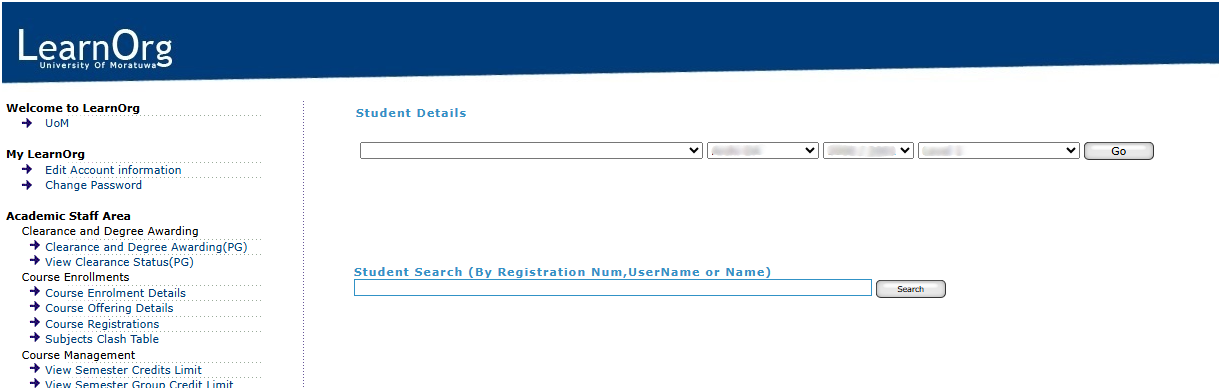
Figure 7 -
Students' Personal Profiles
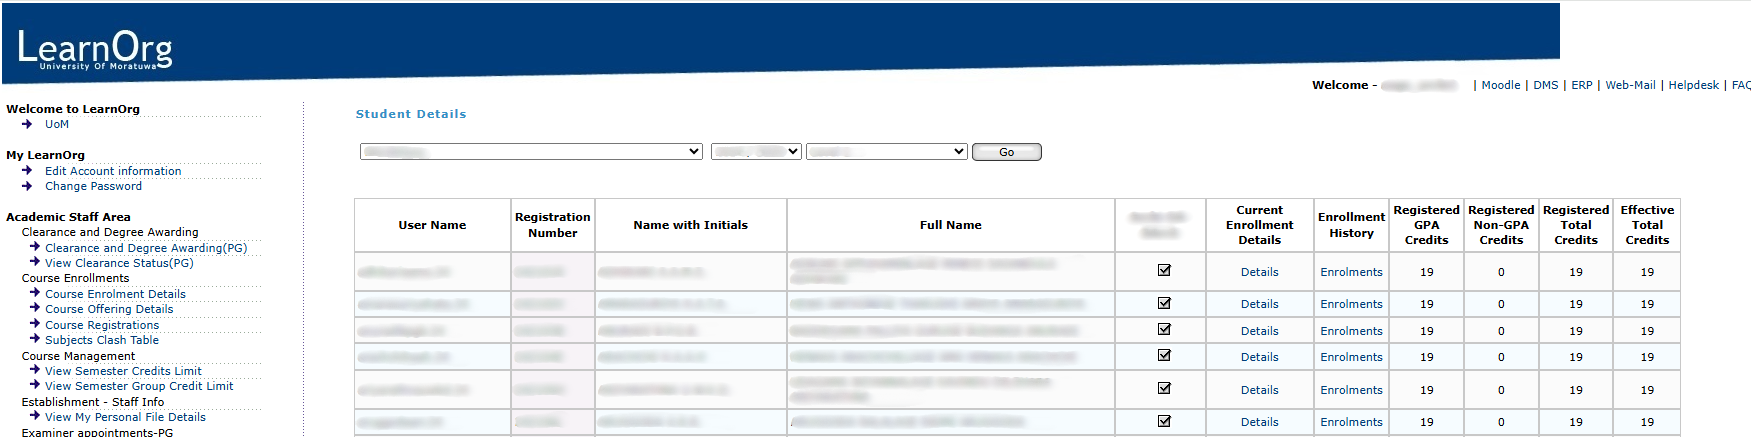
Figure 8 -
Add new course
Add new course
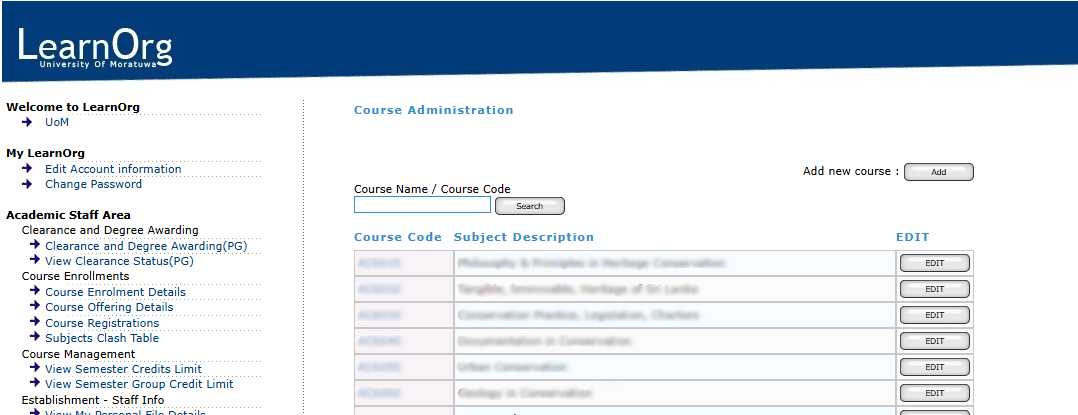
Figure 9 -
Student Group Management
Student Group Management
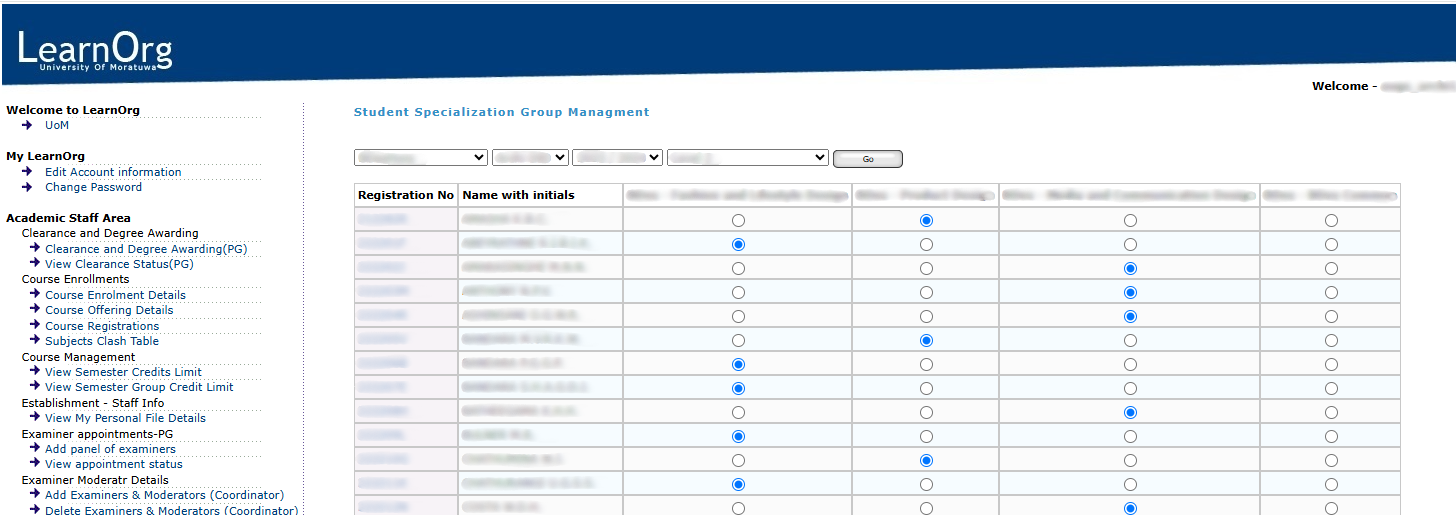
Figure 10 -
Bulk Enrollment
Bulk Enrollment
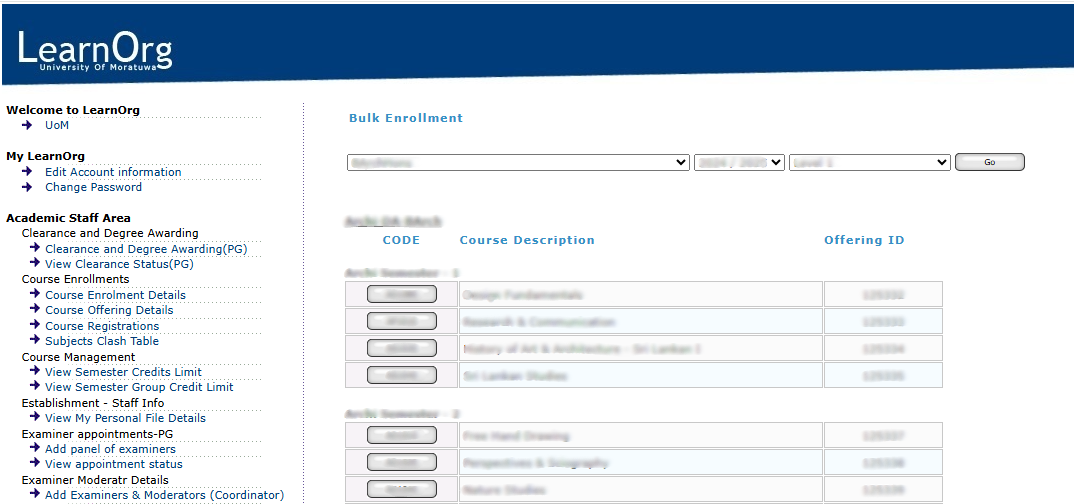
Figure 11 -
Enrollments Correction
Enrollments Correction
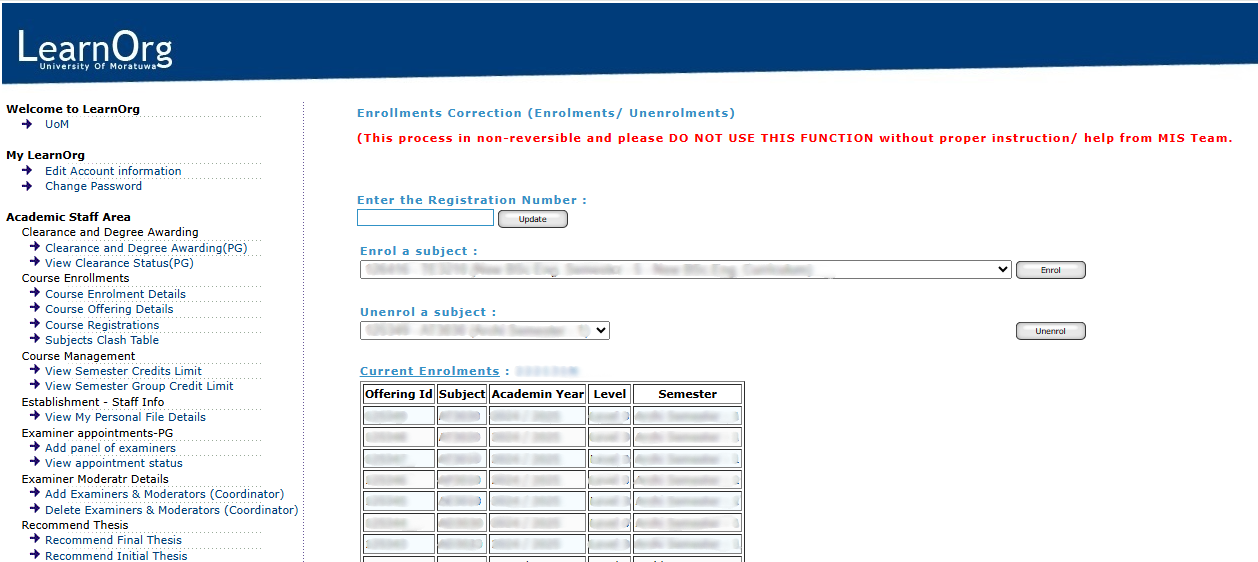
Figure 12 -
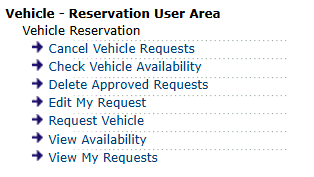
Vehicle Reservation
If you have the permission to reserve vehicles you should see the menus below in the LearnOrg side bar.
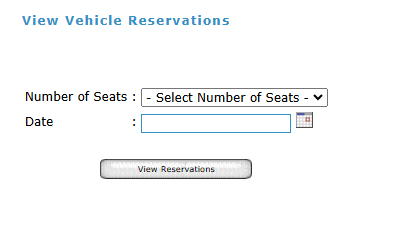
First check the availability of a vehicle by clicking on "Check Vehicle Availability". The following form will be loaded to the main area. Select the number of seats from the dropdown, the date from the date selector and click "View Reservation"
To request a vehicle click on "Request Vehicle", The request form will be loaded to the main area on the right. All the fields that has a '*' is mandatory.
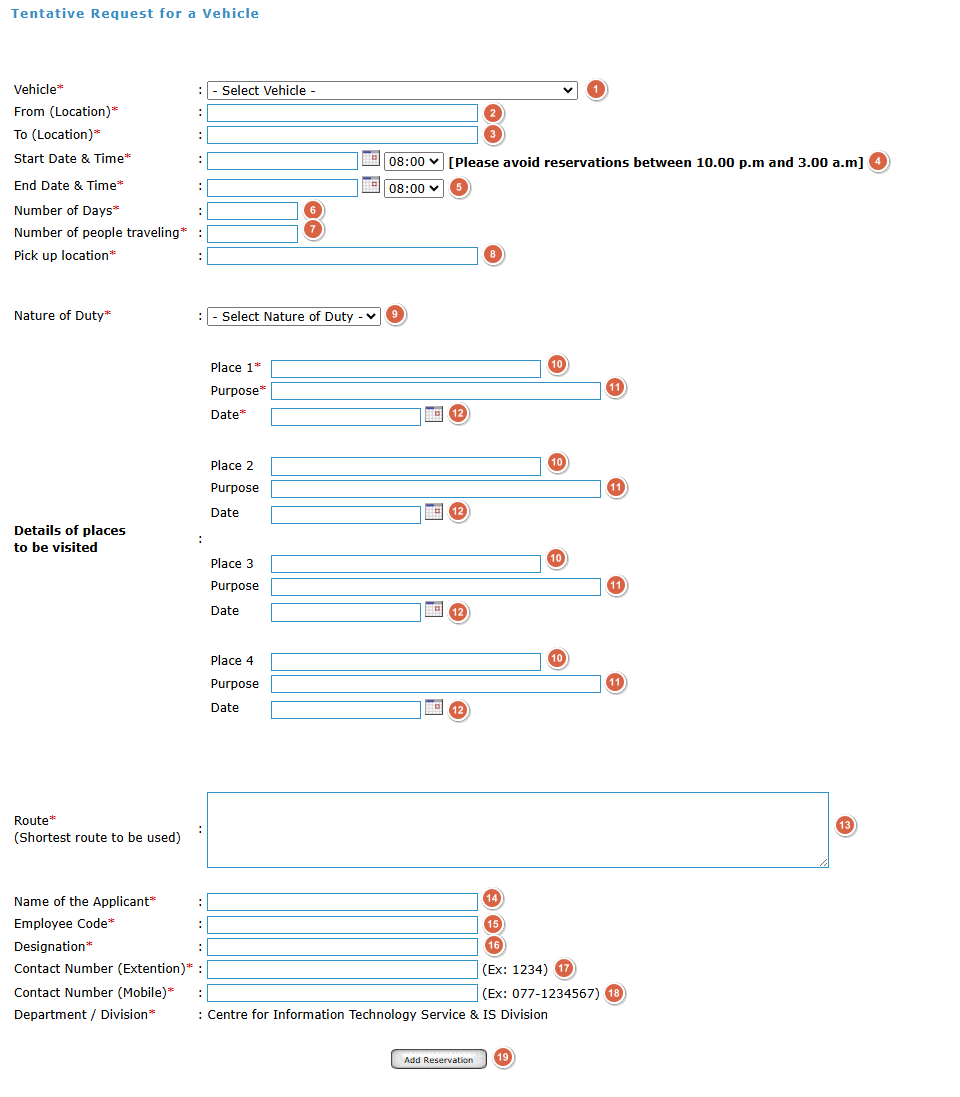
For sections 1 to 19 refer the reference guide below,
| Section | Reference Guide |
| 1 | Select the required vehicle by clicking the dropdown menu |
| 2 | Enter the location where your journey starts. (do not enter the pick up location as the start location even if it is different than your start location) |
| 3 | Enter your destination. |
| 4 | Select the start date and time from the provided calendar and the drop down (do not type in). Do not reserve between 10.00pm and 3.00am (between 22:00 and 03:00 hours) |
| 5 | Select the end date and time from the provided calendar and the drop down (do not type in). Do not reserve between 10.00pm and 3.00am (between 22:00 hours and 03:00 hours). |
| 6 | Enter the total number of days taken for the journey. |
| 7 | Enter the total number of people participating in the journey. |
| 8 | Enter the location where you will meet the driver. |
| 9 |
Select the relevant category out of below three
|
| 10 |
Enter your destination. If you have more than one use the additional spaces. You can add maximum of four. |
| 11 |
Enter the purpose. If you have more than one use the additional spaces. You can add maximum of four. |
| 12 |
Select the date. If you have more than one use the additional spaces. You can add maximum of four. |
| 13 |
Enter your preferred route. Make sure to select the shortest path for your journey, and it's mandatory. |
| 14 |
Enter the name of the person that actually travels. |
| 15 |
Enter the employee code of the person that actually travels. |
| 16 |
Enter the designation of the person that actually travels. |
| 17 |
Enter the extension number of the person that actually travels. |
| 18 |
Enter the working mobile number of the person that actually travels. |
| 19 |
Click Add Reservation to submit the request |
To view the progress click "View My Request"